While attempting to run a newly-installed OmniPage Pro 17 on a Windows 2008 x64 machine, I received a cryptic and frustrating error:
The application has failed to start because its side-by-side configuration is incorrect. Please see the application log for more details.
So, what do I do? I try re-running it. I try removing and reinstalling it. I run a repair from the Programs and Features Control Panel Applet. Nothing seems to be yielding any results.
So, I decide to check out the Application Log, like the dialog box suggested.
The Application Event Log has a little more detail about what's missing:
Activation context generation failed for "C:\Program Files (x86)\Nuance\OmniPage17\OmniPage17.exe". Dependent Assembly Microsoft.VC80.MFC,processorArchitecture="x86",publicKeyToken="1fc8b3b9a1e18e3b",type="win32",version="8.0.50727.762" could not be found. Please use sxstrace.exe for detailed diagnosis.
So, I crack open a command prompt and run the following command:
sxstrace trace -logfile:omnipage.etl
The system returns the following message:
Tracing started. Trace will be saved to file omnipage.etl.
Press Enter to stop tracing...
I launch the application again, generate the error, tab back to the command prompt window, and then press Enter to stop tracing.
You can try to read the trace file, but it's not going to do you any good. You need to convert it to human-readable form with the following command:
sxstrace parse -logfile:omnipage.etl -outfile:omnipage.txt
After a few moments, you should receive a notification that it's complete:
Parsing log file omnipage.etl...
Parsing finished! Output saved to file omnipage.txt.
At that point, you can open up the result file (omnipage.txt in my case) to get a detailed analysis of what is wrong.
=================
Begin Activation Context Generation.
Input Parameter:
Flags = 0
ProcessorArchitecture = Wow32
CultureFallBacks = en-US;en
ManifestPath = C:\Program Files (x86)\Nuance\OmniPage17\OmniPage17.exe
AssemblyDirectory = C:\Program Files (x86)\Nuance\OmniPage17\
Application Config File =
-----------------
INFO: Parsing Manifest File C:\Program Files (x86)\Nuance\OmniPage17\OmniPage17.exe.
INFO: Manifest Definition Identity is (null).
INFO: Reference: Microsoft.VC80.CRT,processorArchitecture="x86",publicKeyToken="1fc8b3b9a1e18e3b",type="win32",version="8.0.50727.762"
INFO: Reference: Microsoft.VC80.MFC,processorArchitecture="x86",publicKeyToken="1fc8b3b9a1e18e3b",type="win32",version="8.0.50727.762"
INFO: Reference: Microsoft.Windows.Common-Controls,language="*",processorArchitecture="x86",publicKeyToken="6595b64144ccf1df",type="win32",version="6.0.0.0"
INFO: Resolving reference Microsoft.VC80.CRT,processorArchitecture="x86",publicKeyToken="1fc8b3b9a1e18e3b",type="win32",version="8.0.50727.762".
INFO: Resolving reference for ProcessorArchitecture WOW64.
INFO: Resolving reference for culture Neutral.
INFO: Applying Binding Policy.
INFO: No publisher policy found.
INFO: No binding policy redirect found.
INFO: Begin assembly probing.
INFO: Did not find the assembly in WinSxS.
INFO: Attempt to probe manifest at C:\Windows\assembly\GAC_32\Microsoft.VC80.CRT\8.0.50727.762__1fc8b3b9a1e18e3b\Microsoft.VC80.CRT.DLL.
INFO: Did not find manifest for culture Neutral.
INFO: End assembly probing.
The long and short of it is that OmniPage is looking for some C++ components that it can't find in the program files directory or the SxS manifest. Specifically, it can't find the x86 platform version of the C++ components. So, I download and install the Visual Studio 2005 C++ Redistributable package (which the application vendor should have bundled), and the problem is resolved.
You can download the components here:
Microsoft Visual C++ 2005 SP1 Redistributable Package (x86)
Microsoft Visual C++ 2005 SP1 Redistributable Package (x64)
Showing posts with label windows. Show all posts
Showing posts with label windows. Show all posts
Thursday, February 11, 2010


Sunday, January 10, 2010
Installing Data Protection Manager 2007 on a Dell NX3000
Dell has this great NAS device that runs Windows 2008 Storage Server Standard--the NX3000. The only problem is that Dell treats it like an "appliance," meaning you can't partition it the way you want. I recently ordered two with 6x1TB drives and wanted to deploy DPM to them. Unfortunately, Dell's RAID1/RAID5 combo doesn't make very good use of the available storage. I wanted to be able to use most of the space for DPM storage, so I needed to re-set it up from scratch.
Dell only provides "recovery" media (an image as opposed to install media), so you need to obtain the Windows 2008 Storage Server media on your own (such as from MSDN). Note: Dell's recovery media will not work if the disk configuration if the first two drives are not in a mirror set.
I spent two days figuring it out so you don't have to.
Once you have the media, here are the steps to get it set up completely:
1. Download all of the drivers from the Dell Support Site and save them to a USB stick.
2. Install from Windows Storage Server 2008 media. Be sure to select the edition (if installing from media with multiple editions) that matches the WSS key on the system chassis). Use the WSS key on the chassis for installation.
3. Install drivers from USB stick.
4. Log in to server with username administrator, password wSS2008!. This would be the only OS I've ever installed with a pre-configured administrator password.
5. Install Dell OpenManage software from Dell System Build DVD.
6. Restart.
7. Add Web Server role and add all role services (except FTP).
8. Open command prompt and run start /wait ocsetup.exe SIS-Limited /norestart.
9. Run Windows Update and install all available updates to bring current.
10. Restart.
11. From System Center Data Protection Manager DVD, navigate to SQL2005 installation directory.
12. Run Setup to install SQL 2005.
13. Select Database, Reporting Services, and Workstation/Client components. Ensure all sub-items are selected by clicking "Advanced" button and expanding each component.
14. Specify an instance name of MS$DPM2007$.
15. On the Service Account page, select the Customize for each service check box and configure as follows:
a. Select Customize for each service account.
b. In the Service box, select SQL Server.
c. Select Use the built-in System account, then select Local System account.
d. In the Service box, select SQL Server Agent.
e. Select Use the built-in System account, then select Local System account.
f. In the Service box, select Reporting Services.
g. Select Use the built-in System account, and then select the Network service account.
h. In the Service box, select SQL Browser.
i. Select Use the built-in System account, then select Local Service account.
16. Accept defaults for the rest of the SQL 2005 installation.
17. Open the Internet Services Manager (Windows 2008 version).
18. Expand Web Sites, expand Default Web Site, and then click the virtual directory for the report server.
19. Under Features View, double-click Handler Mappings.
20. Under Actions, click Edit Feature Permissions.
21. Click to select the Scripts check box, and then click OK.
22. Close Internet Services Manager.
23. Open Services applet.
24. Stop all SQL services.
25. Run SQL 2005 SP2 setup.
26. Restart.
27. Launch System Center Data Protection Manager 2007 setup.
28. Select the local database instance (MS$DPM2007$).
29. Enter a strong password for the DPM account.
30. Complete setup, accepting all defaults.
31. Restart.
32. Download and install DPM 2007 SP1.
33. Restart.
34. Download and install most recent hotfixes from http://support.microsoft.com/kb/961659/EN-US.
35. Call 1-888-571-2048 (if in USA) to activate WSS by phone (online activation will most likely not work in this instance; you will need to speak to a representative).
Good luck!
Dell only provides "recovery" media (an image as opposed to install media), so you need to obtain the Windows 2008 Storage Server media on your own (such as from MSDN). Note: Dell's recovery media will not work if the disk configuration if the first two drives are not in a mirror set.
I spent two days figuring it out so you don't have to.
Once you have the media, here are the steps to get it set up completely:
1. Download all of the drivers from the Dell Support Site and save them to a USB stick.
2. Install from Windows Storage Server 2008 media. Be sure to select the edition (if installing from media with multiple editions) that matches the WSS key on the system chassis). Use the WSS key on the chassis for installation.
3. Install drivers from USB stick.
4. Log in to server with username administrator, password wSS2008!. This would be the only OS I've ever installed with a pre-configured administrator password.
5. Install Dell OpenManage software from Dell System Build DVD.
6. Restart.
7. Add Web Server role and add all role services (except FTP).
8. Open command prompt and run start /wait ocsetup.exe SIS-Limited /norestart.
9. Run Windows Update and install all available updates to bring current.
10. Restart.
11. From System Center Data Protection Manager DVD, navigate to SQL2005 installation directory.
12. Run Setup to install SQL 2005.
13. Select Database, Reporting Services, and Workstation/Client components. Ensure all sub-items are selected by clicking "Advanced" button and expanding each component.
14. Specify an instance name of MS$DPM2007$.
15. On the Service Account page, select the Customize for each service check box and configure as follows:
a. Select Customize for each service account.
b. In the Service box, select SQL Server.
c. Select Use the built-in System account, then select Local System account.
d. In the Service box, select SQL Server Agent.
e. Select Use the built-in System account, then select Local System account.
f. In the Service box, select Reporting Services.
g. Select Use the built-in System account, and then select the Network service account.
h. In the Service box, select SQL Browser.
i. Select Use the built-in System account, then select Local Service account.
16. Accept defaults for the rest of the SQL 2005 installation.
17. Open the Internet Services Manager (Windows 2008 version).
18. Expand Web Sites, expand Default Web Site, and then click the virtual directory for the report server.
19. Under Features View, double-click Handler Mappings.
20. Under Actions, click Edit Feature Permissions.
21. Click to select the Scripts check box, and then click OK.
22. Close Internet Services Manager.
23. Open Services applet.
24. Stop all SQL services.
25. Run SQL 2005 SP2 setup.
26. Restart.
27. Launch System Center Data Protection Manager 2007 setup.
28. Select the local database instance (MS$DPM2007$).
29. Enter a strong password for the DPM account.
30. Complete setup, accepting all defaults.
31. Restart.
32. Download and install DPM 2007 SP1.
33. Restart.
34. Download and install most recent hotfixes from http://support.microsoft.com/kb/961659/EN-US.
35. Call 1-888-571-2048 (if in USA) to activate WSS by phone (online activation will most likely not work in this instance; you will need to speak to a representative).
Good luck!
Tuesday, October 20, 2009
Troubleshooting 0xc0190036 Errors on Windows Vista / Windows 2008
This morning, I found myself in the unfortunate circumstance of the dreaded 0xc0190036 error. There is not a lot of information about this particular error code. It is, in fact, related to inaccessible or corrupt files.
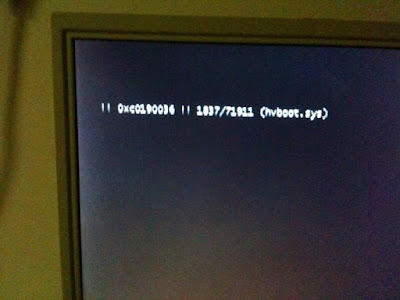
During an update process, many files are flagged for replacement during the next system boot--that way, the system can keep running until the next convenient restart. In this case, however, some of the files are corrupt for whatever reason (bad blocks on hard drive, bad memory causing CRC errors, lots of potential sources). The solution is relatively easy once you know what the problem is.
To repair this problem, you will need:
- Windows Vista or 2008 Boot Media
- USB thumb drive containing
-- disk controller drivers not included on Windows Media
-- replacement for corrupt file
- ImageX (or another way to read the Windows install.wim from either the original media or service pack installation)
ImageX is part of the Windows Automated Installation Kit (WAIK). It's a 1GB download; a few folks have been kind enough to extract the necessary bits and host them. If you are unable to find them, leave a comment and I'll send them to you.
The file listed in the 0xc0190036 error is most likely the corrupt file. The first step is to extract the replacement files using ImageX. In this case, I'm going to be using the Windows 2008 SP2 installation media since it contains the updated file that I need (hvboot.sys).
1. After extracting the ImageX support files, right-click wimfltr.inf and select "Install." This will install the WIM Filter Driver (required to mount WIM files).
2. Create a temporary directory to which the WIM file will be mounted (such as C:\Mounted_Images).
3. Run the command imagex /mount e:\sources\install.wim 1 C:\Mounted_Images to mount image 1 inside the install.wim file to C:\Mounted_Images.
4. Copy the necessary file (in my case, C:\Mounted_Images\Windows\winsxs\amd64_microsoft-hyper-v-drivers_31bf3856ad364e35_6.0.6002.18005_none_c73bce55acf5cb5f\hvboot.sys) to a USB thumb drive.
Next, you'll need to make sure you have the appropriate RAID drivers for your system if they are not included on the Windows media. If you presented driver media during the original Windows installation, you can use that media.
Finally, the repair:
1. Boot to the Windows Vista or 2008 installation media.
2. Attach your USB thumb drive containing the replacement for the corrupt file as well as controller drivers.
3. Select "Repair My Computer."
4. Select "Load drivers" and browse to the drive containing your controller driver (in my case, the USB drive was mounted as C:\).
5. Select the driver from the list presented and click "Add driver."
6. Click Next to go to the repair menu.
7. Select "Command Prompt" to launch a command prompt session.
8. Run chkdsk /F on your system volume (in my case, the system volume had been mounted as E:\, so I ran chkdsk /f e:\).
9. When prompted, dismount the volume so Chkdsk can have exclusive access to it.
10. When Chkdsk is complete, copy the replacement file from your USB thumb drive to the appropriate location on your system drive (since the system volume had been mounted as E:\, I needed to copy hvboot.sys to E:\Windows\system32\drivers).
11. Restart.
If you encounter more c0190036 errors, you can repeat the process for each damaged file.

During an update process, many files are flagged for replacement during the next system boot--that way, the system can keep running until the next convenient restart. In this case, however, some of the files are corrupt for whatever reason (bad blocks on hard drive, bad memory causing CRC errors, lots of potential sources). The solution is relatively easy once you know what the problem is.
To repair this problem, you will need:
- Windows Vista or 2008 Boot Media
- USB thumb drive containing
-- disk controller drivers not included on Windows Media
-- replacement for corrupt file
- ImageX (or another way to read the Windows install.wim from either the original media or service pack installation)
ImageX is part of the Windows Automated Installation Kit (WAIK). It's a 1GB download; a few folks have been kind enough to extract the necessary bits and host them. If you are unable to find them, leave a comment and I'll send them to you.
The file listed in the 0xc0190036 error is most likely the corrupt file. The first step is to extract the replacement files using ImageX. In this case, I'm going to be using the Windows 2008 SP2 installation media since it contains the updated file that I need (hvboot.sys).
1. After extracting the ImageX support files, right-click wimfltr.inf and select "Install." This will install the WIM Filter Driver (required to mount WIM files).
2. Create a temporary directory to which the WIM file will be mounted (such as C:\Mounted_Images).
3. Run the command imagex /mount e:\sources\install.wim 1 C:\Mounted_Images to mount image 1 inside the install.wim file to C:\Mounted_Images.
4. Copy the necessary file (in my case, C:\Mounted_Images\Windows\winsxs\amd64_microsoft-hyper-v-drivers_31bf3856ad364e35_6.0.6002.18005_none_c73bce55acf5cb5f\hvboot.sys) to a USB thumb drive.
Next, you'll need to make sure you have the appropriate RAID drivers for your system if they are not included on the Windows media. If you presented driver media during the original Windows installation, you can use that media.
Finally, the repair:
1. Boot to the Windows Vista or 2008 installation media.
2. Attach your USB thumb drive containing the replacement for the corrupt file as well as controller drivers.
3. Select "Repair My Computer."
4. Select "Load drivers" and browse to the drive containing your controller driver (in my case, the USB drive was mounted as C:\).
5. Select the driver from the list presented and click "Add driver."
6. Click Next to go to the repair menu.
7. Select "Command Prompt" to launch a command prompt session.
8. Run chkdsk /F on your system volume (in my case, the system volume had been mounted as E:\, so I ran chkdsk /f e:\).
9. When prompted, dismount the volume so Chkdsk can have exclusive access to it.
10. When Chkdsk is complete, copy the replacement file from your USB thumb drive to the appropriate location on your system drive (since the system volume had been mounted as E:\, I needed to copy hvboot.sys to E:\Windows\system32\drivers).
11. Restart.
If you encounter more c0190036 errors, you can repeat the process for each damaged file.
Thursday, September 3, 2009
Using LDIFDE and CSVDE to find computers in Active Directory
LDIFDE is an oldie-but-goodie tool for finding specific information in Active Directory. If you know the name of the attribute that contains the data you're looking for, you can construct a pretty powerful query.
For example, you can search for all computers in the Active Directory domain mydomain.com:
ldifde -f output.txt -r "(objectClass=computer)" -d "dc=mydomain,dc=com"
You can filter it down to all workstation-class computers (running Windows XP), as well:
ldifde -f output.txt -r "(&(objectClass=computer)(operatingSystem=Windows XP))" -d dc=mydomain,dc=com
Or even all workstations running Windows XP and Vista:
ldifde -f output.txt -r "(&(objectClass=computer)((operatingSystem=Windows XP)(operatingSystem=Windows Vista)))" -d dc=mydomain,dc=com
And workstations running Windows 2000, XP, and Vista:
ldifde -f output.txt -r "(&(objectClass=computer)(((operatingSystem=Windows XP*)(operatingSystem=Windows 2000 Pro*)(operatingSystem=Windows Vista))))" -l "cn,operatingSystem" -d dc=mydomain,dc=com
"But Aaron," you ask, "LDIFDE returns a lot of fields I don't need. How can I control the output?" Glad you asked.
You can use the -l switch to do just that:
ldifde -f output.txt -r "(&(objectClass=computer)(operatingSystem=Windows Server*))" -d dc=mydomain,dc=com -l "cn,operatingSystem"
Will return an output like this:
dn: CN=SERVERA,OU=Servers,DC=mydomain,DC=com
changetype: add
cn: SERVERA
operatingSystem: Windows Server 2003
You can swap out LDIFDE for the tool CSVDE to generate the output in a CSV format.
For example, you can search for all computers in the Active Directory domain mydomain.com:
ldifde -f output.txt -r "(objectClass=computer)" -d "dc=mydomain,dc=com"
You can filter it down to all workstation-class computers (running Windows XP), as well:
ldifde -f output.txt -r "(&(objectClass=computer)(operatingSystem=Windows XP))" -d dc=mydomain,dc=com
Or even all workstations running Windows XP and Vista:
ldifde -f output.txt -r "(&(objectClass=computer)((operatingSystem=Windows XP)(operatingSystem=Windows Vista)))" -d dc=mydomain,dc=com
And workstations running Windows 2000, XP, and Vista:
ldifde -f output.txt -r "(&(objectClass=computer)(((operatingSystem=Windows XP*)(operatingSystem=Windows 2000 Pro*)(operatingSystem=Windows Vista))))" -l "cn,operatingSystem" -d dc=mydomain,dc=com
"But Aaron," you ask, "LDIFDE returns a lot of fields I don't need. How can I control the output?" Glad you asked.
You can use the -l switch to do just that:
ldifde -f output.txt -r "(&(objectClass=computer)(operatingSystem=Windows Server*))" -d dc=mydomain,dc=com -l "cn,operatingSystem"
Will return an output like this:
dn: CN=SERVERA,OU=Servers,DC=mydomain,DC=com
changetype: add
cn: SERVERA
operatingSystem: Windows Server 2003
You can swap out LDIFDE for the tool CSVDE to generate the output in a CSV format.
Friday, July 31, 2009
How to Schedule Recycling an IIS Application Pool
We have a customer with an IIS 6.0 application that crashes randomly--either the Application Pool worker process runs the server out of memory or hangs.
If you have a need to recycle the Application Pool between scheduled maintenance intervals, there are a couple of available solutions.
IISApp.vbs
This script is part of the Windows 2003 Platform. Windows 2003 SP1 introduced the ability to recycle application pools. The syntax is pretty easy:
IISApp /a /r
Save this into a batch file and drop it into the task scheduler.
Application Pool Recycling through IISAdmin
1. On the taskbar, click Start, point to Administrative Tools, and then click Internet Information Services (IIS) Manager.
2. Expand the server name, and then click Application Pools.
3. Right-click > Properties on the Application Pool you wish to recycle.
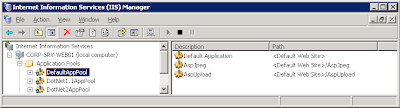
4. Set the appropriate properties for recycling.
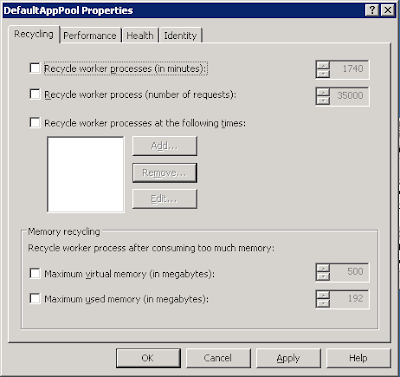
5. For example, to recycle the worker processes at 6AM, select the "Recycle worker processes at the following times" checkbox and enter the appropriate time (24-hour format).
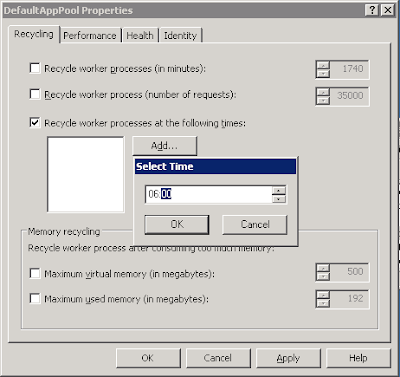
6. Click OK.
1. On the taskbar, click Start, point to Administrative Tools, and then click Internet Information Services (IIS) Manager.
2. In the Connections pane, expand the server name, and then click Application Pools.
3. In the Application Poolspane, select the application pool you wish to edit.
4. In the Actions pane, click Recycling...
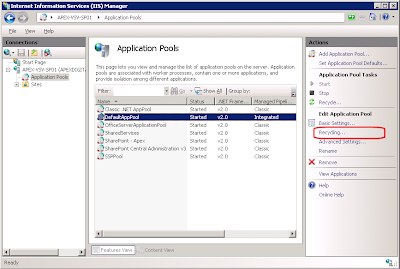
5. On the Recycling Conditions page of the Edit Application Pool Recycling Settings Wizard, select at least one of the options in the Fixed Intervals section, select the checkboxes and enter values for "Regular time intervals" or "Specific Times" as necessary, and then click Next.
6. Click Finish.
If you have a need to recycle the Application Pool between scheduled maintenance intervals, there are a couple of available solutions.
Windows 2003 (IIS 6)
IISApp.vbs
This script is part of the Windows 2003 Platform. Windows 2003 SP1 introduced the ability to recycle application pools. The syntax is pretty easy:
IISApp /a
Save this into a batch file and drop it into the task scheduler.
Application Pool Recycling through IISAdmin
1. On the taskbar, click Start, point to Administrative Tools, and then click Internet Information Services (IIS) Manager.
2. Expand the server name, and then click Application Pools.
3. Right-click > Properties on the Application Pool you wish to recycle.

4. Set the appropriate properties for recycling.

5. For example, to recycle the worker processes at 6AM, select the "Recycle worker processes at the following times" checkbox and enter the appropriate time (24-hour format).

6. Click OK.
Windows 2008 (IIS 7)
1. On the taskbar, click Start, point to Administrative Tools, and then click Internet Information Services (IIS) Manager.
2. In the Connections pane, expand the server name, and then click Application Pools.
3. In the Application Poolspane, select the application pool you wish to edit.
4. In the Actions pane, click Recycling...

5. On the Recycling Conditions page of the Edit Application Pool Recycling Settings Wizard, select at least one of the options in the Fixed Intervals section, select the checkboxes and enter values for "Regular time intervals" or "Specific Times" as necessary, and then click Next.
6. Click Finish.
Thursday, April 16, 2009
Erratic or Negative Ping Times in Hyper-V Guests
A customer approached me with a some puzzling issues. They noticed a bunch of 1053 and 1054 Userenv errors in their event logs on their virtual machines. 1053 and 1054 error messages have very similar wording:
Typically, these are related to DNS. In this instance, however, the customer also presented some other interesting issues--negative ping times or very high ping times (in excess of 5000ms). And, to boot, these erratic ping times were only present on virtual machines with two or more virtual processors.
So, what's the relationship?
It turns out to be a relatively simple explanation.
In order for a Group Policy client to be qualified to process GPOs, AD measures the RTT time between the client and the DC processing the logon and group policy request. If the average RTT is > 10ms for 2048 byte packets, the link is generally considered "slow" by default (another value can be configured). Under "slow" conditions, group policy will not process. I’ve seen this issue before in environments where authentication is happening over a WAN (where times are greater than 10ms) or with routers dropping or fragmenting large ICMP packets (affectionately known as “blackhole router syndrome”).
So, if a machine is reporting a 5000ms ping, it stands to reason that the OS might think that the link is indeed slow.
As previously mentioned, this problem is occurring on Windows 2003 hosts that are configured for multiple virtual processors (VPs). All operating systems use some sort of clock timing mechanism, and frequently they rely on the Time Stamp Counter (TSC), which counts CPU ticks since system start. Each processor has its own TSC, and the TSC for each processor can be different because they’re not necessarily synchronized. What this ends up meaning is that if a VM is reading the TSC from multiple VPs, the date stamps may actually go backwards or be out of order. This does not happen in a single CPU scenario (physical or virtual), since only one TSC is being used.
The three possible workarounds:
1. Upgrade to Windows 2008. Obviously, this won't work for everyone, so for those people, workarounds two or three should provide some relief.
2. Shut down the VM, change the number of CPUs to 1 in Hyper-V manager and then start the VM.
3. Add the /usepmtimer switch to the boot.ini configuration of each Windows 2003 server using multiple processors. In the physical world, this phenomenon only appears to only happen on AMD processors. The VM world is less discriminating against processor type. Windows 2003 SP2 normally is supposed to use the ACPI Power Management Timer (PM Timer), as long as the BIOS check for it succeeds. In the case of Hyper-V, the BIOS check fails, so it falls back to the TSC. Remember, modifying the boot.ini requires a reboot for the change to become effective.
The Win32 API call, QueryPerformanceCounter, uses the TSC by default. Adding the /usepmtimer boot.ini flag tells QueryPerformanceCounter to use the ACPI/PM timer.
Related information:
Wikipedia - Time Stamp Counter
A Windows Server 2003-based server may experience time-stamp counter drift if the server uses dual-core AMD Opteron processors or multiprocessor AMD Opteron processors
Programs that use the QueryPerformanceCounter function may perform poorly in Windows Server 2000, in Windows Server 2003, and in Windows XP
Explanation for the USEPMTIMER switch in the boot.ini
Windows Server Performance Team Blog : Hyper-V and Multiprocessor VMs
Negative ping times in Windows VM's - what's up?
How a slow link is detected for processing user profiles and Group Policy
How to enable user environment debug logging in retail builds of Windows
Available switch options for the Windows XP and the Windows Server 2003 Boot.ini files
1053 - Windows cannot determine the user or computer name. (description>). Group Policy processing aborted.
1054 - Windows cannot obtain the domain controller name for your computer network. (). Group Policy processing aborted.
Typically, these are related to DNS. In this instance, however, the customer also presented some other interesting issues--negative ping times or very high ping times (in excess of 5000ms). And, to boot, these erratic ping times were only present on virtual machines with two or more virtual processors.
So, what's the relationship?
It turns out to be a relatively simple explanation.
In order for a Group Policy client to be qualified to process GPOs, AD measures the RTT time between the client and the DC processing the logon and group policy request. If the average RTT is > 10ms for 2048 byte packets, the link is generally considered "slow" by default (another value can be configured). Under "slow" conditions, group policy will not process. I’ve seen this issue before in environments where authentication is happening over a WAN (where times are greater than 10ms) or with routers dropping or fragmenting large ICMP packets (affectionately known as “blackhole router syndrome”).
So, if a machine is reporting a 5000ms ping, it stands to reason that the OS might think that the link is indeed slow.
As previously mentioned, this problem is occurring on Windows 2003 hosts that are configured for multiple virtual processors (VPs). All operating systems use some sort of clock timing mechanism, and frequently they rely on the Time Stamp Counter (TSC), which counts CPU ticks since system start. Each processor has its own TSC, and the TSC for each processor can be different because they’re not necessarily synchronized. What this ends up meaning is that if a VM is reading the TSC from multiple VPs, the date stamps may actually go backwards or be out of order. This does not happen in a single CPU scenario (physical or virtual), since only one TSC is being used.
The three possible workarounds:
1. Upgrade to Windows 2008. Obviously, this won't work for everyone, so for those people, workarounds two or three should provide some relief.
2. Shut down the VM, change the number of CPUs to 1 in Hyper-V manager and then start the VM.
3. Add the /usepmtimer switch to the boot.ini configuration of each Windows 2003 server using multiple processors. In the physical world, this phenomenon only appears to only happen on AMD processors. The VM world is less discriminating against processor type. Windows 2003 SP2 normally is supposed to use the ACPI Power Management Timer (PM Timer), as long as the BIOS check for it succeeds. In the case of Hyper-V, the BIOS check fails, so it falls back to the TSC. Remember, modifying the boot.ini requires a reboot for the change to become effective.
The Win32 API call, QueryPerformanceCounter, uses the TSC by default. Adding the /usepmtimer boot.ini flag tells QueryPerformanceCounter to use the ACPI/PM timer.
Related information:
Wikipedia - Time Stamp Counter
A Windows Server 2003-based server may experience time-stamp counter drift if the server uses dual-core AMD Opteron processors or multiprocessor AMD Opteron processors
Programs that use the QueryPerformanceCounter function may perform poorly in Windows Server 2000, in Windows Server 2003, and in Windows XP
Explanation for the USEPMTIMER switch in the boot.ini
Windows Server Performance Team Blog : Hyper-V and Multiprocessor VMs
Negative ping times in Windows VM's - what's up?
How a slow link is detected for processing user profiles and Group Policy
How to enable user environment debug logging in retail builds of Windows
Available switch options for the Windows XP and the Windows Server 2003 Boot.ini files
Tuesday, April 14, 2009
Rebuild a Corrupt WMI Repository
From time to time, many administrators have found themselves faced with a corrupt WMI repository. Here's a quick fix. Copy/paste into a .bat file and run on the affected computer.
You'll probably get a pop-up for wbemtest when you run this script because of the FOR loop including all *.exe files. Simply click "exit" when the wbemtest application launches.
NET STOP WINMGMT /y
RD /S /Q C:\Windows\system32\wbem\Repository
%windir%\system32\rundll32 wbemupgd,UpgradeRepository
FOR %%i in (%windir%\system32\wbem\*.dll) do RegSvr32 -s %%i
FOR %%i in (%windir%\system32\wbem\*.exe) do %%i /RegServer
You'll probably get a pop-up for wbemtest when you run this script because of the FOR loop including all *.exe files. Simply click "exit" when the wbemtest application launches.
Friday, March 20, 2009
Using WinDbg for Quick Memory Dump Analysis
Blue screens are no fun. Trying to resolve them without the proper tools can be even less fun.
In my experience, a large percentage of blue screens are the result of some poorly-tested or incompatible third-party device drivers. For the desktop crowd, a round up of the usual suspects includes scanner, printer, and video drivers. On the server end of things, the most likely culprits are usually backup/continuous data protection filter drivers or printer drivers.
All standard troubleshooting questions apply in either case:
- Has any new hardware been installed?
- Has any software recently been installed (either new applications or patches)?
- Have any existing device drivers been updated?
- Can you reproduce the conditions that cause the blue screen (for example, under heavy load conditions or during a backup window)
Take this case. I recently received a dump file from a server that had crashed and recovered overnight. To analyze the dump file, head on over to the microsoft.com site and get the appropriate debugging tools for your platform (x86 or x64/ia64).
In my case, I needed the 32-bit debug package. I downloaded and installed it, and then ran C:\Program Files\Debugging Tools for Windows (x86)\windbg.exe.
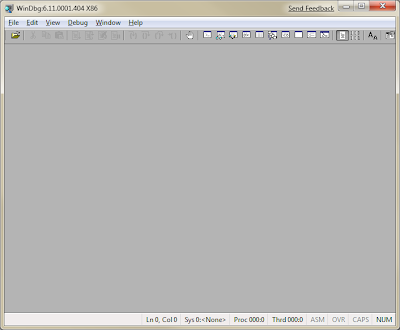
Before we can make any progress, we should grab the Windows symbols, which will allow the debugger to go through the crash dump and identify components.
Make a directory on your local computer, such as C:\Symbols. From inside WinDbg, go to File > Symbol File Path.
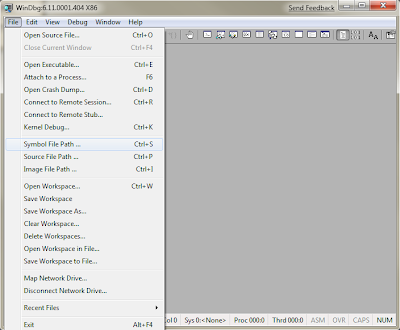
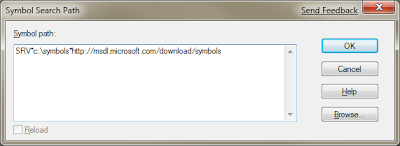
In the dialog box, type in
SRV*c:\symbols*http://msdl.microsoft.com/download/symbols
and click OK. This will instruct WinDbg to contact the Microsoft symbols server and download the parts that you need and store them in C:\symbols.
Now that the symbols are configured, click File > Open Crash Dump.
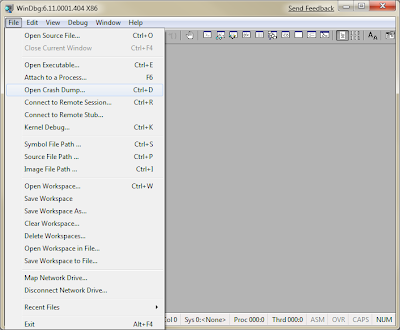
Browse to your memory dump file, and select it. WinDbg will process it, and should return something like this:
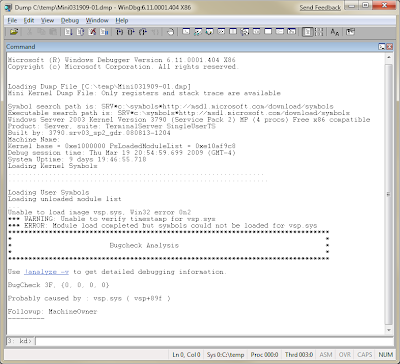
At this stage, WinDbg has identified vsp.sys as a likely source of the problem. Type !analyze -v in the text box at the bottom and hit enter.
WinDbg will process a bit more and return some (hopefully) useful information.
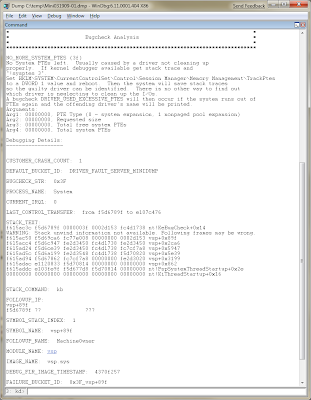
The key area to look at is the "DEFAULT_BUCKET_ID," which, in this case, says "DRIVER_FAULT_SERVER_MINIDUMP." Browsing through the dump file, you can see that the system ran out of PTEs and subsequently crashed.
Having worked with NetBackup for a number of years, I recognized vsp.sys immediately as part of NetBackup. However, if you want to try to figure out more from the dump file, typing the command lmv will list the loaded modules. After it's done listing the images, press Control-F to and enter the driver that was listed as faulting.
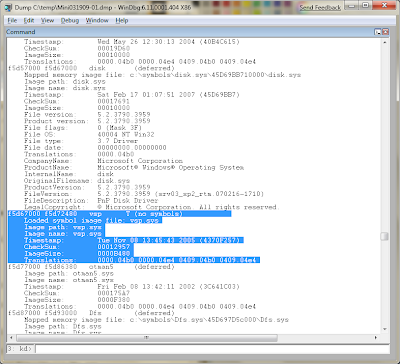
Unfortunately, the dump file didn't have the full path to the loaded driver, so we've hit a little bit of a wall.
In this instance, the faulty driver (vsp.sys) is part of the Advanced Open File option for the Veritas NetBackup client. We upgraded the NetBackup agent to the latest version and all is well again.
Good luck!
In my experience, a large percentage of blue screens are the result of some poorly-tested or incompatible third-party device drivers. For the desktop crowd, a round up of the usual suspects includes scanner, printer, and video drivers. On the server end of things, the most likely culprits are usually backup/continuous data protection filter drivers or printer drivers.
All standard troubleshooting questions apply in either case:
- Has any new hardware been installed?
- Has any software recently been installed (either new applications or patches)?
- Have any existing device drivers been updated?
- Can you reproduce the conditions that cause the blue screen (for example, under heavy load conditions or during a backup window)
Take this case. I recently received a dump file from a server that had crashed and recovered overnight. To analyze the dump file, head on over to the microsoft.com site and get the appropriate debugging tools for your platform (x86 or x64/ia64).
In my case, I needed the 32-bit debug package. I downloaded and installed it, and then ran C:\Program Files\Debugging Tools for Windows (x86)\windbg.exe.

Before we can make any progress, we should grab the Windows symbols, which will allow the debugger to go through the crash dump and identify components.
Make a directory on your local computer, such as C:\Symbols. From inside WinDbg, go to File > Symbol File Path.

In the dialog box, type in
SRV*c:\symbols*http://msdl.microsoft.com/download/symbols
and click OK. This will instruct WinDbg to contact the Microsoft symbols server and download the parts that you need and store them in C:\symbols.

Now that the symbols are configured, click File > Open Crash Dump.

Browse to your memory dump file, and select it. WinDbg will process it, and should return something like this:

At this stage, WinDbg has identified vsp.sys as a likely source of the problem. Type !analyze -v in the text box at the bottom and hit enter.
WinDbg will process a bit more and return some (hopefully) useful information.

The key area to look at is the "DEFAULT_BUCKET_ID," which, in this case, says "DRIVER_FAULT_SERVER_MINIDUMP." Browsing through the dump file, you can see that the system ran out of PTEs and subsequently crashed.
Having worked with NetBackup for a number of years, I recognized vsp.sys immediately as part of NetBackup. However, if you want to try to figure out more from the dump file, typing the command lmv will list the loaded modules. After it's done listing the images, press Control-F to and enter the driver that was listed as faulting.

Unfortunately, the dump file didn't have the full path to the loaded driver, so we've hit a little bit of a wall.
In this instance, the faulty driver (vsp.sys) is part of the Advanced Open File option for the Veritas NetBackup client. We upgraded the NetBackup agent to the latest version and all is well again.
Good luck!
Sunday, March 15, 2009
Windows 2008 Server Backup
This is not your father's backup. This is not your backup. Frankly, this should be nobody's backup.
Recently, I found my self in need of having to make a quick snapshot of a physical server's configuration before making some complex configuration changes.
So, I hit the Windows Key + R, and typed the tried-and-true ntbackup. No dice. What? Where did this go?!
It's not there anymore. Instead, we now have "Windows Server Backup," a rewrite that adds a lot of new features (backup files are stored as a VHD, which is pretty neat), but they come with a price--an unintuitive and complex command line.
After performing my initial backup without incident, I made my configuration changes, but eventually found myself in need of restoring from backup. I entered the Windows Server Backup console and went to restore, but was dutifully informed that if I wanted to restore the System State, I would have to do it from the command line.
So, I launch the command-line tool, wbadmin.
Seeing this, I discover what I believe is the appropriate option--START SYSTEMSTATERECOVERY, since the System State is what I'm trying to recover.
So, I run wbadmin START SYSTEMSTATERECOVERY, but ... then I get another screen.
Ug. How do I discover the version that I need to restore? Scrolling back through the list reveals another option--GET VERSIONS.
Ahh. The version is 03/14/2009-22:01--the time I made the backup.
So, I now run:
Finally. Progress. I Enter "Y" and then see my progress...
So this is progress? Better than selecting it through the familiar interface? I must be getting old.
Recently, I found my self in need of having to make a quick snapshot of a physical server's configuration before making some complex configuration changes.
So, I hit the Windows Key + R, and typed the tried-and-true ntbackup. No dice. What? Where did this go?!
It's not there anymore. Instead, we now have "Windows Server Backup," a rewrite that adds a lot of new features (backup files are stored as a VHD, which is pretty neat), but they come with a price--an unintuitive and complex command line.
After performing my initial backup without incident, I made my configuration changes, but eventually found myself in need of restoring from backup. I entered the Windows Server Backup console and went to restore, but was dutifully informed that if I wanted to restore the System State, I would have to do it from the command line.
So, I launch the command-line tool, wbadmin.
C:\Users\Administrator>wbadmin
wbadmin 1.0 - Backup command-line tool
(C) Copyright 2004 Microsoft Corp.
ERROR - Command incomplete. See list below.
For more help, type wbadmin-help
---- Commands Supported ----
ENABLE BACKUP -- Enable or modify a scheduled daily backup
DISABLE BACKUP -- Disables running scheduled daily backups
START BACKUP -- Runs a backup
STOP JOB -- Stops the currently running backup or recovery
GET VERSIONS -- List details of backups recoverable from a
specific location
GET ITEMS -- Lists items contained in the backup
START RECOVERY -- Run a recovery
GET STATUS -- Reports the status of the currently running job
GET DISKS -- Lists the disks that are currently online
START SYSTEMSTATERECOVERY -- Run a system state recovery
START SYSTEMSTATEBACKUP -- Run a system state backup
DELETE SYSTEMSTATEBACKUP -- Delete system state backup(s)
Seeing this, I discover what I believe is the appropriate option--START SYSTEMSTATERECOVERY, since the System State is what I'm trying to recover.
So, I run wbadmin START SYSTEMSTATERECOVERY, but ... then I get another screen.
C:\Users\Administrator>wbadmin START SYSTEMSTATERECOVERY
wbadmin 1.0 - Backup command-line tool
(C) Copyright 2004 Microsoft Corp.
ERROR - An option required for command is missing: Version. See usage below.
Usage: WBADMIN START SYSTEMSTATERECOVERY
-version:VersionIdentifier
-showsummary
[-backupTarget:{VolumeName | NetworkSharePath}]
[-machine:BackupMachineName]
[-recoveryTarget:TargetPathForRecovery]
[-authsysvol]
[-quiet]
Runs a system state recovery based on the options specified.
-version Version identifier of the backup in MM/DD/YYYY-HH:MM format,
as listed by WBADMIN GET VERSIONS.
-backupTarget Specifies the storage location that contains the backups for
which you want to do the recovery. Useful when the backups are
stored in a different location than the normal location for
backups of this computer.
-machine Specifies the name of the computer for which you want to do the
recovery. Useful when multiple computers have been backed up to
the same location. Should be used when -backupTarget is
specified.
-recoveryTarget Existing directory path to restore to. Useful if the restore
is to be done to an alternate location.
-authsysvol Perform an authoritative restore of SYSVOL
-quiet Runs the command with no user prompts.
-showsummary Reports the summary of the last run of reboot status of last
successful online system state recovery. This option cannot be
accompanied by any other options.
Examples:
WBADMIN START SYSTEMSTATERECOVERY -version:03/31/2005-09:00
WBADMIN START SYSTEMSTATERECOVERY -version:04/31/2005-09:00 -backupTarget:\\serv
ername\share
-machine:server01
C:\Users\Administrator>
Ug. How do I discover the version that I need to restore? Scrolling back through the list reveals another option--GET VERSIONS.
C:\Users\Administrator>wbadmin GET VERSIONS
wbadmin 1.0 - Backup command-line tool
(C) Copyright 2004 Microsoft Corp.
Backup time: 3/14/2009 6:01 PM
Backup target: Network Share labeled \\server\c$\Software
Version identifier: 03/14/2009-22:01
Can Recover: Volume(s), File(s), Application(s), Bare Metal Recovery, System State
Ahh. The version is 03/14/2009-22:01--the time I made the backup.
So, I now run:
C:\Users\Administrator>wbadmin start systemstaterecovery -version:03/14/2009-22:01
wbadmin 1.0 - Backup command-line tool
(C) Copyright 2004 Microsoft Corp.
Do you want to start the system state recovery operation?
[Y] Yes [N] No
Finally. Progress. I Enter "Y" and then see my progress...
Starting System State Restore [3/15/2009 11:31 PM]
Processing files to restore (This may take a few minutes)...
Processed (1279) files
Processed (5733) files
Processed (11025) files
Processed (21513) files
Processed (34191) files
Processed (47192) files
Processed (60265) files
Processed (62310) files
Processed (62310) files
Processing of files complete
Starting restore of files from backup
Preparing for Restore...
Restore of files reported by 'COM+ REGDB Writer' completed
Overall progress - 1% (Currently restoring files reported by 'System Writer')
Overall progress - 3% (Currently restoring files reported by 'System Writer')
Overall progress - 4% (Currently restoring files reported by 'System Writer')
Overall progress - 6% (Currently restoring files reported by 'System Writer')
Overall progress - 7% (Currently restoring files reported by 'System Writer')
Overall progress - 9% (Currently restoring files reported by 'System Writer')
Overall progress - 11% (Currently restoring files reported by 'System Writer')
Overall progress - 13% (Currently restoring files reported by 'System Writer')
Overall progress - 15% (Currently restoring files reported by 'System Writer')
Overall progress - 18% (Currently restoring files reported by 'System Writer')
Overall progress - 19% (Currently restoring files reported by 'System Writer')
Overall progress - 21% (Currently restoring files reported by 'System Writer')
Overall progress - 24% (Currently restoring files reported by 'System Writer')
Overall progress - 26% (Currently restoring files reported by 'System Writer')
Overall progress - 28% (Currently restoring files reported by 'System Writer')
Overall progress - 30% (Currently restoring files reported by 'System Writer')
Overall progress - 32% (Currently restoring files reported by 'System Writer')
Overall progress - 36% (Currently restoring files reported by 'System Writer')
Overall progress - 40% (Currently restoring files reported by 'System Writer')
Overall progress - 43% (Currently restoring files reported by 'System Writer')
Overall progress - 46% (Currently restoring files reported by 'System Writer')
Overall progress - 49% (Currently restoring files reported by 'System Writer')
Overall progress - 52% (Currently restoring files reported by 'System Writer')
Overall progress - 54% (Currently restoring files reported by 'System Writer')
Overall progress - 57% (Currently restoring files reported by 'System Writer')
Overall progress - 61% (Currently restoring files reported by 'System Writer')
Overall progress - 64% (Currently restoring files reported by 'System Writer')
Overall progress - 68% (Currently restoring files reported by 'System Writer')
Overall progress - 71% (Currently restoring files reported by 'System Writer')
Overall progress - 73% (Currently restoring files reported by 'System Writer')
Overall progress - 76% (Currently restoring files reported by 'System Writer')
Overall progress - 79% (Currently restoring files reported by 'System Writer')
Overall progress - 81% (Currently restoring files reported by 'System Writer')
Overall progress - 84% (Currently restoring files reported by 'System Writer')
Overall progress - 85% (Currently restoring files reported by 'System Writer')
Overall progress - 88% (Currently restoring files reported by 'System Writer')
Overall progress - 91% (Currently restoring files reported by 'System Writer')
Overall progress - 95% (Currently restoring files reported by 'System Writer')
Overall progress - 98% (Currently restoring files reported by 'System Writer')
Cleaning up...
Summary of recovery:
--------------------
Restore of system state completed successfully [3/15/2009 11:40 PM]
Log of files successfully restored
'C:\Windows\Logs\WindowsServerBackup\SystemStateRestore 15-03-2009 23-31-27.log'
Please restart the machine to complete the operation.
NOTE: When you restart your server, System State Recovery will attempt to
recover many system files which may take several minutes to complete depending
on the number of files that are getting replaced. The machine might reboot multi
ple times in the process. Please be patient and do not interrupt the reboot process.
C:\Users\Administrator>
So this is progress? Better than selecting it through the familiar interface? I must be getting old.
Monday, March 9, 2009
If I Could Turn Back Time
For anyone who manages an Active Directory environment, you've undoubtedly come to understand the need for keeping time in sync. In short, you won't be able to log in if the local computer time has more than 5 minutes difference than the logon server.
By default, Windows machines are configured to use NTDS5 or domain hierarchy time synchronization. The idea is that clients and servers synchronize their time with domain controllers, and the domain controllers synchronize their time with the domain controller holding the PDCE FSMO role. The idea is that administrator is supposed to configure the PDCE role holder to synchronize time with an outside NTP source.
However, you may someday find yourself in an environment where "things were changed." Unwitting administrators may have configured their environment differently, and if your luck is anything like mine, you'll eventually find yourself inheiriting or troubleshooting such an environment.
To reset a Windows Server 2003 computer back to default NTDS5 synchronization, run the following command:
"But, Aaron," you say, "I have hundreds of servers!"
No worry, there's help for you as well. Grab the free PSTools from http://www.microsoft.com/sysinternals. Inside you'll find the Windows Administrator's best friend--psexec. With that great tool, you can run any command against a list of servers.
In addition, you'll want to grab a copy of the Gnu32 core utilities, which has Win32 versions of the great *nix utilities. Windows prettymuch sucks at command-line text manipulation, which makes this toolset invaluable.
So, armed with the right tools, how to get that list?
From either a domain controller (or a server/workstation with the AdminPak, PSTools, and Gnu32 Core Utilities installed):
The resulting file (temp2.txt) will contain all of the Windows Server 2003 and 2008 machines in your environment. Once you have that list:
The last step is to configure the server holding the PDCE FSMO role to use an external NTP time source.
Replace time.windows.com with whatever NTP server you want to use. Make sure you can get to it on UDP 123.
And ... you're done.
By default, Windows machines are configured to use NTDS5 or domain hierarchy time synchronization. The idea is that clients and servers synchronize their time with domain controllers, and the domain controllers synchronize their time with the domain controller holding the PDCE FSMO role. The idea is that administrator is supposed to configure the PDCE role holder to synchronize time with an outside NTP source.
However, you may someday find yourself in an environment where "things were changed." Unwitting administrators may have configured their environment differently, and if your luck is anything like mine, you'll eventually find yourself inheiriting or troubleshooting such an environment.
To reset a Windows Server 2003 computer back to default NTDS5 synchronization, run the following command:
w32tm /config /syncfromflags:domhier & w32tm /config /update
"But, Aaron," you say, "I have hundreds of servers!"
No worry, there's help for you as well. Grab the free PSTools from http://www.microsoft.com/sysinternals. Inside you'll find the Windows Administrator's best friend--psexec. With that great tool, you can run any command against a list of servers.
In addition, you'll want to grab a copy of the Gnu32 core utilities, which has Win32 versions of the great *nix utilities. Windows prettymuch sucks at command-line text manipulation, which makes this toolset invaluable.
So, armed with the right tools, how to get that list?
From either a domain controller (or a server/workstation with the AdminPak, PSTools, and Gnu32 Core Utilities installed):
1. ldifde -f temp1.txt -d "dc=domain,dc=com" -r "(&(objectClass=computer)(operatingSystem=Windows Server*))" -l cn
2. findstr /i "cn: " temp1.txt tr -d "cn :" >> temp2.txt
The resulting file (temp2.txt) will contain all of the Windows Server 2003 and 2008 machines in your environment. Once you have that list:
psexec @temp2.txt w32tm /config /syncfromflags:domhier & w32tm /config /update
The last step is to configure the server holding the PDCE FSMO role to use an external NTP time source.
w32tm.exe /config /syncfromflags:manual /manualpeerlist:time.windows.com /reliable:yes & w32tm.exe /config /update
Replace time.windows.com with whatever NTP server you want to use. Make sure you can get to it on UDP 123.
And ... you're done.
Saturday, March 7, 2009
Now You See It, Now You Don't
Lots of programs on the internet will claim to "erase your tracks" on your Windows-based computer. Well, you don't need to waste your money. Windows XP and later come with a built-in utility, that when used correctly, will overwrite the free space on your hard drive with ones and zeroes.
To make a long story short, when a file is deleted, the data blocks for the file still exist on the hard drive. The blocks that the deleted file occupy have been marked "available" for use by the filesystem. Recovering deleted data depends on these data blocks not having been overwritten yet.
Every act of creating, copying, or saving data on the hard drive with deleted data increases the chances that those "maked" data blocks will be overwritten, eliminating chances for a full, successful recovery.
If you want to ensure that data you've deleted is not going to be recoverable, you may think that simply formatting a drive will wipe the data. However, several types of "quick" formats may only specify the filesystem type and wipe the MFT or FAT, leaving the data blocks still intact on the drive.
To totally "erase" your data, you'll need to actually write data to every free region of your hard drive.
Now, as I previously mentioned, there are plenty of companies that will sell you programs to wipe your NTFS or FAT16/FAT32 filesystems--but they're not counting on you using a built-in utility to do the task.
What is this marvelous utility, you ask?
The utilitiy is cipher.exe. The main purpose of the utility is for EFS encryption. However, one of the switches can wipe the free space.
Running cipher /? at the command prompt in Windows 7 shows a whole host of options (in fact, too many to display here). The option we're looking for is the /W option:
Cipher with the /W switch will create a temporary file that will write over every block on your filesystem.
The appropriate syntax:
cipher /W:C:\
Will yield a screen like this:
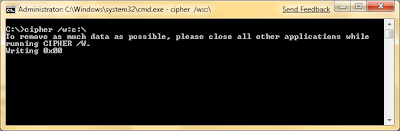
As the screen indicates, close as many programs as possible. To achieve maximum data clearing effect, try grabbing a program like CCleaner to remove temporary internet files, temporary setup files, cookies, and a bunch of other personal data before wiping with cipher.
To make a long story short, when a file is deleted, the data blocks for the file still exist on the hard drive. The blocks that the deleted file occupy have been marked "available" for use by the filesystem. Recovering deleted data depends on these data blocks not having been overwritten yet.
Every act of creating, copying, or saving data on the hard drive with deleted data increases the chances that those "maked" data blocks will be overwritten, eliminating chances for a full, successful recovery.
If you want to ensure that data you've deleted is not going to be recoverable, you may think that simply formatting a drive will wipe the data. However, several types of "quick" formats may only specify the filesystem type and wipe the MFT or FAT, leaving the data blocks still intact on the drive.
To totally "erase" your data, you'll need to actually write data to every free region of your hard drive.
Now, as I previously mentioned, there are plenty of companies that will sell you programs to wipe your NTFS or FAT16/FAT32 filesystems--but they're not counting on you using a built-in utility to do the task.
What is this marvelous utility, you ask?
The utilitiy is cipher.exe. The main purpose of the utility is for EFS encryption. However, one of the switches can wipe the free space.
Running cipher /? at the command prompt in Windows 7 shows a whole host of options (in fact, too many to display here). The option we're looking for is the /W option:
C:\>cipher /?
Displays or alters the encryption of directories [files] on NTFS partitions.
...
CIPHER /W:directory
...
/W Removes data from available unused disk space on the entire
volume. If this option is chosen, all other options are ignored.
The directory specified can be anywhere in a local volume. If it
is a mount point or points to a directory in another volume, the
data on that volume will be removed.
Cipher with the /W switch will create a temporary file that will write over every block on your filesystem.
The appropriate syntax:
cipher /W:C:\
Will yield a screen like this:

As the screen indicates, close as many programs as possible. To achieve maximum data clearing effect, try grabbing a program like CCleaner to remove temporary internet files, temporary setup files, cookies, and a bunch of other personal data before wiping with cipher.
Monday, February 16, 2009
The Ever-Helpful Microsoft Office Project 2007
Microsoft Office Project 2007 is a relatively complex application. There have been a lot of improvements over the years, but one spot for which improvement is sorely needed is in problem identification. Most applications, when you have a syntax or property problem, will tell you on which line the problem occurs or will highlight the affected region.
If only.
In this example, I was working on a relatively complex Project and had made start-date type dependencies on some tasks (Task B can't be started until Task A is finished). I moved a section of tasks from one spot to another several weeks ago, and recently was attempting to update it. Unfortunately, I had set some task dependencies and could not figure out where to go (in a 500+ task project, it can get quite cumbersome). When trying to change a dependency, I was greeted with this oh-so-helpful dialog box:
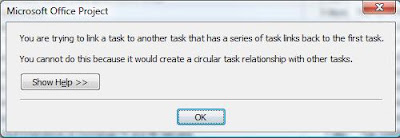
Huh?
I eventually found it, after reviewing my project line by line. It could have been so much easier if the conflict had just been highlighted. The program obviously knows what lines are affected, since it detected the dependency as circular.
If only.
In this example, I was working on a relatively complex Project and had made start-date type dependencies on some tasks (Task B can't be started until Task A is finished). I moved a section of tasks from one spot to another several weeks ago, and recently was attempting to update it. Unfortunately, I had set some task dependencies and could not figure out where to go (in a 500+ task project, it can get quite cumbersome). When trying to change a dependency, I was greeted with this oh-so-helpful dialog box:

Huh?
I eventually found it, after reviewing my project line by line. It could have been so much easier if the conflict had just been highlighted. The program obviously knows what lines are affected, since it detected the dependency as circular.
Thursday, February 12, 2009
Creating a Windows 2003 TFTP Server
If you read my previous post on configuring Windows Server 2003 DHCP to serve PXE clients, you probably noticed option 066 for Boot Server Host Name.
What is a Boot Server, you may ask?
In simple terms, a boot server runs a TFTP (Trivial File Transfer Protocol) instance that is used to transfer small amounts of data. TFTP is unauthenticated, making it an easy choice for automating remote-boot tasks such as jumpstart and kickstart. For more general information on TFTP, check out Wikipedia.
Windows 2003 has a little-known TFTP daemon. Microsoft stopped advertising some time ago, but it still remained as part of the OS load through 2003 (it is no longer present in 2008) because of its usefulness.
Configuring the Native Windows Server 2003 TFTP Daemon
1. Copy the tftpd.exe file from %windir%\system32\dllcache to %windir%\system32.
>> copy %windir%\system32\dllcache\tftpd.exe %windir%\system32
2. Register tftpd as a service.
>> sc create tftpdsvc binPath= C:\Windows\System32\tftpd.exe DisplayName= "TFTP Server" start= demand
3. Set the Directory parameter to the location where your TFTP boot image files will be stored.
>> REG ADD HKLM\SYSTEM\CurrentControlSet\Services\tftpdsvc\Parameters /v Directory /t REG_SZ /d C:\tftpd
Here's a screen capture of the whole process:
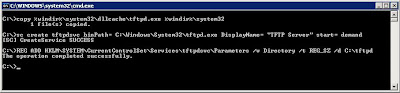
Start the TFTP Server inside the Services MMC (or type net start tftpdsvc from the command prompt). You may get an error if the directory you specified in step 3 doesn't exist, so make sure it does. Also, if you have problems accessing files (you shouldn't, since in this configuration tftpdsvc is running as LocalSystem), you may need to grant "Everyone" or "ANONYMOUS LOGON" access to the boot file directory.
What is a Boot Server, you may ask?
In simple terms, a boot server runs a TFTP (Trivial File Transfer Protocol) instance that is used to transfer small amounts of data. TFTP is unauthenticated, making it an easy choice for automating remote-boot tasks such as jumpstart and kickstart. For more general information on TFTP, check out Wikipedia.
Windows 2003 has a little-known TFTP daemon. Microsoft stopped advertising some time ago, but it still remained as part of the OS load through 2003 (it is no longer present in 2008) because of its usefulness.
Configuring the Native Windows Server 2003 TFTP Daemon
1. Copy the tftpd.exe file from %windir%\system32\dllcache to %windir%\system32.
>> copy %windir%\system32\dllcache\tftpd.exe %windir%\system32
2. Register tftpd as a service.
>> sc create tftpdsvc binPath= C:\Windows\System32\tftpd.exe DisplayName= "TFTP Server" start= demand
3. Set the Directory parameter to the location where your TFTP boot image files will be stored.
>> REG ADD HKLM\SYSTEM\CurrentControlSet\Services\tftpdsvc\Parameters /v Directory /t REG_SZ /d C:\tftpd
Here's a screen capture of the whole process:

Start the TFTP Server inside the Services MMC (or type net start tftpdsvc from the command prompt). You may get an error if the directory you specified in step 3 doesn't exist, so make sure it does. Also, if you have problems accessing files (you shouldn't, since in this configuration tftpdsvc is running as LocalSystem), you may need to grant "Everyone" or "ANONYMOUS LOGON" access to the boot file directory.
Configuring Windows 2003 DHCP for PXE Clients
Today, I was lending a hand to one of our Linux admins who was trying to get his servers Kickstarted. For the unitiated, Kickstart is the Linux equivalent to Windows RIS.
PXE stands for Pre-boot eXecution Environment. PXE clients (commonly known as "diskless workstations") rely on DHCP to tell them where to go for their boot configuration and software. Windows 2003 can handle these requests, with a little bit of work.
Supporting PXE clients requires the following options:
003 Router (potentially, if resources you need are on a different subnet)
013 Boot File Size
043 Vendor Specific Info
060 ClassID
066 Boot Server Host Name
067 Bootfile Name
So, off you go to configure it. But wait, Windows 2003 DHCP doesn't have option 060! What now?
Relax. Fortunately, there's a way to configure the DHCP service to have this option.
On your DHCP server, open up a command prompt and launch netsh.
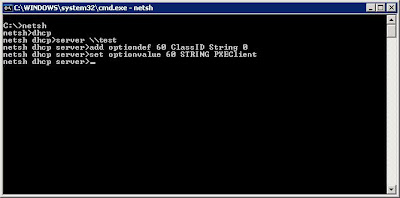
As you can see, the commands are:
C:>netsh
netsh>dhcp
netsh dhcp>server \\test
netsh dhcp server>add optiondef 60 ClassID String 0
netsh dhcp server>set optionvalue 60 STRING PXEClient
You can actually add any of the RFC options for DHCP through this context. Microsoft ships the basic ones, but with netsh, you can customize the DHCP service.
Then, restart the DHCP service. If you have the service and management console running while you do this, you'll see "Unknown Option" when you look under server options.
Launch the DHCP Admin Conosole, and navigate to your scope (or server) options, depending on where you want to set your PXE boot options.
Right-click "Scope Options" (or "Server Options," as appropriate) and select Configure Options.
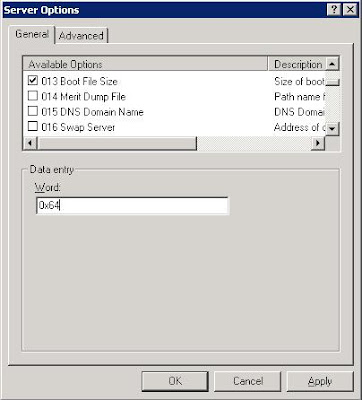
Select option 013 Boot File Size, and enter the boot file size in 512 octet blocks. For example, if your boot file is 32KB, convert it to bytes (1024*32, which is 32768), and then divide that number by 512 (32768/512). Put the result (64) in the data field.
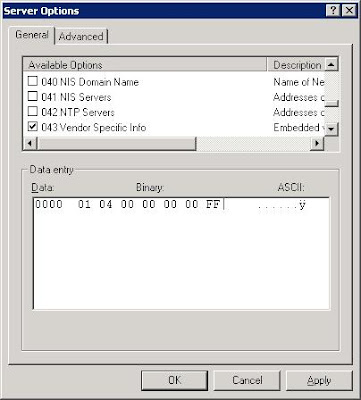
Select option 043 Vendor Specific Info and enter the following binay value:
01 04 00 00 00 00 ff
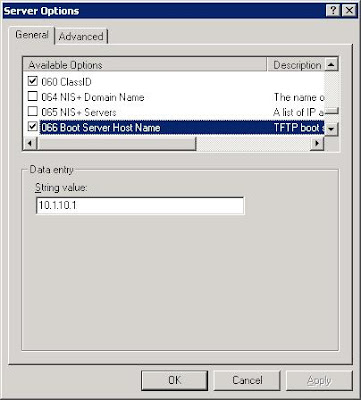
Select option 066 Boot Server Host Name and enter the IP address of the TFTP server hosting your boot image in the data field.
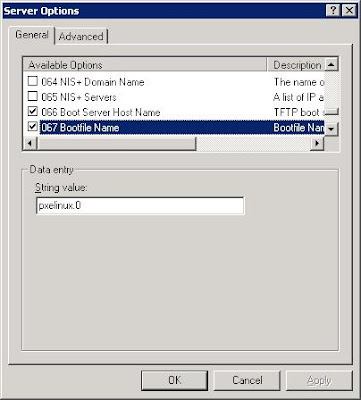
Select option 067 Bootfile Name and enter the name of the boot image that you wish to use.
Ensure your devices have PXE-enabled NICs (if you're using newer servers, nearly all of them do) and boot. If you need help on setting up a TFTP Server on Windows 2003, look no further.
PXE stands for Pre-boot eXecution Environment. PXE clients (commonly known as "diskless workstations") rely on DHCP to tell them where to go for their boot configuration and software. Windows 2003 can handle these requests, with a little bit of work.
Supporting PXE clients requires the following options:
003 Router (potentially, if resources you need are on a different subnet)
013 Boot File Size
043 Vendor Specific Info
060 ClassID
066 Boot Server Host Name
067 Bootfile Name
So, off you go to configure it. But wait, Windows 2003 DHCP doesn't have option 060! What now?
Relax. Fortunately, there's a way to configure the DHCP service to have this option.
On your DHCP server, open up a command prompt and launch netsh.

As you can see, the commands are:
C:>netsh
netsh>dhcp
netsh dhcp>server \\test
netsh dhcp server>add optiondef 60 ClassID String 0
netsh dhcp server>set optionvalue 60 STRING PXEClient
You can actually add any of the RFC options for DHCP through this context. Microsoft ships the basic ones, but with netsh, you can customize the DHCP service.
Then, restart the DHCP service. If you have the service and management console running while you do this, you'll see "Unknown Option" when you look under server options.
Launch the DHCP Admin Conosole, and navigate to your scope (or server) options, depending on where you want to set your PXE boot options.
Right-click "Scope Options" (or "Server Options," as appropriate) and select Configure Options.
Select option 013 Boot File Size, and enter the boot file size in 512 octet blocks. For example, if your boot file is 32KB, convert it to bytes (1024*32, which is 32768), and then divide that number by 512 (32768/512). Put the result (64) in the data field.

Select option 043 Vendor Specific Info and enter the following binay value:
01 04 00 00 00 00 ff

Select option 066 Boot Server Host Name and enter the IP address of the TFTP server hosting your boot image in the data field.

Select option 067 Bootfile Name and enter the name of the boot image that you wish to use.

Ensure your devices have PXE-enabled NICs (if you're using newer servers, nearly all of them do) and boot. If you need help on setting up a TFTP Server on Windows 2003, look no further.
Sunday, November 16, 2008
History of Active Directory
Great little blurb, for those of you interested in how it all began.
http://blog.joeware.net/2008/08/11/1420/
This post features several snippets of email from a newsgroup. The best comments come from one of the integral parts of the DS team, Don Hacherl.
http://blog.joeware.net/2008/08/11/1420/
This post features several snippets of email from a newsgroup. The best comments come from one of the integral parts of the DS team, Don Hacherl.
Subscribe to:
Posts (Atom)