When migrating to a new Exchange 2010 environment, I decided to use a wildcard certificate instead of a UC certificate. It cost about twice as much, but seeing as how I have several other services that currently require SSL certificates, it seemed like a good investment.
When running through the Exchange Remote Connectivity Analyzer, I noticed that my configuration kept failing the Outlook Anywhere test with the following error:
Testing SSL mutual authentication with the RPC proxy server.
Verification of mutual authentication failed.
> Additional Details
>> The certificate common name *.domain.com doesn't validate against the mutual authentication that was provided: msstd:mail.domain.com
The solution was relatively easy. Log into your Exchange CAS server and run the following cmdlet from the Exchange Command Shell:
Set-OutlookProvider -Identity EXPR -CertPrincipalName *.domain.com
I've seen some documentation that replaced the CertPrincipalName value with msstd:*.domain.com, but I believe that is incorrect. The name on the actual SSL certificate is *.domain.com, not msstd:*.domain.com. For giggles, I did try using msstd:*.domain.com as the CertPrincipalName value, but it did not allow me to pass ExRCA.
Run the Get-OutlookProvider cmdlet to review your settings:
RunspaceId : 841d7d59-e89c-42b4-9c3c-9388d40dcd95
CertPrincipalName : *.domain.com
Server :
TTL : 1
OutlookProviderFlags : None
AdminDisplayName :
ExchangeVersion : 0.1 (8.0.535.0)
Name : EXPR
DistinguishedName : CN=EXPR,CN=Outlook,CN=AutoDiscover,CN=Client Access,CN=A
pex Digital Solutions,CN=Microsoft Exchange,CN=Services,
CN=Configuration,DC=domain,DC=com
Identity : EXPR
Guid : d81b1280-1843-4808-812c-48375ed744e0
ObjectCategory : domain.com/Configuration/Schema/ms-Exch-Auto-Discove
r-Config
ObjectClass : {top, msExchAutoDiscoverConfig}
WhenChanged : 11/5/2010 11:53:39 AM
WhenCreated : 1/30/2009 9:23:30 PM
WhenChangedUTC : 11/5/2010 3:53:39 PM
WhenCreatedUTC : 1/31/2009 2:23:30 AM
OrganizationId :
OriginatingServer : mydc03.domain.com
IsValid : True
Friday, November 5, 2010
Thursday, November 4, 2010
Fun with PIX, Part Deux
After getting my PIX to boot in my previous post, I decided to run through the password recovery procedures.
What you'll need:
What you'll need:
- PIX recovery images (availble from either the Cisco site individually or here in one ZIP file)
- PIX firewall software version
- TFTP server software (I used the TFTP server included in the PacketTrap pt360 Suite in this exercise)
- Terminal Emulator (I typically use PuTTY)
Steps:
- Connect Ethernet 0 on the PIX to your local LAN.
- Open a command prompt and run ipconfig to determine your computer's IP address.
- Download PIX recovery images to a directory on your computer (such as C:\tftp).
- Point your TFTP server to the download directory containing your tools.
- With a console cable attached and terminal emulator running, power on the PIX firewall.
- Note the version of the PIX firewall software. If you missed the boot sequence, you can type sh ver at the prompt. The firewall software version will normally be the first line returned:
Cisco PIX Firewall Version 6.3(5)
Cisco PIX Device Manager Version 3.0(4)
In this case, the number you need is "Cisco PIX Firewall Version." - Power off the PIX.
- Power on the PIX.
- After the startup messages appear, press ESC or send a BREAK command. Note: If you do it too early, you'll get a testing/diagnostic menu. To continue the boot process, type C. A successful BREAK command should leave you at the monitor> prompt.
- Type int e0 and press ENTER.
- Type addr a.b.c.d and press ENTER (where a.b.c.d is an IP address you want to assign to the PIX. To reduce troubleshooting, choose an address on the same network as your the computer you're using).
- Type server w.x.y.z and press ENTER (where w.x.y.z is the IP address of the computer you're using to perform this procedure).
- Type file np[nn].bin (where [nn] is the version number corresponding to the BIN file for password recovery. For example, if your PIX is running version 6.3 of the firewall software, enter np63.bin).
- Type tftp and press ENTER.
- When prompted, type Y to erase the passwords.
- If prompted to remove the commands from the configuration, type Y.
- The device will reboot and will have a blank password.
Fun with PIX, Part I
When meeting with a potential customer the other day, she mentioned that she had a running PIX with an unknown password.
I thought I'd refresh my PIX skills and decided to bust out an old PIX 506E we had sitting in the office. After the unfortunate re-realization that my laptop doesn't have a serial port (and the resulting short jaunt to the computer store to get a USB-to-Serial cable), I consoled into the PIX and turned it on.
My adventure was short-lived, however. While watching the boot-up, I was greeted with a hung firewall:
CISCO SYSTEMS PIX FIREWALL
Embedded BIOS Version 4.3.207 01/02/02 16:12:22.73
Compiled by morlee
32 MB RAM
PCI Device Table.
Bus Dev Func VendID DevID Class Irq
00 00 00 8086 7192 Host Bridge
00 07 00 8086 7110 ISA Bridge
00 07 01 8086 7111 IDE Controller
00 07 02 8086 7112 Serial Bus 9
00 07 03 8086 7113 PCI Bridge
00 0D 00 8086 1209 Ethernet 11
00 0E 00 8086 1209 Ethernet 10
And that's all she wrote.

3. Locate the J5 jumper. It should be right next to the CMOS battery. Move it over 1 PIN.
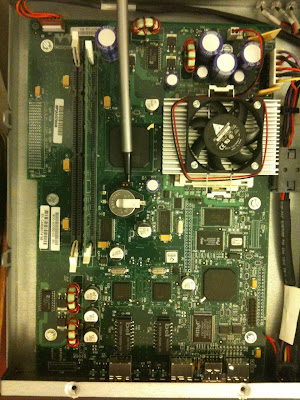
4. Power on the device.
5. After unit has booted, power off.
6. Replace cover.
I thought I'd refresh my PIX skills and decided to bust out an old PIX 506E we had sitting in the office. After the unfortunate re-realization that my laptop doesn't have a serial port (and the resulting short jaunt to the computer store to get a USB-to-Serial cable), I consoled into the PIX and turned it on.
My adventure was short-lived, however. While watching the boot-up, I was greeted with a hung firewall:
CISCO SYSTEMS PIX FIREWALL
Embedded BIOS Version 4.3.207 01/02/02 16:12:22.73
Compiled by morlee
32 MB RAM
PCI Device Table.
Bus Dev Func VendID DevID Class Irq
00 00 00 8086 7192 Host Bridge
00 07 00 8086 7110 ISA Bridge
00 07 01 8086 7111 IDE Controller
00 07 02 8086 7112 Serial Bus 9
00 07 03 8086 7113 PCI Bridge
00 0D 00 8086 1209 Ethernet 11
00 0E 00 8086 1209 Ethernet 10
And that's all she wrote.
Fortunately, there's an easy enough work-around.
1. Power off the device.
2. Remove the cover. There are two Phillips screws located at the top rear of the unit. The top half slides back about an inch or so and then lifts off.

3. Locate the J5 jumper. It should be right next to the CMOS battery. Move it over 1 PIN.


4. Power on the device.
5. After unit has booted, power off.
6. Replace cover.
Subscribe to:
Posts (Atom)