Any bartender can combine cheap ingredients and pre-made mixes. But if you want to make incredible drinks people really enjoy, you need to start with good quality ingredients.
A little high school chemistry never hurt, either.
The Lemon Drop is a drink that is routinely desecrated with bottom-shelf vodka and sour mix. If you've spent any time on my drinks blog posts, you'll find that I favor drinkability and flavor over just about everything else.
This is no different.
Lemon Drop
1 1/2 oz Belvedere Vodka
3/4 oz Caravella Limoncello
-or-
2 oz Absolut Citron Vodka
1/4 oz Caravella Limoncello
3/4 oz simple syrup
1/2 oz Cointreau Orange Liqueur
1 fresh-squeezed lemon
Rim either an old-fashioned or martini glass with the squeezed lemon and dip in sugar. Combine the spirits and fresh-squeezed lemon in a metal shaker full of ice. Shake until the canister is frosty and strain into the glass. Garnish with a lemon wedge.
If the drink is too strong, you can add a splash of club soda without affecting the flavor.
Tuesday, September 29, 2009
Thursday, September 24, 2009
An Old Fashioned Drink for the Modern Man
If you're looking for a drink that hearkens back to simpler times or a crisp drink that none of your neighors are drinking, look no further than the Old Fashioned. Concocted as early as 1806 (according to some), this blend of whisky or bourbon tempered by a little sugar and bitters hits the spot every time.
Old Fashioned
1 tsp or so of simple syrup (or about 1/2 tsp of loose sugar)
Splash of club soda or water
2 or 3 dashes of Angostura bitters
1 1/2 oz of whisky or bourbon (I prefer Maker's Mark)
Comine the syrup, club soda (or not, if you're a purist), and bitters in a glass with an ice cube. If using loose sugar, make sure it's fully dissolved. Swirl around until the inside of the glass is coated. Add the whisky or bouron. Serve with a cherry or two and an orange slice.
Setting up a Receive Connect for Postini Re-Injection
For any of you that use Postini for email services, setting up reinjection for the receive connectors in Exchange 2007 is a lot more work than allowing connection and relay through a vSMTP server in Exchange 2003.
Exchange 2007 has a lot of great features, such as the uber-powerful Exchange Management Shell. IMHO, Exchange 2007 also has a lot of drawbacks, such as a half-assed GUI. You can only achieve the most basic things through the GUI; anything that requires thought or a little more configuration is done through the cumbersome Exchange Management Shell interface.
To achieve the previously simple task of allowing relay through a vSMTP server, you can go one of two routes. I'm going to document the route that grants least privilege. The MSExchangeTeam blog as well as Technet both have variations on this as well as the Pro's and Con's of using it.
Allow Anonymous Relay
1. Open the Exchange Management Console.
2. Expand Server Configuration > Hub Transport.
3. Select the server in the top pane, and then click New Receive Connector... in the right pane.
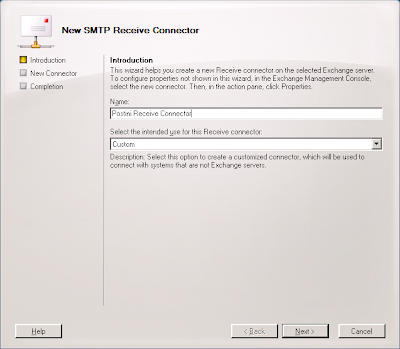
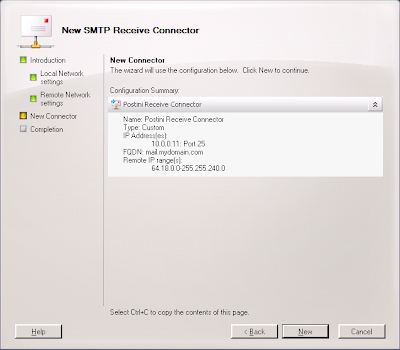
4. Enter a name for the connector, such as "Postini Receive Connector," select "Custom" as the intended use for the connector, and click Next.
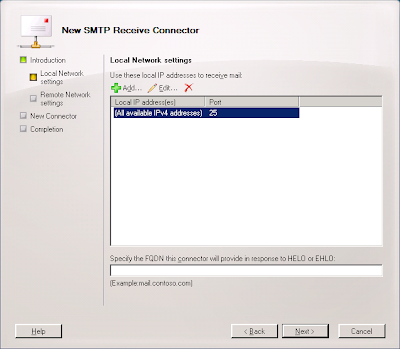
5. Select the "All availble IPv4 addresses" entry and click the Edit... button.
6. Select the "Specify an IP address:" radio button, enter the IP address of the interface that will be communicating with Postini, and click OK.
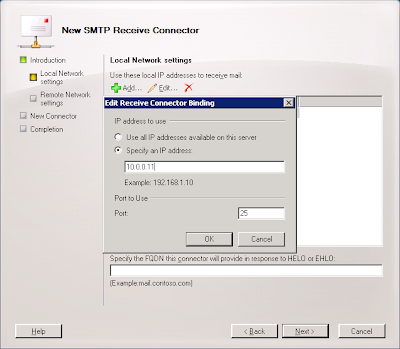
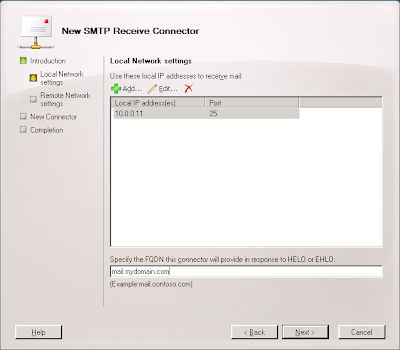
7. Enter the Fully-Qualified Domain Name the connector use to respond to connection attempts (most likely something like mail.mydomain.com) and click Next.
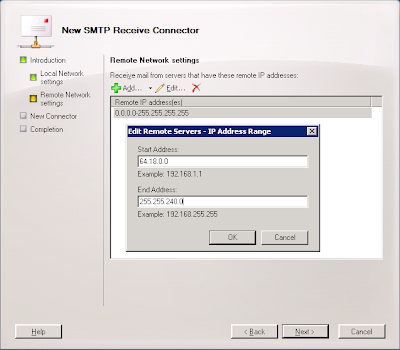
8. Click the 0.0.0.0-255.255.255.255 enter and click Edit....
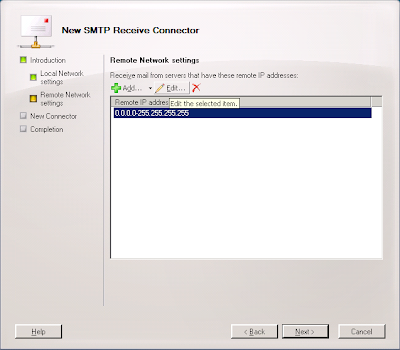
9. Enter the appropriate address range for the Postini system you use. Systems 5, 6, 7, 8, and 20 are 64.18.0.0/20 (64.18.0.0./255.255.240.0); System 9 is 74.125.148.0/22 (75.125.148.0/255.255.252.0); Systems 20, 200, and 201 are 207.126.144.0/20 (207.126.144.0/255.255.240.0) and click OK.
10. Click Next.
11. Click New.
12. Right-click on the new connector, select Properties, select the Authenticaion tab and Ensure "Transport Layer Security" and "Basic Authentication" are selected.
14. Click the Permissions Groups tab and ensure Anonymous Users is selected.
15. Click OK.
So that gets you about half-way there. To finish it up, open the EMS and Copy/Paste the following cmdlet in:
Get-ReceiveConnector "Postini Receive Connector" | Add-ADPermission -User "NT AUTHORITY\ANONYMOUS LOGON" -ExtendedRights "Ms-Exch-SMTP-Accept-Any-Recipient"
Replace "Postini Receive Connector" with the name of the connector you created in Step 4 above.
If you want to use the EMS to create and set the permissions on the new connector, you can use these cmdlets:
New-ReceiveConnector -Name "Postini Receive Connector" -AuthMechanism "Tls,BasicAuth" -Usage Custom -PermissionGroups AnonymousUsers -Bindings 10.0.0.11:25 -RemoteIpRanges 64.18.0.0/20
Get-ReceiveConnector "Postini Receive Connector" | Add-ADPermission -User "NT AUTHORITY\ANONYMOUS LOGON" -ExtendedRights "Ms-Exch-SMTP-Accept-Any-Recipient"
Replace the values for -Name, -Bindings, and -RemoteIPRanges as necessary.
For more information on these types of connectors:
MSExchange Team Blog
Microsoft Technet
Exchange 2007 has a lot of great features, such as the uber-powerful Exchange Management Shell. IMHO, Exchange 2007 also has a lot of drawbacks, such as a half-assed GUI. You can only achieve the most basic things through the GUI; anything that requires thought or a little more configuration is done through the cumbersome Exchange Management Shell interface.
To achieve the previously simple task of allowing relay through a vSMTP server, you can go one of two routes. I'm going to document the route that grants least privilege. The MSExchangeTeam blog as well as Technet both have variations on this as well as the Pro's and Con's of using it.
Allow Anonymous Relay
1. Open the Exchange Management Console.
2. Expand Server Configuration > Hub Transport.
3. Select the server in the top pane, and then click New Receive Connector... in the right pane.
4. Enter a name for the connector, such as "Postini Receive Connector," select "Custom" as the intended use for the connector, and click Next.

5. Select the "All availble IPv4 addresses" entry and click the Edit... button.

6. Select the "Specify an IP address:" radio button, enter the IP address of the interface that will be communicating with Postini, and click OK.

7. Enter the Fully-Qualified Domain Name the connector use to respond to connection attempts (most likely something like mail.mydomain.com) and click Next.

8. Click the 0.0.0.0-255.255.255.255 enter and click Edit....

9. Enter the appropriate address range for the Postini system you use. Systems 5, 6, 7, 8, and 20 are 64.18.0.0/20 (64.18.0.0./255.255.240.0); System 9 is 74.125.148.0/22 (75.125.148.0/255.255.252.0); Systems 20, 200, and 201 are 207.126.144.0/20 (207.126.144.0/255.255.240.0) and click OK.

10. Click Next.
11. Click New.

12. Right-click on the new connector, select Properties, select the Authenticaion tab and Ensure "Transport Layer Security" and "Basic Authentication" are selected.
14. Click the Permissions Groups tab and ensure Anonymous Users is selected.
15. Click OK.
So that gets you about half-way there. To finish it up, open the EMS and Copy/Paste the following cmdlet in:
Get-ReceiveConnector "Postini Receive Connector" | Add-ADPermission -User "NT AUTHORITY\ANONYMOUS LOGON" -ExtendedRights "Ms-Exch-SMTP-Accept-Any-Recipient"
Replace "Postini Receive Connector" with the name of the connector you created in Step 4 above.
If you want to use the EMS to create and set the permissions on the new connector, you can use these cmdlets:
New-ReceiveConnector -Name "Postini Receive Connector" -AuthMechanism "Tls,BasicAuth" -Usage Custom -PermissionGroups AnonymousUsers -Bindings 10.0.0.11:25 -RemoteIpRanges 64.18.0.0/20
Get-ReceiveConnector "Postini Receive Connector" | Add-ADPermission -User "NT AUTHORITY\ANONYMOUS LOGON" -ExtendedRights "Ms-Exch-SMTP-Accept-Any-Recipient"
Replace the values for -Name, -Bindings, and -RemoteIPRanges as necessary.
For more information on these types of connectors:
MSExchange Team Blog
Microsoft Technet
Thursday, September 3, 2009
Using LDIFDE and CSVDE to find computers in Active Directory
LDIFDE is an oldie-but-goodie tool for finding specific information in Active Directory. If you know the name of the attribute that contains the data you're looking for, you can construct a pretty powerful query.
For example, you can search for all computers in the Active Directory domain mydomain.com:
ldifde -f output.txt -r "(objectClass=computer)" -d "dc=mydomain,dc=com"
You can filter it down to all workstation-class computers (running Windows XP), as well:
ldifde -f output.txt -r "(&(objectClass=computer)(operatingSystem=Windows XP))" -d dc=mydomain,dc=com
Or even all workstations running Windows XP and Vista:
ldifde -f output.txt -r "(&(objectClass=computer)((operatingSystem=Windows XP)(operatingSystem=Windows Vista)))" -d dc=mydomain,dc=com
And workstations running Windows 2000, XP, and Vista:
ldifde -f output.txt -r "(&(objectClass=computer)(((operatingSystem=Windows XP*)(operatingSystem=Windows 2000 Pro*)(operatingSystem=Windows Vista))))" -l "cn,operatingSystem" -d dc=mydomain,dc=com
"But Aaron," you ask, "LDIFDE returns a lot of fields I don't need. How can I control the output?" Glad you asked.
You can use the -l switch to do just that:
ldifde -f output.txt -r "(&(objectClass=computer)(operatingSystem=Windows Server*))" -d dc=mydomain,dc=com -l "cn,operatingSystem"
Will return an output like this:
dn: CN=SERVERA,OU=Servers,DC=mydomain,DC=com
changetype: add
cn: SERVERA
operatingSystem: Windows Server 2003
You can swap out LDIFDE for the tool CSVDE to generate the output in a CSV format.
Subscribe to:
Posts (Atom)