Recently, there have been a rash of "fake antivirus" viruses and trojans floating around the internet. Two of the more frustrating issues:
- Why are all my icons hidden?
- Where the heck did my Automatic Updates service go?
- Why am I getting Windows Update Error 0x80072EFE?
The icons hidden one is fairly benign and relatively easy to resolve:
1. Open Windows Explorer.
2. Select Tools > Folder Options.
3. Select the View tab.
4. Select the Show hidden files and folders radio button and click OK.
5. From Windows Explorer, navigate to C:\.
6. Right-click on the folder "Documents and Settings" and click Properties.
7. Clear the "Hidden" checkbox.
8. When prompted, choose to apply to all subfolders and files.
As far as the Automatic Updates issue goes, it's a little trickier. These particular strains of malware do everything from unregister DLLs to removing the Windows Update service altogether. Most of the time, the solution involves one or more of the following tasks:
- Re-registering the WUAU DLLs
- Re-registering Internet Explorer DLLs
- Deleting the cached update downloads
- Resetting the cryptographic service database
Copy/paste the following script into Notepad and save it as a .bat file:
net stop wuauserv /y
net stop bits /y
net stop cryptsvc /y
ren %systemroot%\system32\catroot2 catroot2_old
rd /s /q %systemroot%\SoftwareDistribution
regsvr32 /s actxprxy.dll
regsvr32 /s atl.dll
regsvr32 /s browseui.dll
regsvr32 /s cdm.dll
regsvr32 /s cryptdlg.dll
regsvr32 /s dssenh.dll
regsvr32 /s gpkcsp.dll
regsvr32 /s initpki.dll
regsvr32 /s iuengine.dll
regsvr32 /s mshtml.dll
regsvr32 /s msxml.dll
regsvr32 /s msxml2.dll
regsvr32 /s msxml2r.dll
regsvr32 /s msxml3.dll
regsvr32 /s msxml3r.dll
regsvr32 /s msxmlr.dll
regsvr32 /s oleaut32.dll
regsvr32 /s qmgr.dll
regsvr32 /s rsaenh.dll
regsvr32 /s sccbase.dll
regsvr32 /s shdocvw.dll
regsvr32 /s slbcsp.dll
regsvr32 /s softpub.dll
regsvr32 /s urlmon.dll
regsvr32 /s wintrust.dll
regsvr32 /s wuapi.dll
regsvr32 /s wuaueng.dll
regsvr32 /s wuaueng1.dll
regsvr32 /s wuauserv.dll
regsvr32 /s wucltui.dll
regsvr32 /s wups.dll
regsvr32 /s wups2.dll
regsvr32 /s wuweb.dll
net start cryptsvc
net start bits
net start wuauserv
Run. The "Automatic Updates" service should now be visible in the Services applet.
Showing posts with label troubleshooting. Show all posts
Showing posts with label troubleshooting. Show all posts
Wednesday, July 20, 2011


Friday, May 20, 2011
Internet Explorer 8 and the continuous "Manage Add-Ons" Prompt
While trying to deploy the Microsoft Online Services Single Sign-On Tool for a customer migrating to BPOS, I found myself sitting at a customer's computer banging my head against the wall. When I'd launch the tool and sign in as the user, I kept on getting the "Unable to prepare certificate" error.
The MSOL tool is dependent on a number of things:
- .NET Framework 2.0 or later
- Correct time (within 5 minute skew of the MSOL servers)
- Internet Explorer as your default browser
I was OK on the firsts two items, but I had noticed that my customer had installed both Firefox and Chrome. No big deal, right? I launch IE and set it as the default browser and attempt to reconfigure the sign-on tool (to no avail).
I proceed to follow the traditional troubleshooting steps:
- Uninstall/reinstall Online Services Single Sign-On Tool
- Uninstall/reinstall .NET Framework from 4.0 down to 2.0 and back again
- Reset IE to default settings.
Neither of these fixed my problem.
I launched IE and was faced with what I thought was an annoyance--the "Manage Add-Ons" window kept popping up with my default search providers. I'd set it, close IE, restart, and get the dialog box again.
I thought, "Now I'm getting somewhere." I thought maybe there was a piece of malware affecting the customer's system, so I downloaded one of my favorite programs, ran a scan, and didn't find anything.
In the end, I stumbled upon a tip from another hapless soul facing my same problem:
1. Make sure all IE windows are closed. To be sure, you can open a command prompt and run taskkill /im iexplore.exe /f .
2. Open Regedit.
3. Navigate to HKCU\SOFTWARE\Microsoft\Windows\CurrentVersion\Explorer\User Shell Folders.
4. Right-click, point to New > Expandable String Value.
5. Type AppData and press ENTER.
6. Double-click the new AppData value and enter %userprofile%\Application Data and click OK.
7. Try launching IE again.
The MSOL tool is dependent on a number of things:
- .NET Framework 2.0 or later
- Correct time (within 5 minute skew of the MSOL servers)
- Internet Explorer as your default browser
I was OK on the firsts two items, but I had noticed that my customer had installed both Firefox and Chrome. No big deal, right? I launch IE and set it as the default browser and attempt to reconfigure the sign-on tool (to no avail).
I proceed to follow the traditional troubleshooting steps:
- Uninstall/reinstall Online Services Single Sign-On Tool
- Uninstall/reinstall .NET Framework from 4.0 down to 2.0 and back again
- Reset IE to default settings.
Neither of these fixed my problem.
I launched IE and was faced with what I thought was an annoyance--the "Manage Add-Ons" window kept popping up with my default search providers. I'd set it, close IE, restart, and get the dialog box again.
I thought, "Now I'm getting somewhere." I thought maybe there was a piece of malware affecting the customer's system, so I downloaded one of my favorite programs, ran a scan, and didn't find anything.
In the end, I stumbled upon a tip from another hapless soul facing my same problem:
1. Make sure all IE windows are closed. To be sure, you can open a command prompt and run taskkill /im iexplore.exe /f .
2. Open Regedit.
3. Navigate to HKCU\SOFTWARE\Microsoft\Windows\CurrentVersion\Explorer\User Shell Folders.
4. Right-click, point to New > Expandable String Value.
5. Type AppData and press ENTER.
6. Double-click the new AppData value and enter %userprofile%\Application Data and click OK.
7. Try launching IE again.
Wednesday, February 2, 2011
Exchange 2010 Messages Stuck in Retry status in "MapiDeliveryQueue"
In case your Exchange admin life wasn't difficult enough, you can always have this problem, manifested with the following symptoms:
- Mail delivery hung
- Messages stuck in local delivery "MapiDeliveryQueue" with a status of "Retry"
Classic tactics such as restarting the server or right-clicking the queue and selecting "Retry" have no effect.
The key here is that Exchange 2007 and later treat these messages differently than standard SMTP queues. In order to process these messages, they need to be re-submitted using the following Exchange cmdlet:
Retry-Queue -Filter {Status -eq "Retry"} -Server "exchangeserver" -resubmit $true
The default re-submit queue time is 12 hours. To modify this:
1. Using Notepad, edit the file: C:\Program Files\Microsoft\Exchange Server\V14\Bin\EdgeTransport.exe.config.
2. Modify the following line in the
<add key="MaxIdleTimeBeforeResubmit" value="<hh:mm:ss>"/>
3. Save the file.
4. Open up the Exchange Command shell and run restart-service *rt
- Mail delivery hung
- Messages stuck in local delivery "MapiDeliveryQueue" with a status of "Retry"
Classic tactics such as restarting the server or right-clicking the queue and selecting "Retry" have no effect.
The key here is that Exchange 2007 and later treat these messages differently than standard SMTP queues. In order to process these messages, they need to be re-submitted using the following Exchange cmdlet:
Retry-Queue -Filter {Status -eq "Retry"} -Server "exchangeserver" -resubmit $true
The default re-submit queue time is 12 hours. To modify this:
1. Using Notepad, edit the file: C:\Program Files\Microsoft\Exchange Server\V14\Bin\EdgeTransport.exe.config.
2. Modify the following line in the
<add key="MaxIdleTimeBeforeResubmit" value="<hh:mm:ss>"/>
3. Save the file.
4. Open up the Exchange Command shell and run restart-service *rt
Saturday, January 22, 2011
IIS 6.0 404 Error for a file you *know* is there
This morning I was doing some maintenance on a customer's machine and needed to reinstall the application. The customer site is closed, but the work still needs to be done. I had a copy of the ISO media available on a server in our office, so the solution seemed obvious: drop it on a web server and pull it down from the client's machine.
So, I created a directory on one of our web servers, placed the ISO file there, and turned on "Directory Browsing" for that directory. I then logged into my customer's machine and navigated to the site and found the file. I right-clicked on the file, hit "Save Target As..." and ....
Internet Explorer cannot download myfile.iso from my.webserver.com.
Internet Explorer was not able to open this Internet site. The requested site is either unavailable or cannot be found. Please try again later.
I went back to the site and this time, just clicked on the file name, and was greeted with the generic 404 message.
Fortunately, the solution is very simple and only takes a few seconds.
1. Open up IIS Manager.
2. Navigate to the web site (if you don't want to change the setting for the entire web server, you can just navigate to the directory path off the web site).
3. Right-click > Properties on the website (or directory).
4. Select the "HTTP Headers" tab.
5. Select the "MIME Types" button.
6. Click the "New" button.
7. Add the extension type (in my case, ISO).
8. Add the MIME type (in my case, application/octet-stream).
9. Click OK three times.
Try to re-download the file in your browser.
The reason for this behavior is described in detail in the IIS 6.0 documentation here.
So, I created a directory on one of our web servers, placed the ISO file there, and turned on "Directory Browsing" for that directory. I then logged into my customer's machine and navigated to the site and found the file. I right-clicked on the file, hit "Save Target As..." and ....
Internet Explorer cannot download myfile.iso from my.webserver.com.
Internet Explorer was not able to open this Internet site. The requested site is either unavailable or cannot be found. Please try again later.
I went back to the site and this time, just clicked on the file name, and was greeted with the generic 404 message.
Fortunately, the solution is very simple and only takes a few seconds.
1. Open up IIS Manager.
2. Navigate to the web site (if you don't want to change the setting for the entire web server, you can just navigate to the directory path off the web site).
3. Right-click > Properties on the website (or directory).
4. Select the "HTTP Headers" tab.
5. Select the "MIME Types" button.
6. Click the "New" button.
7. Add the extension type (in my case, ISO).
8. Add the MIME type (in my case, application/octet-stream).
9. Click OK three times.
Try to re-download the file in your browser.
The reason for this behavior is described in detail in the IIS 6.0 documentation here.
Tuesday, January 4, 2011
How to fix a bad/corrupt/hidden source in Cydia
I was adding a new Cydia repository the other day to my iPhone and apparently mistyped something. I deleted it from the GUI, but every time I went to search Cydia for an application or manage my source list, I received an error that the repository was unavailable and then received the following error:
Sub-process bzip2 returned an error code (2)
Sub-process bzip2 returned an error code (2)
Fortunately, there's a way to fix it. You'll need a few pieces of software:
- OpenSSH installed on your iDevice
- WinSCP (free Windows Secure Copy client; available at http://sourceforge.net/projects/winscp)
- plist Editor for Windows (Mac OS Property List editor; http://www.ipodrobot.com/blog/2009/02/free-plist-editor-for-windows-10-released.htm)
- Make sure you have SSH access to your iDevice When you installed Cydia, you had the option for which tool sets you wanted. If you didnt' select a tool set that includes command-line tools, you'll need to install those first (OpenSSH is the main piece that's required). If SSH isn't working, you'll need to reinstall it and then respring your device.
- Test your SSH login credentials by using an SSH client such as putty connecting to your device's WiFi address and logging in as 'root.' If you have not changed the root password, the default is 'alpine.'
- Using a secure copy client (such as WinSCP), connect to your iDevice and navigate to /private/etc/apt/source.list.d.
- Right-click > Edit the cydia.list file, remove the offending line, and click Save. Close the WinSCP editor.
- Navigate to /private/var/lib/cydia.
- Copy the metadata.plist file to your computer.
- Using plist editor, open the metadata.plist on your computer.
- Search for the repository you need to remove. The line will look something like
deb:http://repositoryname/:./ - Select and delete down to the next key
tag. Your selection should start with an open key tag and end with a close dict tag and should contain approximately 9 lines of data. - Copy it back to /private/var/lib/cydia and overwrite the existing file.
- Navigate to /private/var/lib/apt/lists and delete the files starting with the name of the source you wish to remove.
- Navigate to /private/var/lib/apt/list/partial and do the same.
- Close WinSCP and respring your iDevice.
Thursday, December 9, 2010
How to Join Windows XP Media Center to a Domain
During an SBS deployment, I ran into a few machines at my customer's site that were running Windows XP Media Center Edition (MCE). As most of you know, the only machines that are technically eligible to join a Windows domain are "Business" class operating systems, such as Windows XP Professional, Windows Vista Business, Windows Vista Enterprise, Windows 7 Professional and Windows 7 Enterprise (although not technically "business" class, Windows Vista/7 Ultimate Editions are also able to join domains, since they're supposed to be everything-but-the-kitchen-sink editions).
And, as luck would have it, the customer has critical LOB applications installed on these machines and some other pieces of legacy software for which the media is no where to be found, so a fresh install with Windows XP Professional media is out of the question.
No problem, right? I've upgraded dozens of Windows XP Home PCs to Windows XP Professional for this exact reason. I pop some newly acquired Windows XP Professional with SP3 "Get Genuine" media (designed for those folks that have potentially illegitimate Windows versions); the upgrade is going well until ... the part where I enter the license key. It won't take it, even though I know it's valid (tested against an XP Home machine in the same office).
While trying to find a reason why I can't upgrade, I stumble upon another blog with some basic instructions on how to join XP MCE to a domain. The first step the author lists is to install the Windows XP Recovery Console; I run the command and restart ... and ... bluescreen.
I turn to my trusty recovery tools disc (which has gotten me out of more tight spots than you can imagine) and boot to a WinPE shell which has a bunch of great tools loaded, including RegEdit PE.
To perform this feat of amazement yourself:
1. From a WinPE installation, launch RegEdit PE, point it to the Windows installation director, and load up the registry hives.
2. Navigate to HKEY_LOCAL_MACHINE\_REMOTE_SYSTEM\WPA\MedCtrUpg.
3. Double-click the value IsLegacyMCE.
4. Change the '0' to a '1'.
5. Close RegEdit PE and restart the machine into Windows.
6. Join domain.
And, as luck would have it, the customer has critical LOB applications installed on these machines and some other pieces of legacy software for which the media is no where to be found, so a fresh install with Windows XP Professional media is out of the question.
No problem, right? I've upgraded dozens of Windows XP Home PCs to Windows XP Professional for this exact reason. I pop some newly acquired Windows XP Professional with SP3 "Get Genuine" media (designed for those folks that have potentially illegitimate Windows versions); the upgrade is going well until ... the part where I enter the license key. It won't take it, even though I know it's valid (tested against an XP Home machine in the same office).
While trying to find a reason why I can't upgrade, I stumble upon another blog with some basic instructions on how to join XP MCE to a domain. The first step the author lists is to install the Windows XP Recovery Console; I run the command and restart ... and ... bluescreen.
I turn to my trusty recovery tools disc (which has gotten me out of more tight spots than you can imagine) and boot to a WinPE shell which has a bunch of great tools loaded, including RegEdit PE.
To perform this feat of amazement yourself:
1. From a WinPE installation, launch RegEdit PE, point it to the Windows installation director, and load up the registry hives.
2. Navigate to HKEY_LOCAL_MACHINE\_REMOTE_SYSTEM\WPA\MedCtrUpg.
3. Double-click the value IsLegacyMCE.
4. Change the '0' to a '1'.
5. Close RegEdit PE and restart the machine into Windows.
6. Join domain.
Friday, November 5, 2010
Outlook Anywhere and Wildcard Certificates in Exchange 2010
When migrating to a new Exchange 2010 environment, I decided to use a wildcard certificate instead of a UC certificate. It cost about twice as much, but seeing as how I have several other services that currently require SSL certificates, it seemed like a good investment.
When running through the Exchange Remote Connectivity Analyzer, I noticed that my configuration kept failing the Outlook Anywhere test with the following error:
Testing SSL mutual authentication with the RPC proxy server.
Verification of mutual authentication failed.
> Additional Details
>> The certificate common name *.domain.com doesn't validate against the mutual authentication that was provided: msstd:mail.domain.com
The solution was relatively easy. Log into your Exchange CAS server and run the following cmdlet from the Exchange Command Shell:
Set-OutlookProvider -Identity EXPR -CertPrincipalName *.domain.com
I've seen some documentation that replaced the CertPrincipalName value with msstd:*.domain.com, but I believe that is incorrect. The name on the actual SSL certificate is *.domain.com, not msstd:*.domain.com. For giggles, I did try using msstd:*.domain.com as the CertPrincipalName value, but it did not allow me to pass ExRCA.
Run the Get-OutlookProvider cmdlet to review your settings:
RunspaceId : 841d7d59-e89c-42b4-9c3c-9388d40dcd95
CertPrincipalName : *.domain.com
Server :
TTL : 1
OutlookProviderFlags : None
AdminDisplayName :
ExchangeVersion : 0.1 (8.0.535.0)
Name : EXPR
DistinguishedName : CN=EXPR,CN=Outlook,CN=AutoDiscover,CN=Client Access,CN=A
pex Digital Solutions,CN=Microsoft Exchange,CN=Services,
CN=Configuration,DC=domain,DC=com
Identity : EXPR
Guid : d81b1280-1843-4808-812c-48375ed744e0
ObjectCategory : domain.com/Configuration/Schema/ms-Exch-Auto-Discove
r-Config
ObjectClass : {top, msExchAutoDiscoverConfig}
WhenChanged : 11/5/2010 11:53:39 AM
WhenCreated : 1/30/2009 9:23:30 PM
WhenChangedUTC : 11/5/2010 3:53:39 PM
WhenCreatedUTC : 1/31/2009 2:23:30 AM
OrganizationId :
OriginatingServer : mydc03.domain.com
IsValid : True
When running through the Exchange Remote Connectivity Analyzer, I noticed that my configuration kept failing the Outlook Anywhere test with the following error:
Testing SSL mutual authentication with the RPC proxy server.
Verification of mutual authentication failed.
> Additional Details
>> The certificate common name *.domain.com doesn't validate against the mutual authentication that was provided: msstd:mail.domain.com
The solution was relatively easy. Log into your Exchange CAS server and run the following cmdlet from the Exchange Command Shell:
Set-OutlookProvider -Identity EXPR -CertPrincipalName *.domain.com
I've seen some documentation that replaced the CertPrincipalName value with msstd:*.domain.com, but I believe that is incorrect. The name on the actual SSL certificate is *.domain.com, not msstd:*.domain.com. For giggles, I did try using msstd:*.domain.com as the CertPrincipalName value, but it did not allow me to pass ExRCA.
Run the Get-OutlookProvider cmdlet to review your settings:
RunspaceId : 841d7d59-e89c-42b4-9c3c-9388d40dcd95
CertPrincipalName : *.domain.com
Server :
TTL : 1
OutlookProviderFlags : None
AdminDisplayName :
ExchangeVersion : 0.1 (8.0.535.0)
Name : EXPR
DistinguishedName : CN=EXPR,CN=Outlook,CN=AutoDiscover,CN=Client Access,CN=A
pex Digital Solutions,CN=Microsoft Exchange,CN=Services,
CN=Configuration,DC=domain,DC=com
Identity : EXPR
Guid : d81b1280-1843-4808-812c-48375ed744e0
ObjectCategory : domain.com/Configuration/Schema/ms-Exch-Auto-Discove
r-Config
ObjectClass : {top, msExchAutoDiscoverConfig}
WhenChanged : 11/5/2010 11:53:39 AM
WhenCreated : 1/30/2009 9:23:30 PM
WhenChangedUTC : 11/5/2010 3:53:39 PM
WhenCreatedUTC : 1/31/2009 2:23:30 AM
OrganizationId :
OriginatingServer : mydc03.domain.com
IsValid : True
Thursday, November 4, 2010
Fun with PIX, Part Deux
After getting my PIX to boot in my previous post, I decided to run through the password recovery procedures.
What you'll need:
What you'll need:
- PIX recovery images (availble from either the Cisco site individually or here in one ZIP file)
- PIX firewall software version
- TFTP server software (I used the TFTP server included in the PacketTrap pt360 Suite in this exercise)
- Terminal Emulator (I typically use PuTTY)
Steps:
- Connect Ethernet 0 on the PIX to your local LAN.
- Open a command prompt and run ipconfig to determine your computer's IP address.
- Download PIX recovery images to a directory on your computer (such as C:\tftp).
- Point your TFTP server to the download directory containing your tools.
- With a console cable attached and terminal emulator running, power on the PIX firewall.
- Note the version of the PIX firewall software. If you missed the boot sequence, you can type sh ver at the prompt. The firewall software version will normally be the first line returned:
Cisco PIX Firewall Version 6.3(5)
Cisco PIX Device Manager Version 3.0(4)
In this case, the number you need is "Cisco PIX Firewall Version." - Power off the PIX.
- Power on the PIX.
- After the startup messages appear, press ESC or send a BREAK command. Note: If you do it too early, you'll get a testing/diagnostic menu. To continue the boot process, type C. A successful BREAK command should leave you at the monitor> prompt.
- Type int e0 and press ENTER.
- Type addr a.b.c.d and press ENTER (where a.b.c.d is an IP address you want to assign to the PIX. To reduce troubleshooting, choose an address on the same network as your the computer you're using).
- Type server w.x.y.z and press ENTER (where w.x.y.z is the IP address of the computer you're using to perform this procedure).
- Type file np[nn].bin (where [nn] is the version number corresponding to the BIN file for password recovery. For example, if your PIX is running version 6.3 of the firewall software, enter np63.bin).
- Type tftp and press ENTER.
- When prompted, type Y to erase the passwords.
- If prompted to remove the commands from the configuration, type Y.
- The device will reboot and will have a blank password.
Fun with PIX, Part I
When meeting with a potential customer the other day, she mentioned that she had a running PIX with an unknown password.
I thought I'd refresh my PIX skills and decided to bust out an old PIX 506E we had sitting in the office. After the unfortunate re-realization that my laptop doesn't have a serial port (and the resulting short jaunt to the computer store to get a USB-to-Serial cable), I consoled into the PIX and turned it on.
My adventure was short-lived, however. While watching the boot-up, I was greeted with a hung firewall:
CISCO SYSTEMS PIX FIREWALL
Embedded BIOS Version 4.3.207 01/02/02 16:12:22.73
Compiled by morlee
32 MB RAM
PCI Device Table.
Bus Dev Func VendID DevID Class Irq
00 00 00 8086 7192 Host Bridge
00 07 00 8086 7110 ISA Bridge
00 07 01 8086 7111 IDE Controller
00 07 02 8086 7112 Serial Bus 9
00 07 03 8086 7113 PCI Bridge
00 0D 00 8086 1209 Ethernet 11
00 0E 00 8086 1209 Ethernet 10
And that's all she wrote.
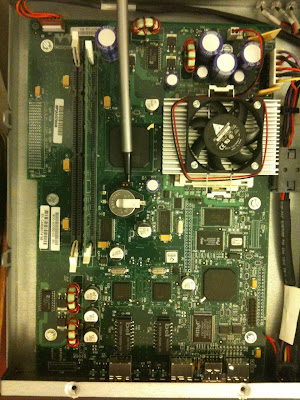
3. Locate the J5 jumper. It should be right next to the CMOS battery. Move it over 1 PIN.
4. Power on the device.
5. After unit has booted, power off.
6. Replace cover.
I thought I'd refresh my PIX skills and decided to bust out an old PIX 506E we had sitting in the office. After the unfortunate re-realization that my laptop doesn't have a serial port (and the resulting short jaunt to the computer store to get a USB-to-Serial cable), I consoled into the PIX and turned it on.
My adventure was short-lived, however. While watching the boot-up, I was greeted with a hung firewall:
CISCO SYSTEMS PIX FIREWALL
Embedded BIOS Version 4.3.207 01/02/02 16:12:22.73
Compiled by morlee
32 MB RAM
PCI Device Table.
Bus Dev Func VendID DevID Class Irq
00 00 00 8086 7192 Host Bridge
00 07 00 8086 7110 ISA Bridge
00 07 01 8086 7111 IDE Controller
00 07 02 8086 7112 Serial Bus 9
00 07 03 8086 7113 PCI Bridge
00 0D 00 8086 1209 Ethernet 11
00 0E 00 8086 1209 Ethernet 10
And that's all she wrote.
Fortunately, there's an easy enough work-around.
1. Power off the device.
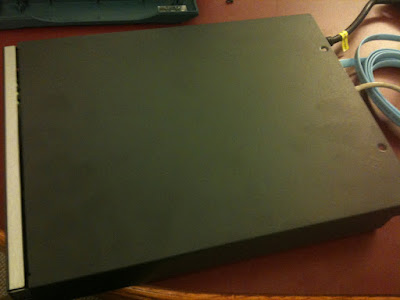
2. Remove the cover. There are two Phillips screws located at the top rear of the unit. The top half slides back about an inch or so and then lifts off.

3. Locate the J5 jumper. It should be right next to the CMOS battery. Move it over 1 PIN.


4. Power on the device.
5. After unit has booted, power off.
6. Replace cover.
Wednesday, October 6, 2010
"Saved-Critical" for Almost-Clustered Virtual Machines in Windows 2008 R2 Hyper-V
While staging a clustered Hyper-V environment this week, I ran into a head-scratching issue. After provisioning a few LUNs, masking them, and adding them as available storage to Failover Clustering, I began setting up the virtual machines on one of my cluster nodes. During maintenance, the physical servers were restarted. When I went back to continue configuring the virtual machines (which were not yet clustered at this point), I connected to the physical host on which I had been configuring them. While my other clustered virtual machines were running fine, the new ones that I had not yet finished configuring were in a "Saved-Critical" state.
I attempted to start them, but received an eror that the saved state could not be restored. I attempted to delete the saved state, but received an "Unable to perform operation" error. Additionally, I could not view the properties of the virtual machines in the Saved-Critical state.
I opened up Failover Cluster manager and noticed that the storage was now owned by the other cluster node. The problem is now obvious--the storage is no longer being presented to the host on which I was configuring the virtual machines. So, how to move these disks? Since the disks are marked "Available" (not having run through the new service Failover Clustering wizard to make the virtual machines highly available), I can't move them by right-clicking on them and selecting a new node.
There is another solution, however, and it involves the cluster.exe command.
1. Open up a command prompt.
2. Run the following command: cluster.exe GROUP "Available Storage" /Move
Voila! The disks moved back to the other node and the virtual machine state in Hyper-V manager changed from "Saved-Critical" to "Off." I was then able to cluster the machines normally through Failover Clustering.
I attempted to start them, but received an eror that the saved state could not be restored. I attempted to delete the saved state, but received an "Unable to perform operation" error. Additionally, I could not view the properties of the virtual machines in the Saved-Critical state.
I opened up Failover Cluster manager and noticed that the storage was now owned by the other cluster node. The problem is now obvious--the storage is no longer being presented to the host on which I was configuring the virtual machines. So, how to move these disks? Since the disks are marked "Available" (not having run through the new service Failover Clustering wizard to make the virtual machines highly available), I can't move them by right-clicking on them and selecting a new node.
There is another solution, however, and it involves the cluster.exe command.
1. Open up a command prompt.
2. Run the following command: cluster.exe GROUP "Available Storage" /Move
Voila! The disks moved back to the other node and the virtual machine state in Hyper-V manager changed from "Saved-Critical" to "Off." I was then able to cluster the machines normally through Failover Clustering.
Monday, September 20, 2010
Outlook 2007 Continuously Prompting for POP3 Credentials
Recently, I had a customer running Outlook 2007 on Windows 7 that experienced a condition I like to refer to as "the dreaded attack of the authentication dialog box." She was connecting to a POP3 server and had the "Save password" box checked, but during every Send/Receive session, would get prompted twice for credentials.
The solution was simple, but elusive.
1. Close Outlook.
2. Open Windows Explorer.
3. Tools > Folder Options > View; click "Show hidden files, folders, and drives."
4. Deselect "Hid protected operating system files (Recommended)" and click OK.
5. Navigate to %USERPROFILE%\AppData\Roaming\Microsoft\Protect.
6. Rename the folder S-1-5-21- to S-1-5-21--old.
7. Rename the file CREDHIST to CREDHIST-old.
8. Restart.
9. Launch Outlook, enter credentials when prompted, and click Save Password.
The solution was simple, but elusive.
1. Close Outlook.
2. Open Windows Explorer.
3. Tools > Folder Options > View; click "Show hidden files, folders, and drives."
4. Deselect "Hid protected operating system files (Recommended)" and click OK.
5. Navigate to %USERPROFILE%\AppData\Roaming\Microsoft\Protect.
6. Rename the folder S-1-5-21-
7. Rename the file CREDHIST to CREDHIST-old.
8. Restart.
9. Launch Outlook, enter credentials when prompted, and click Save Password.
Tuesday, September 7, 2010
General Authentication Failed when using IMAP over SSL on Exchange 2010
Ran into an interesting certificate issue with Exchange 2010 and wildcard certificates.
I had installed a wildcard certificate for our domain on an Exchange 2010 server (just like I had previously for Exchange 2007) and enabled the IMAP service (Microsoft Exchange IMAP4 is the Exchange 2010 name of the service). However, when running the Enable-ExchangeCertificate cmdlet, I received an error enabling the wildcard certificate for IMAP services.
I eventually stumbled across this KB Article, Certificates that contain wildcard characters may not work correctly on an Exchange 2007 Service Pack 1-based server. When I ran the Get-ImapSettings cmdlet, I received the following output:
UnencryptedorTLSBindings SSLBindings LoginType X509CertificateName
------------------------ ----------- --------- -------------------
{:::143, 0.0.0.0:143} {:::993, 0.0.0.0:993} SecureLogin myservername
According to the KB, this is due to a problem with the way the cmdlet generates the X.509 certificate name. It can't interpret the wildcard character correctly, so it says that the FQDN of your server is just the NetBIOS name of your server. Oops. Exchange 2007 SP1 Roll-Up 4 is supposed to fix this behavior, but I experienced it on an Exchange 2010 server that was updated to current before deploying the certificate.
After I updated the X.509 Certificate name (using the command Set-ImapSettings -X509CertificateName "myserver.mydomain.com"), I restarted the IMAP service.
To make sure everything was working, I configured an Outlook profile with the IMAP settings of my test mailbox. When I clicked the "Test Connection" button, I was greeted with yet another error:
The answer, was, in fact, in the output of the Get-ImapSettings cmdlet that I previously ran. Apparently, it was looking for a secure login method. However, in most SSL-enabled configurations, data is submitted in clear text through the SSL tunnel. To test my theory, I ran the command Set-ImapSettings -LoginType PlainTextlogin and restarted the IMAP service again. In my Outlook client, I clicked the "Test Connection" button again and all was right with the world.
I had installed a wildcard certificate for our domain on an Exchange 2010 server (just like I had previously for Exchange 2007) and enabled the IMAP service (Microsoft Exchange IMAP4 is the Exchange 2010 name of the service). However, when running the Enable-ExchangeCertificate cmdlet, I received an error enabling the wildcard certificate for IMAP services.
I eventually stumbled across this KB Article, Certificates that contain wildcard characters may not work correctly on an Exchange 2007 Service Pack 1-based server. When I ran the Get-ImapSettings cmdlet, I received the following output:
UnencryptedorTLSBindings SSLBindings LoginType X509CertificateName
------------------------ ----------- --------- -------------------
{:::143, 0.0.0.0:143} {:::993, 0.0.0.0:993} SecureLogin myservername
According to the KB, this is due to a problem with the way the cmdlet generates the X.509 certificate name. It can't interpret the wildcard character correctly, so it says that the FQDN of your server is just the NetBIOS name of your server. Oops. Exchange 2007 SP1 Roll-Up 4 is supposed to fix this behavior, but I experienced it on an Exchange 2010 server that was updated to current before deploying the certificate.
After I updated the X.509 Certificate name (using the command Set-ImapSettings -X509CertificateName "myserver.mydomain.com"), I restarted the IMAP service.
To make sure everything was working, I configured an Outlook profile with the IMAP settings of my test mailbox. When I clicked the "Test Connection" button, I was greeted with yet another error:
Log on to incoming mail server (IMAP): General authentication failed. None of the authentication methods supported by your IMAP server (if any) are supported on this computer.
The answer, was, in fact, in the output of the Get-ImapSettings cmdlet that I previously ran. Apparently, it was looking for a secure login method. However, in most SSL-enabled configurations, data is submitted in clear text through the SSL tunnel. To test my theory, I ran the command Set-ImapSettings -LoginType PlainTextlogin and restarted the IMAP service again. In my Outlook client, I clicked the "Test Connection" button again and all was right with the world.
Thursday, April 15, 2010
Emailreg.org is a scam
Barracuda ... The mere mention of their name strikes fear in the hearts of any email admin unlucky enough to have to do relay mail through one of their devices.
One of my customers today submitted a ticket with problems relaying mail to one of their customers using a Barracuda device. My customer's relay responds with this message:
Ah, yes, the Barracuda Black List. Clicking on the link they provide takes you do a page where they tell you, "Sorry, your email was blocked....Barracuda Networks is not attempting to block your individual emails in particular. The repuation systemed uses automated algorithms for determining its results -- very similar to the anti-fraud mechanisms used for credit cards."
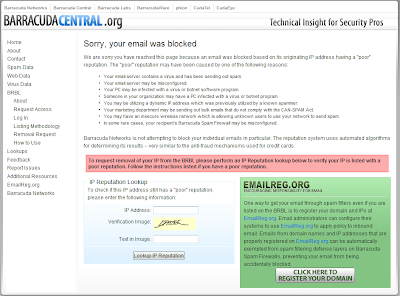
Yeah, whatever. You can put any IP address in the URL, and it will give you the same message for each one. It's a generic page they use to try to get you to buy into their Emailreg.org scam.
Clicking on the "Click here to register your domain" link and you have the ability to sign up and register your domains. Sounds great, right? Except for the $20 USD fee per domain registered.
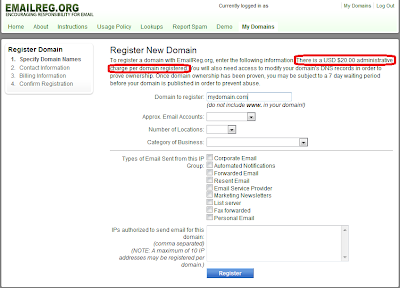
For a while, Barracuda Networks denied that they had anything to do with Emailreg.org and said that they only used the list provided there to help determine what mail was spam. And, if you queried emailreg.org for the WHOIS information, it's obscured, so it's hard to know:
Domain ID:D152388600-LROR
Domain Name:EMAILREG.ORG
Created On:12-Apr-2008 21:40:49 UTC
Last Updated On:14-Mar-2010 12:46:16 UTC
Expiration Date:12-Apr-2011 21:40:49 UTC
Sponsoring Registrar:eNom, Inc. (R39-LROR)
Status:CLIENT TRANSFER PROHIBITED
Registrant ID:77b4c5687ae40560
Registrant Name:Whois Agent
Registrant Organization:Whois Privacy Protection Service, Inc.
Registrant Street1:PMB 368, 14150 NE 20th St - F1
Registrant Street2:
Registrant Street3:
Registrant City:Bellevue
Registrant State/Province:WA
Registrant Postal Code:98007
Registrant Country:US
Registrant Phone:+1.4252740657
Registrant Phone Ext.:
Registrant FAX:
Registrant FAX Ext.:
Registrant Email:tsbnwxhk@whoisprivacyprotect.com
Admin ID:77b4c5687ae40560
Admin Name:Whois Agent
Admin Organization:Whois Privacy Protection Service, Inc.
Admin Street1:PMB 368, 14150 NE 20th St - F1
Admin Street2:
Admin Street3:
Admin City:Bellevue
Admin State/Province:WA
Admin Postal Code:98007
Admin Country:US
Admin Phone:+1.4252740657
Admin Phone Ext.:
Admin FAX:
Admin FAX Ext.:
Admin Email:tsbnwxhk@whoisprivacyprotect.com
Tech ID:77b4c5687ae40560
Tech Name:Whois Agent
Tech Organization:Whois Privacy Protection Service, Inc.
Tech Street1:PMB 368, 14150 NE 20th St - F1
Tech Street2:
Tech Street3:
Tech City:Bellevue
Tech State/Province:WA
Tech Postal Code:98007
Tech Country:US
Tech Phone:+1.4252740657
Tech Phone Ext.:
Tech FAX:
Tech FAX Ext.:
Tech Email:tsbnwxhk@whoisprivacyprotect.com
Name Server:NS2.MYDYNDNS.ORG
Name Server:NS1.MYDYNDNS.ORG
Name Server:NS3.MYDYNDNS.ORG
Name Server:NS4.MYDYNDNS.ORG
Name Server:NS5.MYDYNDNS.ORG
Name Server:
Name Server:
Name Server:
Name Server:
Name Server:
Name Server:
Name Server:
Name Server:
DNSSEC:Unsigned
But alas, IP address information is not hidden from ARIN:
Network Information for: 64.235.146.64
--------------------------------------------------------------
OrgName: Barracuda Networks, Inc.
OrgID: BARRA-7
Address: 3175 S. Winchester Blvd
City: Campbell
StateProv: CA
PostalCode: 95008
Country: US
NetRange: 64.235.144.0 - 64.235.159.255
CIDR: 64.235.144.0/20
OriginAS: AS15324
NetName: BARRAUCDA
NetHandle: NET-64-235-144-0-1
Parent: NET-64-0-0-0-0
NetType: Direct Assignment
NameServer: NS1.P23.DYNECT.NET
NameServer: NS2.P23.DYNECT.NET
NameServer: NS3.P23.DYNECT.NET
NameServer: NS4.P23.DYNECT.NET
Comment: http://www.barracuda.com/
RegDate: 2006-10-31
Updated: 2010-03-04
RAbuseHandle: BARRA1-ARIN
RAbuseName: Barracuda Hostmaster
RAbusePhone: +1-408-342-5400
RAbuseEmail: hostmaster@barracuda.com
RNOCHandle: BARRA1-ARIN
RNOCName: Barracuda Hostmaster
RNOCPhone: +1-408-342-5400
RNOCEmail: hostmaster@barracuda.com
RTechHandle: BARRA1-ARIN
RTechName: Barracuda Hostmaster
RTechPhone: +1-408-342-5400
RTechEmail: hostmaster@barracuda.com
OrgTechHandle: BARRA1-ARIN
OrgTechName: Barracuda Hostmaster
OrgTechPhone: +1-408-342-5400
OrgTechEmail: hostmaster@barracuda.com
# ARIN WHOIS database, last updated 2010-04-14 20:00
# Enter ? for additional hints on searching ARIN's WHOIS database.
#
# ARIN WHOIS data and services are subject to the Terms of Use
# available at https://www.arin.net/whois_tou.html
Sneaky. But, that's the way Barracuda is.
Thankfully, there's another way, although Barracuda devices may or may not look at it (I've not confirmed it either way). The method is called Sender Policy Framework, and it's free. The Sender Policy Framework relies on a DNS record to check which hosts are "permitted" to send email for a particular domain. Check out http://www.openspf.org for a wizard to help create your SPF record.
One of my customers today submitted a ticket with problems relaying mail to one of their customers using a Barracuda device. My customer's relay responds with this message:
#554 Service unavailable; Client host [XXXXXXXXXX.XXXXXXX.XXX] blocked using Barracuda Reputation; http://bbl.barracudacentral.com/q.cgi?ip=XXX.XXX.XXX.XXX ##
Ah, yes, the Barracuda Black List. Clicking on the link they provide takes you do a page where they tell you, "Sorry, your email was blocked....Barracuda Networks is not attempting to block your individual emails in particular. The repuation systemed uses automated algorithms for determining its results -- very similar to the anti-fraud mechanisms used for credit cards."

Yeah, whatever. You can put any IP address in the URL, and it will give you the same message for each one. It's a generic page they use to try to get you to buy into their Emailreg.org scam.
Clicking on the "Click here to register your domain" link and you have the ability to sign up and register your domains. Sounds great, right? Except for the $20 USD fee per domain registered.

For a while, Barracuda Networks denied that they had anything to do with Emailreg.org and said that they only used the list provided there to help determine what mail was spam. And, if you queried emailreg.org for the WHOIS information, it's obscured, so it's hard to know:
Domain ID:D152388600-LROR
Domain Name:EMAILREG.ORG
Created On:12-Apr-2008 21:40:49 UTC
Last Updated On:14-Mar-2010 12:46:16 UTC
Expiration Date:12-Apr-2011 21:40:49 UTC
Sponsoring Registrar:eNom, Inc. (R39-LROR)
Status:CLIENT TRANSFER PROHIBITED
Registrant ID:77b4c5687ae40560
Registrant Name:Whois Agent
Registrant Organization:Whois Privacy Protection Service, Inc.
Registrant Street1:PMB 368, 14150 NE 20th St - F1
Registrant Street2:
Registrant Street3:
Registrant City:Bellevue
Registrant State/Province:WA
Registrant Postal Code:98007
Registrant Country:US
Registrant Phone:+1.4252740657
Registrant Phone Ext.:
Registrant FAX:
Registrant FAX Ext.:
Registrant Email:tsbnwxhk@whoisprivacyprotect.com
Admin ID:77b4c5687ae40560
Admin Name:Whois Agent
Admin Organization:Whois Privacy Protection Service, Inc.
Admin Street1:PMB 368, 14150 NE 20th St - F1
Admin Street2:
Admin Street3:
Admin City:Bellevue
Admin State/Province:WA
Admin Postal Code:98007
Admin Country:US
Admin Phone:+1.4252740657
Admin Phone Ext.:
Admin FAX:
Admin FAX Ext.:
Admin Email:tsbnwxhk@whoisprivacyprotect.com
Tech ID:77b4c5687ae40560
Tech Name:Whois Agent
Tech Organization:Whois Privacy Protection Service, Inc.
Tech Street1:PMB 368, 14150 NE 20th St - F1
Tech Street2:
Tech Street3:
Tech City:Bellevue
Tech State/Province:WA
Tech Postal Code:98007
Tech Country:US
Tech Phone:+1.4252740657
Tech Phone Ext.:
Tech FAX:
Tech FAX Ext.:
Tech Email:tsbnwxhk@whoisprivacyprotect.com
Name Server:NS2.MYDYNDNS.ORG
Name Server:NS1.MYDYNDNS.ORG
Name Server:NS3.MYDYNDNS.ORG
Name Server:NS4.MYDYNDNS.ORG
Name Server:NS5.MYDYNDNS.ORG
Name Server:
Name Server:
Name Server:
Name Server:
Name Server:
Name Server:
Name Server:
Name Server:
DNSSEC:Unsigned
But alas, IP address information is not hidden from ARIN:
Network Information for: 64.235.146.64
--------------------------------------------------------------
OrgName: Barracuda Networks, Inc.
OrgID: BARRA-7
Address: 3175 S. Winchester Blvd
City: Campbell
StateProv: CA
PostalCode: 95008
Country: US
NetRange: 64.235.144.0 - 64.235.159.255
CIDR: 64.235.144.0/20
OriginAS: AS15324
NetName: BARRAUCDA
NetHandle: NET-64-235-144-0-1
Parent: NET-64-0-0-0-0
NetType: Direct Assignment
NameServer: NS1.P23.DYNECT.NET
NameServer: NS2.P23.DYNECT.NET
NameServer: NS3.P23.DYNECT.NET
NameServer: NS4.P23.DYNECT.NET
Comment: http://www.barracuda.com/
RegDate: 2006-10-31
Updated: 2010-03-04
RAbuseHandle: BARRA1-ARIN
RAbuseName: Barracuda Hostmaster
RAbusePhone: +1-408-342-5400
RAbuseEmail: hostmaster@barracuda.com
RNOCHandle: BARRA1-ARIN
RNOCName: Barracuda Hostmaster
RNOCPhone: +1-408-342-5400
RNOCEmail: hostmaster@barracuda.com
RTechHandle: BARRA1-ARIN
RTechName: Barracuda Hostmaster
RTechPhone: +1-408-342-5400
RTechEmail: hostmaster@barracuda.com
OrgTechHandle: BARRA1-ARIN
OrgTechName: Barracuda Hostmaster
OrgTechPhone: +1-408-342-5400
OrgTechEmail: hostmaster@barracuda.com
# ARIN WHOIS database, last updated 2010-04-14 20:00
# Enter ? for additional hints on searching ARIN's WHOIS database.
#
# ARIN WHOIS data and services are subject to the Terms of Use
# available at https://www.arin.net/whois_tou.html
Sneaky. But, that's the way Barracuda is.
Thankfully, there's another way, although Barracuda devices may or may not look at it (I've not confirmed it either way). The method is called Sender Policy Framework, and it's free. The Sender Policy Framework relies on a DNS record to check which hosts are "permitted" to send email for a particular domain. Check out http://www.openspf.org for a wizard to help create your SPF record.
Thursday, February 11, 2010
Troubleshooting WinSXS (Side-by-Side) problems
While attempting to run a newly-installed OmniPage Pro 17 on a Windows 2008 x64 machine, I received a cryptic and frustrating error:
The application has failed to start because its side-by-side configuration is incorrect. Please see the application log for more details.
So, what do I do? I try re-running it. I try removing and reinstalling it. I run a repair from the Programs and Features Control Panel Applet. Nothing seems to be yielding any results.
So, I decide to check out the Application Log, like the dialog box suggested.
The Application Event Log has a little more detail about what's missing:
Activation context generation failed for "C:\Program Files (x86)\Nuance\OmniPage17\OmniPage17.exe". Dependent Assembly Microsoft.VC80.MFC,processorArchitecture="x86",publicKeyToken="1fc8b3b9a1e18e3b",type="win32",version="8.0.50727.762" could not be found. Please use sxstrace.exe for detailed diagnosis.
So, I crack open a command prompt and run the following command:
sxstrace trace -logfile:omnipage.etl
The system returns the following message:
Tracing started. Trace will be saved to file omnipage.etl.
Press Enter to stop tracing...
I launch the application again, generate the error, tab back to the command prompt window, and then press Enter to stop tracing.
You can try to read the trace file, but it's not going to do you any good. You need to convert it to human-readable form with the following command:
sxstrace parse -logfile:omnipage.etl -outfile:omnipage.txt
After a few moments, you should receive a notification that it's complete:
Parsing log file omnipage.etl...
Parsing finished! Output saved to file omnipage.txt.
At that point, you can open up the result file (omnipage.txt in my case) to get a detailed analysis of what is wrong.
=================
Begin Activation Context Generation.
Input Parameter:
Flags = 0
ProcessorArchitecture = Wow32
CultureFallBacks = en-US;en
ManifestPath = C:\Program Files (x86)\Nuance\OmniPage17\OmniPage17.exe
AssemblyDirectory = C:\Program Files (x86)\Nuance\OmniPage17\
Application Config File =
-----------------
INFO: Parsing Manifest File C:\Program Files (x86)\Nuance\OmniPage17\OmniPage17.exe.
INFO: Manifest Definition Identity is (null).
INFO: Reference: Microsoft.VC80.CRT,processorArchitecture="x86",publicKeyToken="1fc8b3b9a1e18e3b",type="win32",version="8.0.50727.762"
INFO: Reference: Microsoft.VC80.MFC,processorArchitecture="x86",publicKeyToken="1fc8b3b9a1e18e3b",type="win32",version="8.0.50727.762"
INFO: Reference: Microsoft.Windows.Common-Controls,language="*",processorArchitecture="x86",publicKeyToken="6595b64144ccf1df",type="win32",version="6.0.0.0"
INFO: Resolving reference Microsoft.VC80.CRT,processorArchitecture="x86",publicKeyToken="1fc8b3b9a1e18e3b",type="win32",version="8.0.50727.762".
INFO: Resolving reference for ProcessorArchitecture WOW64.
INFO: Resolving reference for culture Neutral.
INFO: Applying Binding Policy.
INFO: No publisher policy found.
INFO: No binding policy redirect found.
INFO: Begin assembly probing.
INFO: Did not find the assembly in WinSxS.
INFO: Attempt to probe manifest at C:\Windows\assembly\GAC_32\Microsoft.VC80.CRT\8.0.50727.762__1fc8b3b9a1e18e3b\Microsoft.VC80.CRT.DLL.
INFO: Did not find manifest for culture Neutral.
INFO: End assembly probing.
The long and short of it is that OmniPage is looking for some C++ components that it can't find in the program files directory or the SxS manifest. Specifically, it can't find the x86 platform version of the C++ components. So, I download and install the Visual Studio 2005 C++ Redistributable package (which the application vendor should have bundled), and the problem is resolved.
You can download the components here:
Microsoft Visual C++ 2005 SP1 Redistributable Package (x86)
Microsoft Visual C++ 2005 SP1 Redistributable Package (x64)
The application has failed to start because its side-by-side configuration is incorrect. Please see the application log for more details.
So, what do I do? I try re-running it. I try removing and reinstalling it. I run a repair from the Programs and Features Control Panel Applet. Nothing seems to be yielding any results.
So, I decide to check out the Application Log, like the dialog box suggested.
The Application Event Log has a little more detail about what's missing:
Activation context generation failed for "C:\Program Files (x86)\Nuance\OmniPage17\OmniPage17.exe". Dependent Assembly Microsoft.VC80.MFC,processorArchitecture="x86",publicKeyToken="1fc8b3b9a1e18e3b",type="win32",version="8.0.50727.762" could not be found. Please use sxstrace.exe for detailed diagnosis.
So, I crack open a command prompt and run the following command:
sxstrace trace -logfile:omnipage.etl
The system returns the following message:
Tracing started. Trace will be saved to file omnipage.etl.
Press Enter to stop tracing...
I launch the application again, generate the error, tab back to the command prompt window, and then press Enter to stop tracing.
You can try to read the trace file, but it's not going to do you any good. You need to convert it to human-readable form with the following command:
sxstrace parse -logfile:omnipage.etl -outfile:omnipage.txt
After a few moments, you should receive a notification that it's complete:
Parsing log file omnipage.etl...
Parsing finished! Output saved to file omnipage.txt.
At that point, you can open up the result file (omnipage.txt in my case) to get a detailed analysis of what is wrong.
=================
Begin Activation Context Generation.
Input Parameter:
Flags = 0
ProcessorArchitecture = Wow32
CultureFallBacks = en-US;en
ManifestPath = C:\Program Files (x86)\Nuance\OmniPage17\OmniPage17.exe
AssemblyDirectory = C:\Program Files (x86)\Nuance\OmniPage17\
Application Config File =
-----------------
INFO: Parsing Manifest File C:\Program Files (x86)\Nuance\OmniPage17\OmniPage17.exe.
INFO: Manifest Definition Identity is (null).
INFO: Reference: Microsoft.VC80.CRT,processorArchitecture="x86",publicKeyToken="1fc8b3b9a1e18e3b",type="win32",version="8.0.50727.762"
INFO: Reference: Microsoft.VC80.MFC,processorArchitecture="x86",publicKeyToken="1fc8b3b9a1e18e3b",type="win32",version="8.0.50727.762"
INFO: Reference: Microsoft.Windows.Common-Controls,language="*",processorArchitecture="x86",publicKeyToken="6595b64144ccf1df",type="win32",version="6.0.0.0"
INFO: Resolving reference Microsoft.VC80.CRT,processorArchitecture="x86",publicKeyToken="1fc8b3b9a1e18e3b",type="win32",version="8.0.50727.762".
INFO: Resolving reference for ProcessorArchitecture WOW64.
INFO: Resolving reference for culture Neutral.
INFO: Applying Binding Policy.
INFO: No publisher policy found.
INFO: No binding policy redirect found.
INFO: Begin assembly probing.
INFO: Did not find the assembly in WinSxS.
INFO: Attempt to probe manifest at C:\Windows\assembly\GAC_32\Microsoft.VC80.CRT\8.0.50727.762__1fc8b3b9a1e18e3b\Microsoft.VC80.CRT.DLL.
INFO: Did not find manifest for culture Neutral.
INFO: End assembly probing.
The long and short of it is that OmniPage is looking for some C++ components that it can't find in the program files directory or the SxS manifest. Specifically, it can't find the x86 platform version of the C++ components. So, I download and install the Visual Studio 2005 C++ Redistributable package (which the application vendor should have bundled), and the problem is resolved.
You can download the components here:
Microsoft Visual C++ 2005 SP1 Redistributable Package (x86)
Microsoft Visual C++ 2005 SP1 Redistributable Package (x64)
Tuesday, February 2, 2010
How to enable Outlook Logging
From time to time, we get customers complaining about Outlook POP3/SMTP problems. 99% of the time, the customer has configured Outlook incorrectly (wrong username/password, wrong server, wrong ports, etc). Enabling Outlook logging can help you make the most of your troubleshooting session.
To turn on Outlook logging:
1. Launch Outlook.
2. Navigate to Tools > Options.
3. Click the Other tab.
4. Under the General section, click the Advanced Options button.
5. Place a checkmark in the Enable logging checkbox.
6. Click OK three times, acknowledging that the settings will take effect next time you start Outlook.
7. Restart Outlook.
8. Retry the action that was causing the problem.
Now, where to find this elusive logfile?
If you're running Outlook 2000, 2002/XP, or 2003 on Windows 2000, 2003, or XP:
C:\Documents and Settings\%username%\Local Settings\Temp\OPMLOG.LOG.
If you're running Outlook 2007 on Windows 2000, 2003, or XP:
C:\Documents and Settings\%username%\Local Settings\Temp\Outlook Logging\OPMLOG.LOG.
If you're running Outlook 2007 on Windows Vista, Windows 7, or Windows 2008:
C:\Users\%username%\AppData\Local\Temp\Outlook Logging\OPMLOG.LOG.
For more information, check out the following Microsoft articles:
What is the Enable logging (troubleshooting) option?
How to enable transport logging in Outlook
To turn on Outlook logging:
1. Launch Outlook.
2. Navigate to Tools > Options.
3. Click the Other tab.
4. Under the General section, click the Advanced Options button.
5. Place a checkmark in the Enable logging checkbox.
6. Click OK three times, acknowledging that the settings will take effect next time you start Outlook.
7. Restart Outlook.
8. Retry the action that was causing the problem.
Now, where to find this elusive logfile?
If you're running Outlook 2000, 2002/XP, or 2003 on Windows 2000, 2003, or XP:
C:\Documents and Settings\%username%\Local Settings\Temp\OPMLOG.LOG.
If you're running Outlook 2007 on Windows 2000, 2003, or XP:
C:\Documents and Settings\%username%\Local Settings\Temp\Outlook Logging\OPMLOG.LOG.
If you're running Outlook 2007 on Windows Vista, Windows 7, or Windows 2008:
C:\Users\%username%\AppData\Local\Temp\Outlook Logging\OPMLOG.LOG.
For more information, check out the following Microsoft articles:
What is the Enable logging (troubleshooting) option?
How to enable transport logging in Outlook
Sunday, January 10, 2010
Installing Data Protection Manager 2007 on a Dell NX3000
Dell has this great NAS device that runs Windows 2008 Storage Server Standard--the NX3000. The only problem is that Dell treats it like an "appliance," meaning you can't partition it the way you want. I recently ordered two with 6x1TB drives and wanted to deploy DPM to them. Unfortunately, Dell's RAID1/RAID5 combo doesn't make very good use of the available storage. I wanted to be able to use most of the space for DPM storage, so I needed to re-set it up from scratch.
Dell only provides "recovery" media (an image as opposed to install media), so you need to obtain the Windows 2008 Storage Server media on your own (such as from MSDN). Note: Dell's recovery media will not work if the disk configuration if the first two drives are not in a mirror set.
I spent two days figuring it out so you don't have to.
Once you have the media, here are the steps to get it set up completely:
1. Download all of the drivers from the Dell Support Site and save them to a USB stick.
2. Install from Windows Storage Server 2008 media. Be sure to select the edition (if installing from media with multiple editions) that matches the WSS key on the system chassis). Use the WSS key on the chassis for installation.
3. Install drivers from USB stick.
4. Log in to server with username administrator, password wSS2008!. This would be the only OS I've ever installed with a pre-configured administrator password.
5. Install Dell OpenManage software from Dell System Build DVD.
6. Restart.
7. Add Web Server role and add all role services (except FTP).
8. Open command prompt and run start /wait ocsetup.exe SIS-Limited /norestart.
9. Run Windows Update and install all available updates to bring current.
10. Restart.
11. From System Center Data Protection Manager DVD, navigate to SQL2005 installation directory.
12. Run Setup to install SQL 2005.
13. Select Database, Reporting Services, and Workstation/Client components. Ensure all sub-items are selected by clicking "Advanced" button and expanding each component.
14. Specify an instance name of MS$DPM2007$.
15. On the Service Account page, select the Customize for each service check box and configure as follows:
a. Select Customize for each service account.
b. In the Service box, select SQL Server.
c. Select Use the built-in System account, then select Local System account.
d. In the Service box, select SQL Server Agent.
e. Select Use the built-in System account, then select Local System account.
f. In the Service box, select Reporting Services.
g. Select Use the built-in System account, and then select the Network service account.
h. In the Service box, select SQL Browser.
i. Select Use the built-in System account, then select Local Service account.
16. Accept defaults for the rest of the SQL 2005 installation.
17. Open the Internet Services Manager (Windows 2008 version).
18. Expand Web Sites, expand Default Web Site, and then click the virtual directory for the report server.
19. Under Features View, double-click Handler Mappings.
20. Under Actions, click Edit Feature Permissions.
21. Click to select the Scripts check box, and then click OK.
22. Close Internet Services Manager.
23. Open Services applet.
24. Stop all SQL services.
25. Run SQL 2005 SP2 setup.
26. Restart.
27. Launch System Center Data Protection Manager 2007 setup.
28. Select the local database instance (MS$DPM2007$).
29. Enter a strong password for the DPM account.
30. Complete setup, accepting all defaults.
31. Restart.
32. Download and install DPM 2007 SP1.
33. Restart.
34. Download and install most recent hotfixes from http://support.microsoft.com/kb/961659/EN-US.
35. Call 1-888-571-2048 (if in USA) to activate WSS by phone (online activation will most likely not work in this instance; you will need to speak to a representative).
Good luck!
Dell only provides "recovery" media (an image as opposed to install media), so you need to obtain the Windows 2008 Storage Server media on your own (such as from MSDN). Note: Dell's recovery media will not work if the disk configuration if the first two drives are not in a mirror set.
I spent two days figuring it out so you don't have to.
Once you have the media, here are the steps to get it set up completely:
1. Download all of the drivers from the Dell Support Site and save them to a USB stick.
2. Install from Windows Storage Server 2008 media. Be sure to select the edition (if installing from media with multiple editions) that matches the WSS key on the system chassis). Use the WSS key on the chassis for installation.
3. Install drivers from USB stick.
4. Log in to server with username administrator, password wSS2008!. This would be the only OS I've ever installed with a pre-configured administrator password.
5. Install Dell OpenManage software from Dell System Build DVD.
6. Restart.
7. Add Web Server role and add all role services (except FTP).
8. Open command prompt and run start /wait ocsetup.exe SIS-Limited /norestart.
9. Run Windows Update and install all available updates to bring current.
10. Restart.
11. From System Center Data Protection Manager DVD, navigate to SQL2005 installation directory.
12. Run Setup to install SQL 2005.
13. Select Database, Reporting Services, and Workstation/Client components. Ensure all sub-items are selected by clicking "Advanced" button and expanding each component.
14. Specify an instance name of MS$DPM2007$.
15. On the Service Account page, select the Customize for each service check box and configure as follows:
a. Select Customize for each service account.
b. In the Service box, select SQL Server.
c. Select Use the built-in System account, then select Local System account.
d. In the Service box, select SQL Server Agent.
e. Select Use the built-in System account, then select Local System account.
f. In the Service box, select Reporting Services.
g. Select Use the built-in System account, and then select the Network service account.
h. In the Service box, select SQL Browser.
i. Select Use the built-in System account, then select Local Service account.
16. Accept defaults for the rest of the SQL 2005 installation.
17. Open the Internet Services Manager (Windows 2008 version).
18. Expand Web Sites, expand Default Web Site, and then click the virtual directory for the report server.
19. Under Features View, double-click Handler Mappings.
20. Under Actions, click Edit Feature Permissions.
21. Click to select the Scripts check box, and then click OK.
22. Close Internet Services Manager.
23. Open Services applet.
24. Stop all SQL services.
25. Run SQL 2005 SP2 setup.
26. Restart.
27. Launch System Center Data Protection Manager 2007 setup.
28. Select the local database instance (MS$DPM2007$).
29. Enter a strong password for the DPM account.
30. Complete setup, accepting all defaults.
31. Restart.
32. Download and install DPM 2007 SP1.
33. Restart.
34. Download and install most recent hotfixes from http://support.microsoft.com/kb/961659/EN-US.
35. Call 1-888-571-2048 (if in USA) to activate WSS by phone (online activation will most likely not work in this instance; you will need to speak to a representative).
Good luck!
Tuesday, October 20, 2009
Troubleshooting 0xc0190036 Errors on Windows Vista / Windows 2008
This morning, I found myself in the unfortunate circumstance of the dreaded 0xc0190036 error. There is not a lot of information about this particular error code. It is, in fact, related to inaccessible or corrupt files.
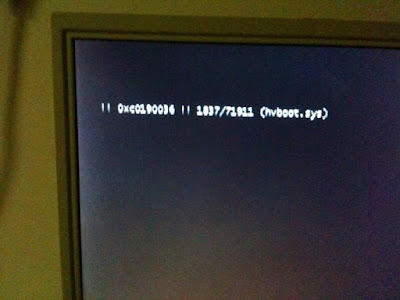
During an update process, many files are flagged for replacement during the next system boot--that way, the system can keep running until the next convenient restart. In this case, however, some of the files are corrupt for whatever reason (bad blocks on hard drive, bad memory causing CRC errors, lots of potential sources). The solution is relatively easy once you know what the problem is.
To repair this problem, you will need:
- Windows Vista or 2008 Boot Media
- USB thumb drive containing
-- disk controller drivers not included on Windows Media
-- replacement for corrupt file
- ImageX (or another way to read the Windows install.wim from either the original media or service pack installation)
ImageX is part of the Windows Automated Installation Kit (WAIK). It's a 1GB download; a few folks have been kind enough to extract the necessary bits and host them. If you are unable to find them, leave a comment and I'll send them to you.
The file listed in the 0xc0190036 error is most likely the corrupt file. The first step is to extract the replacement files using ImageX. In this case, I'm going to be using the Windows 2008 SP2 installation media since it contains the updated file that I need (hvboot.sys).
1. After extracting the ImageX support files, right-click wimfltr.inf and select "Install." This will install the WIM Filter Driver (required to mount WIM files).
2. Create a temporary directory to which the WIM file will be mounted (such as C:\Mounted_Images).
3. Run the command imagex /mount e:\sources\install.wim 1 C:\Mounted_Images to mount image 1 inside the install.wim file to C:\Mounted_Images.
4. Copy the necessary file (in my case, C:\Mounted_Images\Windows\winsxs\amd64_microsoft-hyper-v-drivers_31bf3856ad364e35_6.0.6002.18005_none_c73bce55acf5cb5f\hvboot.sys) to a USB thumb drive.
Next, you'll need to make sure you have the appropriate RAID drivers for your system if they are not included on the Windows media. If you presented driver media during the original Windows installation, you can use that media.
Finally, the repair:
1. Boot to the Windows Vista or 2008 installation media.
2. Attach your USB thumb drive containing the replacement for the corrupt file as well as controller drivers.
3. Select "Repair My Computer."
4. Select "Load drivers" and browse to the drive containing your controller driver (in my case, the USB drive was mounted as C:\).
5. Select the driver from the list presented and click "Add driver."
6. Click Next to go to the repair menu.
7. Select "Command Prompt" to launch a command prompt session.
8. Run chkdsk /F on your system volume (in my case, the system volume had been mounted as E:\, so I ran chkdsk /f e:\).
9. When prompted, dismount the volume so Chkdsk can have exclusive access to it.
10. When Chkdsk is complete, copy the replacement file from your USB thumb drive to the appropriate location on your system drive (since the system volume had been mounted as E:\, I needed to copy hvboot.sys to E:\Windows\system32\drivers).
11. Restart.
If you encounter more c0190036 errors, you can repeat the process for each damaged file.

During an update process, many files are flagged for replacement during the next system boot--that way, the system can keep running until the next convenient restart. In this case, however, some of the files are corrupt for whatever reason (bad blocks on hard drive, bad memory causing CRC errors, lots of potential sources). The solution is relatively easy once you know what the problem is.
To repair this problem, you will need:
- Windows Vista or 2008 Boot Media
- USB thumb drive containing
-- disk controller drivers not included on Windows Media
-- replacement for corrupt file
- ImageX (or another way to read the Windows install.wim from either the original media or service pack installation)
ImageX is part of the Windows Automated Installation Kit (WAIK). It's a 1GB download; a few folks have been kind enough to extract the necessary bits and host them. If you are unable to find them, leave a comment and I'll send them to you.
The file listed in the 0xc0190036 error is most likely the corrupt file. The first step is to extract the replacement files using ImageX. In this case, I'm going to be using the Windows 2008 SP2 installation media since it contains the updated file that I need (hvboot.sys).
1. After extracting the ImageX support files, right-click wimfltr.inf and select "Install." This will install the WIM Filter Driver (required to mount WIM files).
2. Create a temporary directory to which the WIM file will be mounted (such as C:\Mounted_Images).
3. Run the command imagex /mount e:\sources\install.wim 1 C:\Mounted_Images to mount image 1 inside the install.wim file to C:\Mounted_Images.
4. Copy the necessary file (in my case, C:\Mounted_Images\Windows\winsxs\amd64_microsoft-hyper-v-drivers_31bf3856ad364e35_6.0.6002.18005_none_c73bce55acf5cb5f\hvboot.sys) to a USB thumb drive.
Next, you'll need to make sure you have the appropriate RAID drivers for your system if they are not included on the Windows media. If you presented driver media during the original Windows installation, you can use that media.
Finally, the repair:
1. Boot to the Windows Vista or 2008 installation media.
2. Attach your USB thumb drive containing the replacement for the corrupt file as well as controller drivers.
3. Select "Repair My Computer."
4. Select "Load drivers" and browse to the drive containing your controller driver (in my case, the USB drive was mounted as C:\).
5. Select the driver from the list presented and click "Add driver."
6. Click Next to go to the repair menu.
7. Select "Command Prompt" to launch a command prompt session.
8. Run chkdsk /F on your system volume (in my case, the system volume had been mounted as E:\, so I ran chkdsk /f e:\).
9. When prompted, dismount the volume so Chkdsk can have exclusive access to it.
10. When Chkdsk is complete, copy the replacement file from your USB thumb drive to the appropriate location on your system drive (since the system volume had been mounted as E:\, I needed to copy hvboot.sys to E:\Windows\system32\drivers).
11. Restart.
If you encounter more c0190036 errors, you can repeat the process for each damaged file.
Thursday, September 24, 2009
Setting up a Receive Connect for Postini Re-Injection
For any of you that use Postini for email services, setting up reinjection for the receive connectors in Exchange 2007 is a lot more work than allowing connection and relay through a vSMTP server in Exchange 2003.
Exchange 2007 has a lot of great features, such as the uber-powerful Exchange Management Shell. IMHO, Exchange 2007 also has a lot of drawbacks, such as a half-assed GUI. You can only achieve the most basic things through the GUI; anything that requires thought or a little more configuration is done through the cumbersome Exchange Management Shell interface.
To achieve the previously simple task of allowing relay through a vSMTP server, you can go one of two routes. I'm going to document the route that grants least privilege. The MSExchangeTeam blog as well as Technet both have variations on this as well as the Pro's and Con's of using it.
Allow Anonymous Relay
1. Open the Exchange Management Console.
2. Expand Server Configuration > Hub Transport.
3. Select the server in the top pane, and then click New Receive Connector... in the right pane.
4. Enter a name for the connector, such as "Postini Receive Connector," select "Custom" as the intended use for the connector, and click Next.
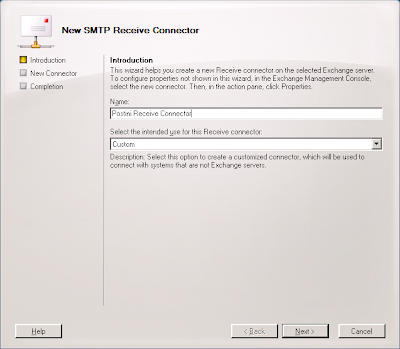
5. Select the "All availble IPv4 addresses" entry and click the Edit... button.
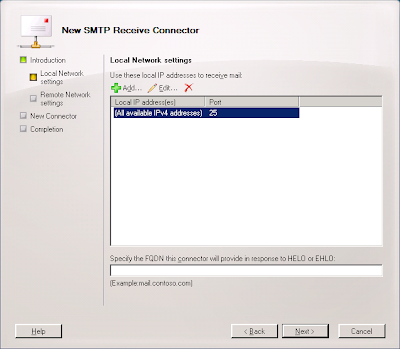
6. Select the "Specify an IP address:" radio button, enter the IP address of the interface that will be communicating with Postini, and click OK.
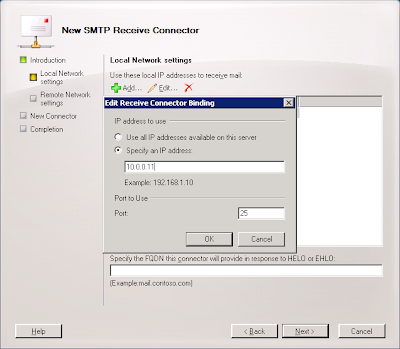
7. Enter the Fully-Qualified Domain Name the connector use to respond to connection attempts (most likely something like mail.mydomain.com) and click Next.
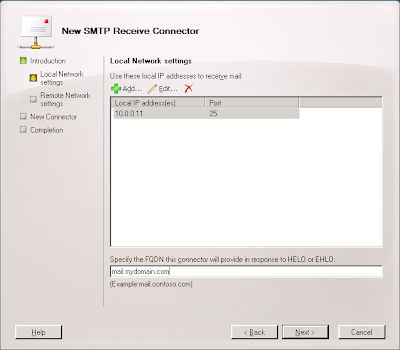
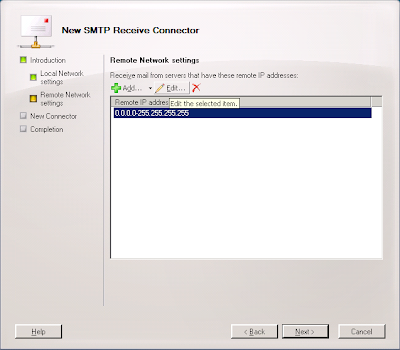
8. Click the 0.0.0.0-255.255.255.255 enter and click Edit....
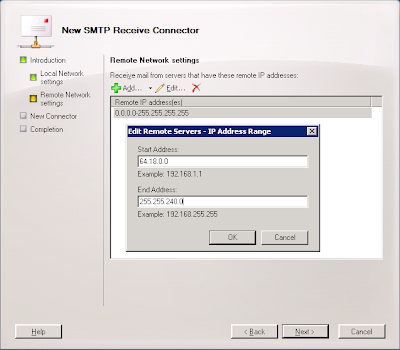
9. Enter the appropriate address range for the Postini system you use. Systems 5, 6, 7, 8, and 20 are 64.18.0.0/20 (64.18.0.0./255.255.240.0); System 9 is 74.125.148.0/22 (75.125.148.0/255.255.252.0); Systems 20, 200, and 201 are 207.126.144.0/20 (207.126.144.0/255.255.240.0) and click OK.
10. Click Next.
11. Click New.
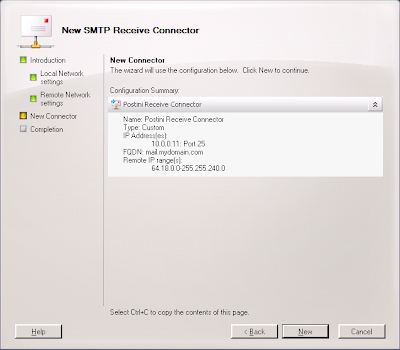
12. Right-click on the new connector, select Properties, select the Authenticaion tab and Ensure "Transport Layer Security" and "Basic Authentication" are selected.
14. Click the Permissions Groups tab and ensure Anonymous Users is selected.
15. Click OK.
So that gets you about half-way there. To finish it up, open the EMS and Copy/Paste the following cmdlet in:
Get-ReceiveConnector "Postini Receive Connector" | Add-ADPermission -User "NT AUTHORITY\ANONYMOUS LOGON" -ExtendedRights "Ms-Exch-SMTP-Accept-Any-Recipient"
Replace "Postini Receive Connector" with the name of the connector you created in Step 4 above.
If you want to use the EMS to create and set the permissions on the new connector, you can use these cmdlets:
New-ReceiveConnector -Name "Postini Receive Connector" -AuthMechanism "Tls,BasicAuth" -Usage Custom -PermissionGroups AnonymousUsers -Bindings 10.0.0.11:25 -RemoteIpRanges 64.18.0.0/20
Get-ReceiveConnector "Postini Receive Connector" | Add-ADPermission -User "NT AUTHORITY\ANONYMOUS LOGON" -ExtendedRights "Ms-Exch-SMTP-Accept-Any-Recipient"
Replace the values for -Name, -Bindings, and -RemoteIPRanges as necessary.
For more information on these types of connectors:
MSExchange Team Blog
Microsoft Technet
Exchange 2007 has a lot of great features, such as the uber-powerful Exchange Management Shell. IMHO, Exchange 2007 also has a lot of drawbacks, such as a half-assed GUI. You can only achieve the most basic things through the GUI; anything that requires thought or a little more configuration is done through the cumbersome Exchange Management Shell interface.
To achieve the previously simple task of allowing relay through a vSMTP server, you can go one of two routes. I'm going to document the route that grants least privilege. The MSExchangeTeam blog as well as Technet both have variations on this as well as the Pro's and Con's of using it.
Allow Anonymous Relay
1. Open the Exchange Management Console.
2. Expand Server Configuration > Hub Transport.
3. Select the server in the top pane, and then click New Receive Connector... in the right pane.
4. Enter a name for the connector, such as "Postini Receive Connector," select "Custom" as the intended use for the connector, and click Next.

5. Select the "All availble IPv4 addresses" entry and click the Edit... button.

6. Select the "Specify an IP address:" radio button, enter the IP address of the interface that will be communicating with Postini, and click OK.

7. Enter the Fully-Qualified Domain Name the connector use to respond to connection attempts (most likely something like mail.mydomain.com) and click Next.

8. Click the 0.0.0.0-255.255.255.255 enter and click Edit....

9. Enter the appropriate address range for the Postini system you use. Systems 5, 6, 7, 8, and 20 are 64.18.0.0/20 (64.18.0.0./255.255.240.0); System 9 is 74.125.148.0/22 (75.125.148.0/255.255.252.0); Systems 20, 200, and 201 are 207.126.144.0/20 (207.126.144.0/255.255.240.0) and click OK.

10. Click Next.
11. Click New.

12. Right-click on the new connector, select Properties, select the Authenticaion tab and Ensure "Transport Layer Security" and "Basic Authentication" are selected.
14. Click the Permissions Groups tab and ensure Anonymous Users is selected.
15. Click OK.
So that gets you about half-way there. To finish it up, open the EMS and Copy/Paste the following cmdlet in:
Get-ReceiveConnector "Postini Receive Connector" | Add-ADPermission -User "NT AUTHORITY\ANONYMOUS LOGON" -ExtendedRights "Ms-Exch-SMTP-Accept-Any-Recipient"
Replace "Postini Receive Connector" with the name of the connector you created in Step 4 above.
If you want to use the EMS to create and set the permissions on the new connector, you can use these cmdlets:
New-ReceiveConnector -Name "Postini Receive Connector" -AuthMechanism "Tls,BasicAuth" -Usage Custom -PermissionGroups AnonymousUsers -Bindings 10.0.0.11:25 -RemoteIpRanges 64.18.0.0/20
Get-ReceiveConnector "Postini Receive Connector" | Add-ADPermission -User "NT AUTHORITY\ANONYMOUS LOGON" -ExtendedRights "Ms-Exch-SMTP-Accept-Any-Recipient"
Replace the values for -Name, -Bindings, and -RemoteIPRanges as necessary.
For more information on these types of connectors:
MSExchange Team Blog
Microsoft Technet
Friday, July 31, 2009
How to Schedule Recycling an IIS Application Pool
We have a customer with an IIS 6.0 application that crashes randomly--either the Application Pool worker process runs the server out of memory or hangs.
If you have a need to recycle the Application Pool between scheduled maintenance intervals, there are a couple of available solutions.
IISApp.vbs
This script is part of the Windows 2003 Platform. Windows 2003 SP1 introduced the ability to recycle application pools. The syntax is pretty easy:
IISApp /a /r
Save this into a batch file and drop it into the task scheduler.
Application Pool Recycling through IISAdmin
1. On the taskbar, click Start, point to Administrative Tools, and then click Internet Information Services (IIS) Manager.
2. Expand the server name, and then click Application Pools.
3. Right-click > Properties on the Application Pool you wish to recycle.
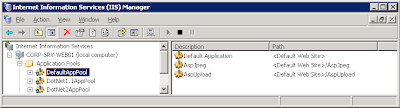
4. Set the appropriate properties for recycling.
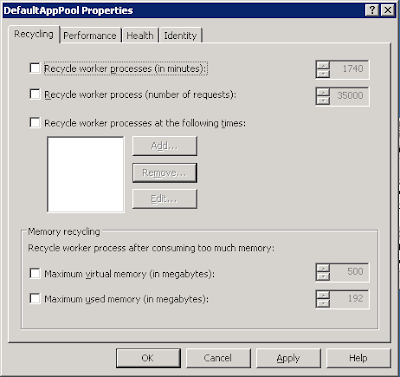
5. For example, to recycle the worker processes at 6AM, select the "Recycle worker processes at the following times" checkbox and enter the appropriate time (24-hour format).
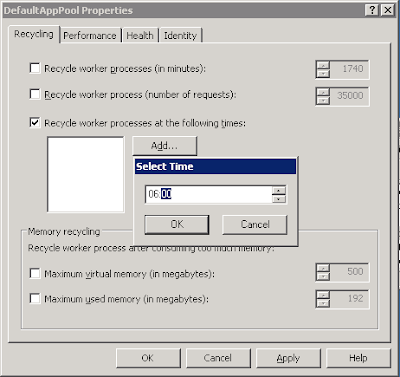
6. Click OK.
1. On the taskbar, click Start, point to Administrative Tools, and then click Internet Information Services (IIS) Manager.
2. In the Connections pane, expand the server name, and then click Application Pools.
3. In the Application Poolspane, select the application pool you wish to edit.
4. In the Actions pane, click Recycling...
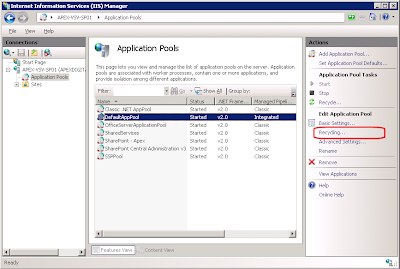
5. On the Recycling Conditions page of the Edit Application Pool Recycling Settings Wizard, select at least one of the options in the Fixed Intervals section, select the checkboxes and enter values for "Regular time intervals" or "Specific Times" as necessary, and then click Next.
6. Click Finish.
If you have a need to recycle the Application Pool between scheduled maintenance intervals, there are a couple of available solutions.
Windows 2003 (IIS 6)
IISApp.vbs
This script is part of the Windows 2003 Platform. Windows 2003 SP1 introduced the ability to recycle application pools. The syntax is pretty easy:
IISApp /a
Save this into a batch file and drop it into the task scheduler.
Application Pool Recycling through IISAdmin
1. On the taskbar, click Start, point to Administrative Tools, and then click Internet Information Services (IIS) Manager.
2. Expand the server name, and then click Application Pools.
3. Right-click > Properties on the Application Pool you wish to recycle.

4. Set the appropriate properties for recycling.

5. For example, to recycle the worker processes at 6AM, select the "Recycle worker processes at the following times" checkbox and enter the appropriate time (24-hour format).

6. Click OK.
Windows 2008 (IIS 7)
1. On the taskbar, click Start, point to Administrative Tools, and then click Internet Information Services (IIS) Manager.
2. In the Connections pane, expand the server name, and then click Application Pools.
3. In the Application Poolspane, select the application pool you wish to edit.
4. In the Actions pane, click Recycling...

5. On the Recycling Conditions page of the Edit Application Pool Recycling Settings Wizard, select at least one of the options in the Fixed Intervals section, select the checkboxes and enter values for "Regular time intervals" or "Specific Times" as necessary, and then click Next.
6. Click Finish.
Friday, June 19, 2009
Exchange Delegates
I recently found myself in a spot where I needed to troubleshoot a delegate issue--a user was set as a delegate but no longer was with the company and didn't have a mailbox anymore, so periodic NDRs were being generated for mail destined for the delegate.
To discover all of the mailbox for which this person had been a delegate, I ran the command (on a domain controller or machine that had ldifde.exe):
ldifde -f delegates.txt -d "dc=domain,dc=com" -r "(publicDelegatesBL=CN=First Last,OU=AppropriateOU,dc=domain,dc=com)" -l name,publicDelegatesBL
Active Directory holds delegate information in two attributes--publicDelegates (listing which users are delegates of "n" mailbox) and publicDelegatesBL (listing which users "n" mailbox is a delegate of).
To find out all of the the mailbox of Aaron Guilmette in OU=Home,DC=aaronguilmette,DC=com:
ldifde -f delegates.txt -d "dc=domain,dc=com" -r "(publicDelegates=CN=Aaron Guilmette,OU=Home,DC=aaronguilmette,DC=com)" -l name,publicDelegates
To find out all of the mailboxes for which Aaron Guilmette in OU=Home,DC=aaronguilmette,DC=com is a delegate:
ldifde -f delegates.txt -d "dc=domain,dc=com" -r "(publicDelegatesBL=CN=Aaron Guilmette,OU=Home,DC=aaronguilmette,DC=com)" -l name,publicDelegatesBL
To find out all of the delegate relationships for a domain:
ldifde -f delegates.txt -d "dc=domain,dc=com" -r "((publicDelegates=*)(publicDelegatesBL=*))" -l name,publicDelegates,publicDelegatesBL
Hope this is helpful to some of you.
To discover all of the mailbox for which this person had been a delegate, I ran the command (on a domain controller or machine that had ldifde.exe):
ldifde -f delegates.txt -d "dc=domain,dc=com" -r "(publicDelegatesBL=CN=First Last,OU=AppropriateOU,dc=domain,dc=com)" -l name,publicDelegatesBL
Active Directory holds delegate information in two attributes--publicDelegates (listing which users are delegates of "n" mailbox) and publicDelegatesBL (listing which users "n" mailbox is a delegate of).
To find out all of the the mailbox of Aaron Guilmette in OU=Home,DC=aaronguilmette,DC=com:
ldifde -f delegates.txt -d "dc=domain,dc=com" -r "(publicDelegates=CN=Aaron Guilmette,OU=Home,DC=aaronguilmette,DC=com)" -l name,publicDelegates
To find out all of the mailboxes for which Aaron Guilmette in OU=Home,DC=aaronguilmette,DC=com is a delegate:
ldifde -f delegates.txt -d "dc=domain,dc=com" -r "(publicDelegatesBL=CN=Aaron Guilmette,OU=Home,DC=aaronguilmette,DC=com)" -l name,publicDelegatesBL
To find out all of the delegate relationships for a domain:
ldifde -f delegates.txt -d "dc=domain,dc=com" -r "((publicDelegates=*)(publicDelegatesBL=*))" -l name,publicDelegates,publicDelegatesBL
Hope this is helpful to some of you.
Subscribe to:
Posts (Atom)