When migrating to a new Exchange 2010 environment, I decided to use a wildcard certificate instead of a UC certificate. It cost about twice as much, but seeing as how I have several other services that currently require SSL certificates, it seemed like a good investment.
When running through the Exchange Remote Connectivity Analyzer, I noticed that my configuration kept failing the Outlook Anywhere test with the following error:
Testing SSL mutual authentication with the RPC proxy server.
Verification of mutual authentication failed.
> Additional Details
>> The certificate common name *.domain.com doesn't validate against the mutual authentication that was provided: msstd:mail.domain.com
The solution was relatively easy. Log into your Exchange CAS server and run the following cmdlet from the Exchange Command Shell:
Set-OutlookProvider -Identity EXPR -CertPrincipalName *.domain.com
I've seen some documentation that replaced the CertPrincipalName value with msstd:*.domain.com, but I believe that is incorrect. The name on the actual SSL certificate is *.domain.com, not msstd:*.domain.com. For giggles, I did try using msstd:*.domain.com as the CertPrincipalName value, but it did not allow me to pass ExRCA.
Run the Get-OutlookProvider cmdlet to review your settings:
RunspaceId : 841d7d59-e89c-42b4-9c3c-9388d40dcd95
CertPrincipalName : *.domain.com
Server :
TTL : 1
OutlookProviderFlags : None
AdminDisplayName :
ExchangeVersion : 0.1 (8.0.535.0)
Name : EXPR
DistinguishedName : CN=EXPR,CN=Outlook,CN=AutoDiscover,CN=Client Access,CN=A
pex Digital Solutions,CN=Microsoft Exchange,CN=Services,
CN=Configuration,DC=domain,DC=com
Identity : EXPR
Guid : d81b1280-1843-4808-812c-48375ed744e0
ObjectCategory : domain.com/Configuration/Schema/ms-Exch-Auto-Discove
r-Config
ObjectClass : {top, msExchAutoDiscoverConfig}
WhenChanged : 11/5/2010 11:53:39 AM
WhenCreated : 1/30/2009 9:23:30 PM
WhenChangedUTC : 11/5/2010 3:53:39 PM
WhenCreatedUTC : 1/31/2009 2:23:30 AM
OrganizationId :
OriginatingServer : mydc03.domain.com
IsValid : True
Friday, November 5, 2010


Thursday, November 4, 2010
Fun with PIX, Part Deux
After getting my PIX to boot in my previous post, I decided to run through the password recovery procedures.
What you'll need:
What you'll need:
- PIX recovery images (availble from either the Cisco site individually or here in one ZIP file)
- PIX firewall software version
- TFTP server software (I used the TFTP server included in the PacketTrap pt360 Suite in this exercise)
- Terminal Emulator (I typically use PuTTY)
Steps:
- Connect Ethernet 0 on the PIX to your local LAN.
- Open a command prompt and run ipconfig to determine your computer's IP address.
- Download PIX recovery images to a directory on your computer (such as C:\tftp).
- Point your TFTP server to the download directory containing your tools.
- With a console cable attached and terminal emulator running, power on the PIX firewall.
- Note the version of the PIX firewall software. If you missed the boot sequence, you can type sh ver at the prompt. The firewall software version will normally be the first line returned:
Cisco PIX Firewall Version 6.3(5)
Cisco PIX Device Manager Version 3.0(4)
In this case, the number you need is "Cisco PIX Firewall Version." - Power off the PIX.
- Power on the PIX.
- After the startup messages appear, press ESC or send a BREAK command. Note: If you do it too early, you'll get a testing/diagnostic menu. To continue the boot process, type C. A successful BREAK command should leave you at the monitor> prompt.
- Type int e0 and press ENTER.
- Type addr a.b.c.d and press ENTER (where a.b.c.d is an IP address you want to assign to the PIX. To reduce troubleshooting, choose an address on the same network as your the computer you're using).
- Type server w.x.y.z and press ENTER (where w.x.y.z is the IP address of the computer you're using to perform this procedure).
- Type file np[nn].bin (where [nn] is the version number corresponding to the BIN file for password recovery. For example, if your PIX is running version 6.3 of the firewall software, enter np63.bin).
- Type tftp and press ENTER.
- When prompted, type Y to erase the passwords.
- If prompted to remove the commands from the configuration, type Y.
- The device will reboot and will have a blank password.
Fun with PIX, Part I
When meeting with a potential customer the other day, she mentioned that she had a running PIX with an unknown password.
I thought I'd refresh my PIX skills and decided to bust out an old PIX 506E we had sitting in the office. After the unfortunate re-realization that my laptop doesn't have a serial port (and the resulting short jaunt to the computer store to get a USB-to-Serial cable), I consoled into the PIX and turned it on.
My adventure was short-lived, however. While watching the boot-up, I was greeted with a hung firewall:
CISCO SYSTEMS PIX FIREWALL
Embedded BIOS Version 4.3.207 01/02/02 16:12:22.73
Compiled by morlee
32 MB RAM
PCI Device Table.
Bus Dev Func VendID DevID Class Irq
00 00 00 8086 7192 Host Bridge
00 07 00 8086 7110 ISA Bridge
00 07 01 8086 7111 IDE Controller
00 07 02 8086 7112 Serial Bus 9
00 07 03 8086 7113 PCI Bridge
00 0D 00 8086 1209 Ethernet 11
00 0E 00 8086 1209 Ethernet 10
And that's all she wrote.
3. Locate the J5 jumper. It should be right next to the CMOS battery. Move it over 1 PIN.
4. Power on the device.
5. After unit has booted, power off.
6. Replace cover.
I thought I'd refresh my PIX skills and decided to bust out an old PIX 506E we had sitting in the office. After the unfortunate re-realization that my laptop doesn't have a serial port (and the resulting short jaunt to the computer store to get a USB-to-Serial cable), I consoled into the PIX and turned it on.
My adventure was short-lived, however. While watching the boot-up, I was greeted with a hung firewall:
CISCO SYSTEMS PIX FIREWALL
Embedded BIOS Version 4.3.207 01/02/02 16:12:22.73
Compiled by morlee
32 MB RAM
PCI Device Table.
Bus Dev Func VendID DevID Class Irq
00 00 00 8086 7192 Host Bridge
00 07 00 8086 7110 ISA Bridge
00 07 01 8086 7111 IDE Controller
00 07 02 8086 7112 Serial Bus 9
00 07 03 8086 7113 PCI Bridge
00 0D 00 8086 1209 Ethernet 11
00 0E 00 8086 1209 Ethernet 10
And that's all she wrote.
Fortunately, there's an easy enough work-around.
1. Power off the device.
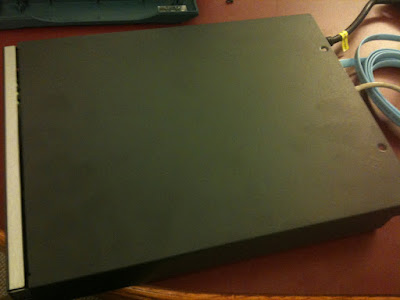
2. Remove the cover. There are two Phillips screws located at the top rear of the unit. The top half slides back about an inch or so and then lifts off.

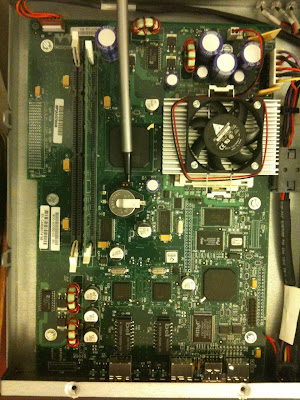
3. Locate the J5 jumper. It should be right next to the CMOS battery. Move it over 1 PIN.


4. Power on the device.
5. After unit has booted, power off.
6. Replace cover.
Wednesday, October 6, 2010
"Saved-Critical" for Almost-Clustered Virtual Machines in Windows 2008 R2 Hyper-V
While staging a clustered Hyper-V environment this week, I ran into a head-scratching issue. After provisioning a few LUNs, masking them, and adding them as available storage to Failover Clustering, I began setting up the virtual machines on one of my cluster nodes. During maintenance, the physical servers were restarted. When I went back to continue configuring the virtual machines (which were not yet clustered at this point), I connected to the physical host on which I had been configuring them. While my other clustered virtual machines were running fine, the new ones that I had not yet finished configuring were in a "Saved-Critical" state.
I attempted to start them, but received an eror that the saved state could not be restored. I attempted to delete the saved state, but received an "Unable to perform operation" error. Additionally, I could not view the properties of the virtual machines in the Saved-Critical state.
I opened up Failover Cluster manager and noticed that the storage was now owned by the other cluster node. The problem is now obvious--the storage is no longer being presented to the host on which I was configuring the virtual machines. So, how to move these disks? Since the disks are marked "Available" (not having run through the new service Failover Clustering wizard to make the virtual machines highly available), I can't move them by right-clicking on them and selecting a new node.
There is another solution, however, and it involves the cluster.exe command.
1. Open up a command prompt.
2. Run the following command: cluster.exe GROUP "Available Storage" /Move
Voila! The disks moved back to the other node and the virtual machine state in Hyper-V manager changed from "Saved-Critical" to "Off." I was then able to cluster the machines normally through Failover Clustering.
I attempted to start them, but received an eror that the saved state could not be restored. I attempted to delete the saved state, but received an "Unable to perform operation" error. Additionally, I could not view the properties of the virtual machines in the Saved-Critical state.
I opened up Failover Cluster manager and noticed that the storage was now owned by the other cluster node. The problem is now obvious--the storage is no longer being presented to the host on which I was configuring the virtual machines. So, how to move these disks? Since the disks are marked "Available" (not having run through the new service Failover Clustering wizard to make the virtual machines highly available), I can't move them by right-clicking on them and selecting a new node.
There is another solution, however, and it involves the cluster.exe command.
1. Open up a command prompt.
2. Run the following command: cluster.exe GROUP "Available Storage" /Move
Voila! The disks moved back to the other node and the virtual machine state in Hyper-V manager changed from "Saved-Critical" to "Off." I was then able to cluster the machines normally through Failover Clustering.
Tuesday, September 28, 2010
How to Expand a Virtual Disk on the Dell MD3000i
I recently found myself in the position of having to expand a virtual disk on a Dell MD3000i. The Dell MD3000i is a great entry-point SAN, but the GUI lacks some of the functions that you think would be there (such as online volume growth).
The feat, however, can be accomplished. It just requires using the arcane command-line interface.
1. Log into the MDSM GUI and make sure no other operations are currently in progress (disk initialization, rebuild, etc). You can find this information on the Summary tab under Operations in Progress.
2. Note the virtual disk name that you want to expand (such as server_a_vol_1). To see a list of your virtual disks from the GUI, click on the Summary tab and then the Disk Groups & Virtual Disks link.
3. Note the name of the array. You can find this information on gray menu bar above the tabs.
4. Exit the MDSM GUI.
5. Open a command prompt and navigate to the directory where the MD storage software is installed (for the newer versions, the default location is C:\Program Files (x86)\Dell\MD Storage Manager\client on x64 platforms or C:\Program Files\Dell\MD Storage Manager\client on x86 platforms).
6. Run the command:
smcli -n arrayname -c "set virtualDisk [\"virtual disk name\"] addCapacity=n;"
Where:
arrayname is the name of the storage array
virtual disk name is the name of the virtual disk
n is the capacity in bytes to add (to convert GB to bytes, multiply the number in GB by 1073741824)
For example, if you want to add 50GB to the virtual disk server_a_vol_1 on the MD3000i array named production, you would type the following:
smcli -n production -c "set virtualDisk [\"server_a_vol_1\"] addCapacity=53687091200;"
From the Windows side, the LUN will not show up as its new size until the operation is complete. The volume growth process doesn't tack on space to the end of the volume, rather, it appears to move the volume to the end and then append the storage. For newly created volumes with no data, it is much faster to destroy the LUN and recreate it than to go through an online expansion. If the volume has data on it, though, you are left with little option.
Once the operation is complete, you can expand the volume using either the disk management snap-in (diskmgmt.msc) or diskpart.exe.
The feat, however, can be accomplished. It just requires using the arcane command-line interface.
1. Log into the MDSM GUI and make sure no other operations are currently in progress (disk initialization, rebuild, etc). You can find this information on the Summary tab under Operations in Progress.
2. Note the virtual disk name that you want to expand (such as server_a_vol_1). To see a list of your virtual disks from the GUI, click on the Summary tab and then the Disk Groups & Virtual Disks link.
3. Note the name of the array. You can find this information on gray menu bar above the tabs.
4. Exit the MDSM GUI.
5. Open a command prompt and navigate to the directory where the MD storage software is installed (for the newer versions, the default location is C:\Program Files (x86)\Dell\MD Storage Manager\client on x64 platforms or C:\Program Files\Dell\MD Storage Manager\client on x86 platforms).
6. Run the command:
smcli -n arrayname -c "set virtualDisk [\"virtual disk name\"] addCapacity=n;"
Where:
arrayname is the name of the storage array
virtual disk name is the name of the virtual disk
n is the capacity in bytes to add (to convert GB to bytes, multiply the number in GB by 1073741824)
For example, if you want to add 50GB to the virtual disk server_a_vol_1 on the MD3000i array named production, you would type the following:
smcli -n production -c "set virtualDisk [\"server_a_vol_1\"] addCapacity=53687091200;"
From the Windows side, the LUN will not show up as its new size until the operation is complete. The volume growth process doesn't tack on space to the end of the volume, rather, it appears to move the volume to the end and then append the storage. For newly created volumes with no data, it is much faster to destroy the LUN and recreate it than to go through an online expansion. If the volume has data on it, though, you are left with little option.
Once the operation is complete, you can expand the volume using either the disk management snap-in (diskmgmt.msc) or diskpart.exe.
Monday, September 20, 2010
Outlook 2007 Continuously Prompting for POP3 Credentials
Recently, I had a customer running Outlook 2007 on Windows 7 that experienced a condition I like to refer to as "the dreaded attack of the authentication dialog box." She was connecting to a POP3 server and had the "Save password" box checked, but during every Send/Receive session, would get prompted twice for credentials.
The solution was simple, but elusive.
1. Close Outlook.
2. Open Windows Explorer.
3. Tools > Folder Options > View; click "Show hidden files, folders, and drives."
4. Deselect "Hid protected operating system files (Recommended)" and click OK.
5. Navigate to %USERPROFILE%\AppData\Roaming\Microsoft\Protect.
6. Rename the folder S-1-5-21- to S-1-5-21--old.
7. Rename the file CREDHIST to CREDHIST-old.
8. Restart.
9. Launch Outlook, enter credentials when prompted, and click Save Password.
The solution was simple, but elusive.
1. Close Outlook.
2. Open Windows Explorer.
3. Tools > Folder Options > View; click "Show hidden files, folders, and drives."
4. Deselect "Hid protected operating system files (Recommended)" and click OK.
5. Navigate to %USERPROFILE%\AppData\Roaming\Microsoft\Protect.
6. Rename the folder S-1-5-21-
7. Rename the file CREDHIST to CREDHIST-old.
8. Restart.
9. Launch Outlook, enter credentials when prompted, and click Save Password.
Tuesday, September 7, 2010
General Authentication Failed when using IMAP over SSL on Exchange 2010
Ran into an interesting certificate issue with Exchange 2010 and wildcard certificates.
I had installed a wildcard certificate for our domain on an Exchange 2010 server (just like I had previously for Exchange 2007) and enabled the IMAP service (Microsoft Exchange IMAP4 is the Exchange 2010 name of the service). However, when running the Enable-ExchangeCertificate cmdlet, I received an error enabling the wildcard certificate for IMAP services.
I eventually stumbled across this KB Article, Certificates that contain wildcard characters may not work correctly on an Exchange 2007 Service Pack 1-based server. When I ran the Get-ImapSettings cmdlet, I received the following output:
UnencryptedorTLSBindings SSLBindings LoginType X509CertificateName
------------------------ ----------- --------- -------------------
{:::143, 0.0.0.0:143} {:::993, 0.0.0.0:993} SecureLogin myservername
According to the KB, this is due to a problem with the way the cmdlet generates the X.509 certificate name. It can't interpret the wildcard character correctly, so it says that the FQDN of your server is just the NetBIOS name of your server. Oops. Exchange 2007 SP1 Roll-Up 4 is supposed to fix this behavior, but I experienced it on an Exchange 2010 server that was updated to current before deploying the certificate.
After I updated the X.509 Certificate name (using the command Set-ImapSettings -X509CertificateName "myserver.mydomain.com"), I restarted the IMAP service.
To make sure everything was working, I configured an Outlook profile with the IMAP settings of my test mailbox. When I clicked the "Test Connection" button, I was greeted with yet another error:
The answer, was, in fact, in the output of the Get-ImapSettings cmdlet that I previously ran. Apparently, it was looking for a secure login method. However, in most SSL-enabled configurations, data is submitted in clear text through the SSL tunnel. To test my theory, I ran the command Set-ImapSettings -LoginType PlainTextlogin and restarted the IMAP service again. In my Outlook client, I clicked the "Test Connection" button again and all was right with the world.
I had installed a wildcard certificate for our domain on an Exchange 2010 server (just like I had previously for Exchange 2007) and enabled the IMAP service (Microsoft Exchange IMAP4 is the Exchange 2010 name of the service). However, when running the Enable-ExchangeCertificate cmdlet, I received an error enabling the wildcard certificate for IMAP services.
I eventually stumbled across this KB Article, Certificates that contain wildcard characters may not work correctly on an Exchange 2007 Service Pack 1-based server. When I ran the Get-ImapSettings cmdlet, I received the following output:
UnencryptedorTLSBindings SSLBindings LoginType X509CertificateName
------------------------ ----------- --------- -------------------
{:::143, 0.0.0.0:143} {:::993, 0.0.0.0:993} SecureLogin myservername
According to the KB, this is due to a problem with the way the cmdlet generates the X.509 certificate name. It can't interpret the wildcard character correctly, so it says that the FQDN of your server is just the NetBIOS name of your server. Oops. Exchange 2007 SP1 Roll-Up 4 is supposed to fix this behavior, but I experienced it on an Exchange 2010 server that was updated to current before deploying the certificate.
After I updated the X.509 Certificate name (using the command Set-ImapSettings -X509CertificateName "myserver.mydomain.com"), I restarted the IMAP service.
To make sure everything was working, I configured an Outlook profile with the IMAP settings of my test mailbox. When I clicked the "Test Connection" button, I was greeted with yet another error:
Log on to incoming mail server (IMAP): General authentication failed. None of the authentication methods supported by your IMAP server (if any) are supported on this computer.
The answer, was, in fact, in the output of the Get-ImapSettings cmdlet that I previously ran. Apparently, it was looking for a secure login method. However, in most SSL-enabled configurations, data is submitted in clear text through the SSL tunnel. To test my theory, I ran the command Set-ImapSettings -LoginType PlainTextlogin and restarted the IMAP service again. In my Outlook client, I clicked the "Test Connection" button again and all was right with the world.
Thursday, April 15, 2010
Emailreg.org is a scam
Barracuda ... The mere mention of their name strikes fear in the hearts of any email admin unlucky enough to have to do relay mail through one of their devices.
One of my customers today submitted a ticket with problems relaying mail to one of their customers using a Barracuda device. My customer's relay responds with this message:
Ah, yes, the Barracuda Black List. Clicking on the link they provide takes you do a page where they tell you, "Sorry, your email was blocked....Barracuda Networks is not attempting to block your individual emails in particular. The repuation systemed uses automated algorithms for determining its results -- very similar to the anti-fraud mechanisms used for credit cards."
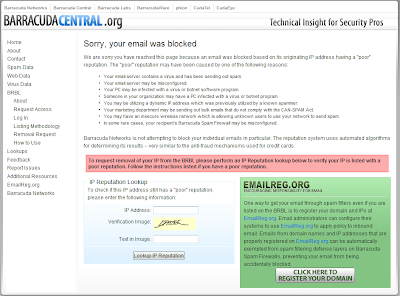
Yeah, whatever. You can put any IP address in the URL, and it will give you the same message for each one. It's a generic page they use to try to get you to buy into their Emailreg.org scam.
Clicking on the "Click here to register your domain" link and you have the ability to sign up and register your domains. Sounds great, right? Except for the $20 USD fee per domain registered.
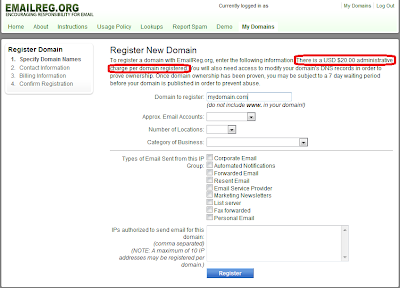
For a while, Barracuda Networks denied that they had anything to do with Emailreg.org and said that they only used the list provided there to help determine what mail was spam. And, if you queried emailreg.org for the WHOIS information, it's obscured, so it's hard to know:
Domain ID:D152388600-LROR
Domain Name:EMAILREG.ORG
Created On:12-Apr-2008 21:40:49 UTC
Last Updated On:14-Mar-2010 12:46:16 UTC
Expiration Date:12-Apr-2011 21:40:49 UTC
Sponsoring Registrar:eNom, Inc. (R39-LROR)
Status:CLIENT TRANSFER PROHIBITED
Registrant ID:77b4c5687ae40560
Registrant Name:Whois Agent
Registrant Organization:Whois Privacy Protection Service, Inc.
Registrant Street1:PMB 368, 14150 NE 20th St - F1
Registrant Street2:
Registrant Street3:
Registrant City:Bellevue
Registrant State/Province:WA
Registrant Postal Code:98007
Registrant Country:US
Registrant Phone:+1.4252740657
Registrant Phone Ext.:
Registrant FAX:
Registrant FAX Ext.:
Registrant Email:tsbnwxhk@whoisprivacyprotect.com
Admin ID:77b4c5687ae40560
Admin Name:Whois Agent
Admin Organization:Whois Privacy Protection Service, Inc.
Admin Street1:PMB 368, 14150 NE 20th St - F1
Admin Street2:
Admin Street3:
Admin City:Bellevue
Admin State/Province:WA
Admin Postal Code:98007
Admin Country:US
Admin Phone:+1.4252740657
Admin Phone Ext.:
Admin FAX:
Admin FAX Ext.:
Admin Email:tsbnwxhk@whoisprivacyprotect.com
Tech ID:77b4c5687ae40560
Tech Name:Whois Agent
Tech Organization:Whois Privacy Protection Service, Inc.
Tech Street1:PMB 368, 14150 NE 20th St - F1
Tech Street2:
Tech Street3:
Tech City:Bellevue
Tech State/Province:WA
Tech Postal Code:98007
Tech Country:US
Tech Phone:+1.4252740657
Tech Phone Ext.:
Tech FAX:
Tech FAX Ext.:
Tech Email:tsbnwxhk@whoisprivacyprotect.com
Name Server:NS2.MYDYNDNS.ORG
Name Server:NS1.MYDYNDNS.ORG
Name Server:NS3.MYDYNDNS.ORG
Name Server:NS4.MYDYNDNS.ORG
Name Server:NS5.MYDYNDNS.ORG
Name Server:
Name Server:
Name Server:
Name Server:
Name Server:
Name Server:
Name Server:
Name Server:
DNSSEC:Unsigned
But alas, IP address information is not hidden from ARIN:
Network Information for: 64.235.146.64
--------------------------------------------------------------
OrgName: Barracuda Networks, Inc.
OrgID: BARRA-7
Address: 3175 S. Winchester Blvd
City: Campbell
StateProv: CA
PostalCode: 95008
Country: US
NetRange: 64.235.144.0 - 64.235.159.255
CIDR: 64.235.144.0/20
OriginAS: AS15324
NetName: BARRAUCDA
NetHandle: NET-64-235-144-0-1
Parent: NET-64-0-0-0-0
NetType: Direct Assignment
NameServer: NS1.P23.DYNECT.NET
NameServer: NS2.P23.DYNECT.NET
NameServer: NS3.P23.DYNECT.NET
NameServer: NS4.P23.DYNECT.NET
Comment: http://www.barracuda.com/
RegDate: 2006-10-31
Updated: 2010-03-04
RAbuseHandle: BARRA1-ARIN
RAbuseName: Barracuda Hostmaster
RAbusePhone: +1-408-342-5400
RAbuseEmail: hostmaster@barracuda.com
RNOCHandle: BARRA1-ARIN
RNOCName: Barracuda Hostmaster
RNOCPhone: +1-408-342-5400
RNOCEmail: hostmaster@barracuda.com
RTechHandle: BARRA1-ARIN
RTechName: Barracuda Hostmaster
RTechPhone: +1-408-342-5400
RTechEmail: hostmaster@barracuda.com
OrgTechHandle: BARRA1-ARIN
OrgTechName: Barracuda Hostmaster
OrgTechPhone: +1-408-342-5400
OrgTechEmail: hostmaster@barracuda.com
# ARIN WHOIS database, last updated 2010-04-14 20:00
# Enter ? for additional hints on searching ARIN's WHOIS database.
#
# ARIN WHOIS data and services are subject to the Terms of Use
# available at https://www.arin.net/whois_tou.html
Sneaky. But, that's the way Barracuda is.
Thankfully, there's another way, although Barracuda devices may or may not look at it (I've not confirmed it either way). The method is called Sender Policy Framework, and it's free. The Sender Policy Framework relies on a DNS record to check which hosts are "permitted" to send email for a particular domain. Check out http://www.openspf.org for a wizard to help create your SPF record.
One of my customers today submitted a ticket with problems relaying mail to one of their customers using a Barracuda device. My customer's relay responds with this message:
#554 Service unavailable; Client host [XXXXXXXXXX.XXXXXXX.XXX] blocked using Barracuda Reputation; http://bbl.barracudacentral.com/q.cgi?ip=XXX.XXX.XXX.XXX ##
Ah, yes, the Barracuda Black List. Clicking on the link they provide takes you do a page where they tell you, "Sorry, your email was blocked....Barracuda Networks is not attempting to block your individual emails in particular. The repuation systemed uses automated algorithms for determining its results -- very similar to the anti-fraud mechanisms used for credit cards."

Yeah, whatever. You can put any IP address in the URL, and it will give you the same message for each one. It's a generic page they use to try to get you to buy into their Emailreg.org scam.
Clicking on the "Click here to register your domain" link and you have the ability to sign up and register your domains. Sounds great, right? Except for the $20 USD fee per domain registered.

For a while, Barracuda Networks denied that they had anything to do with Emailreg.org and said that they only used the list provided there to help determine what mail was spam. And, if you queried emailreg.org for the WHOIS information, it's obscured, so it's hard to know:
Domain ID:D152388600-LROR
Domain Name:EMAILREG.ORG
Created On:12-Apr-2008 21:40:49 UTC
Last Updated On:14-Mar-2010 12:46:16 UTC
Expiration Date:12-Apr-2011 21:40:49 UTC
Sponsoring Registrar:eNom, Inc. (R39-LROR)
Status:CLIENT TRANSFER PROHIBITED
Registrant ID:77b4c5687ae40560
Registrant Name:Whois Agent
Registrant Organization:Whois Privacy Protection Service, Inc.
Registrant Street1:PMB 368, 14150 NE 20th St - F1
Registrant Street2:
Registrant Street3:
Registrant City:Bellevue
Registrant State/Province:WA
Registrant Postal Code:98007
Registrant Country:US
Registrant Phone:+1.4252740657
Registrant Phone Ext.:
Registrant FAX:
Registrant FAX Ext.:
Registrant Email:tsbnwxhk@whoisprivacyprotect.com
Admin ID:77b4c5687ae40560
Admin Name:Whois Agent
Admin Organization:Whois Privacy Protection Service, Inc.
Admin Street1:PMB 368, 14150 NE 20th St - F1
Admin Street2:
Admin Street3:
Admin City:Bellevue
Admin State/Province:WA
Admin Postal Code:98007
Admin Country:US
Admin Phone:+1.4252740657
Admin Phone Ext.:
Admin FAX:
Admin FAX Ext.:
Admin Email:tsbnwxhk@whoisprivacyprotect.com
Tech ID:77b4c5687ae40560
Tech Name:Whois Agent
Tech Organization:Whois Privacy Protection Service, Inc.
Tech Street1:PMB 368, 14150 NE 20th St - F1
Tech Street2:
Tech Street3:
Tech City:Bellevue
Tech State/Province:WA
Tech Postal Code:98007
Tech Country:US
Tech Phone:+1.4252740657
Tech Phone Ext.:
Tech FAX:
Tech FAX Ext.:
Tech Email:tsbnwxhk@whoisprivacyprotect.com
Name Server:NS2.MYDYNDNS.ORG
Name Server:NS1.MYDYNDNS.ORG
Name Server:NS3.MYDYNDNS.ORG
Name Server:NS4.MYDYNDNS.ORG
Name Server:NS5.MYDYNDNS.ORG
Name Server:
Name Server:
Name Server:
Name Server:
Name Server:
Name Server:
Name Server:
Name Server:
DNSSEC:Unsigned
But alas, IP address information is not hidden from ARIN:
Network Information for: 64.235.146.64
--------------------------------------------------------------
OrgName: Barracuda Networks, Inc.
OrgID: BARRA-7
Address: 3175 S. Winchester Blvd
City: Campbell
StateProv: CA
PostalCode: 95008
Country: US
NetRange: 64.235.144.0 - 64.235.159.255
CIDR: 64.235.144.0/20
OriginAS: AS15324
NetName: BARRAUCDA
NetHandle: NET-64-235-144-0-1
Parent: NET-64-0-0-0-0
NetType: Direct Assignment
NameServer: NS1.P23.DYNECT.NET
NameServer: NS2.P23.DYNECT.NET
NameServer: NS3.P23.DYNECT.NET
NameServer: NS4.P23.DYNECT.NET
Comment: http://www.barracuda.com/
RegDate: 2006-10-31
Updated: 2010-03-04
RAbuseHandle: BARRA1-ARIN
RAbuseName: Barracuda Hostmaster
RAbusePhone: +1-408-342-5400
RAbuseEmail: hostmaster@barracuda.com
RNOCHandle: BARRA1-ARIN
RNOCName: Barracuda Hostmaster
RNOCPhone: +1-408-342-5400
RNOCEmail: hostmaster@barracuda.com
RTechHandle: BARRA1-ARIN
RTechName: Barracuda Hostmaster
RTechPhone: +1-408-342-5400
RTechEmail: hostmaster@barracuda.com
OrgTechHandle: BARRA1-ARIN
OrgTechName: Barracuda Hostmaster
OrgTechPhone: +1-408-342-5400
OrgTechEmail: hostmaster@barracuda.com
# ARIN WHOIS database, last updated 2010-04-14 20:00
# Enter ? for additional hints on searching ARIN's WHOIS database.
#
# ARIN WHOIS data and services are subject to the Terms of Use
# available at https://www.arin.net/whois_tou.html
Sneaky. But, that's the way Barracuda is.
Thankfully, there's another way, although Barracuda devices may or may not look at it (I've not confirmed it either way). The method is called Sender Policy Framework, and it's free. The Sender Policy Framework relies on a DNS record to check which hosts are "permitted" to send email for a particular domain. Check out http://www.openspf.org for a wizard to help create your SPF record.
Wednesday, April 7, 2010
Windows 2008 Hyper-V R2 Background Merge
When you remove a snapshot or snapshot subtree from a Hyper-V VM, there is a merge process that combines the data in the .avhd snapshot file back into the VM's VHD.
In Windows 2008 RTM, the merge process only happened once the virtual machine was shut down. The VM was unavailable for the duration of this process. There was, however, a progress bar displayed in either SCVMM or Hyper-V Manager that would indicate the completion percentage.
In Windows 2008 R2, however, the merge process happens in the background. Any indication of it happening is no longer easily visible in the console.
To view the progress of a merge, run the following PowerShell command:
This will give you output about all merges happening, the elasped time (in seconds, so be prepared to do some math), as well as the job completion percentage.
In Windows 2008 RTM, the merge process only happened once the virtual machine was shut down. The VM was unavailable for the duration of this process. There was, however, a progress bar displayed in either SCVMM or Hyper-V Manager that would indicate the completion percentage.
In Windows 2008 R2, however, the merge process happens in the background. Any indication of it happening is no longer easily visible in the console.
To view the progress of a merge, run the following PowerShell command:
Get-WmiObject -Namespace "root\virtualization" -Query "select * from Msvm_ConcreteJob" | Where {$_.ElementName -eq 'Merge in Progress'}
This will give you output about all merges happening, the elasped time (in seconds, so be prepared to do some math), as well as the job completion percentage.
Thursday, February 11, 2010
Troubleshooting WinSXS (Side-by-Side) problems
While attempting to run a newly-installed OmniPage Pro 17 on a Windows 2008 x64 machine, I received a cryptic and frustrating error:
The application has failed to start because its side-by-side configuration is incorrect. Please see the application log for more details.
So, what do I do? I try re-running it. I try removing and reinstalling it. I run a repair from the Programs and Features Control Panel Applet. Nothing seems to be yielding any results.
So, I decide to check out the Application Log, like the dialog box suggested.
The Application Event Log has a little more detail about what's missing:
Activation context generation failed for "C:\Program Files (x86)\Nuance\OmniPage17\OmniPage17.exe". Dependent Assembly Microsoft.VC80.MFC,processorArchitecture="x86",publicKeyToken="1fc8b3b9a1e18e3b",type="win32",version="8.0.50727.762" could not be found. Please use sxstrace.exe for detailed diagnosis.
So, I crack open a command prompt and run the following command:
sxstrace trace -logfile:omnipage.etl
The system returns the following message:
Tracing started. Trace will be saved to file omnipage.etl.
Press Enter to stop tracing...
I launch the application again, generate the error, tab back to the command prompt window, and then press Enter to stop tracing.
You can try to read the trace file, but it's not going to do you any good. You need to convert it to human-readable form with the following command:
sxstrace parse -logfile:omnipage.etl -outfile:omnipage.txt
After a few moments, you should receive a notification that it's complete:
Parsing log file omnipage.etl...
Parsing finished! Output saved to file omnipage.txt.
At that point, you can open up the result file (omnipage.txt in my case) to get a detailed analysis of what is wrong.
=================
Begin Activation Context Generation.
Input Parameter:
Flags = 0
ProcessorArchitecture = Wow32
CultureFallBacks = en-US;en
ManifestPath = C:\Program Files (x86)\Nuance\OmniPage17\OmniPage17.exe
AssemblyDirectory = C:\Program Files (x86)\Nuance\OmniPage17\
Application Config File =
-----------------
INFO: Parsing Manifest File C:\Program Files (x86)\Nuance\OmniPage17\OmniPage17.exe.
INFO: Manifest Definition Identity is (null).
INFO: Reference: Microsoft.VC80.CRT,processorArchitecture="x86",publicKeyToken="1fc8b3b9a1e18e3b",type="win32",version="8.0.50727.762"
INFO: Reference: Microsoft.VC80.MFC,processorArchitecture="x86",publicKeyToken="1fc8b3b9a1e18e3b",type="win32",version="8.0.50727.762"
INFO: Reference: Microsoft.Windows.Common-Controls,language="*",processorArchitecture="x86",publicKeyToken="6595b64144ccf1df",type="win32",version="6.0.0.0"
INFO: Resolving reference Microsoft.VC80.CRT,processorArchitecture="x86",publicKeyToken="1fc8b3b9a1e18e3b",type="win32",version="8.0.50727.762".
INFO: Resolving reference for ProcessorArchitecture WOW64.
INFO: Resolving reference for culture Neutral.
INFO: Applying Binding Policy.
INFO: No publisher policy found.
INFO: No binding policy redirect found.
INFO: Begin assembly probing.
INFO: Did not find the assembly in WinSxS.
INFO: Attempt to probe manifest at C:\Windows\assembly\GAC_32\Microsoft.VC80.CRT\8.0.50727.762__1fc8b3b9a1e18e3b\Microsoft.VC80.CRT.DLL.
INFO: Did not find manifest for culture Neutral.
INFO: End assembly probing.
The long and short of it is that OmniPage is looking for some C++ components that it can't find in the program files directory or the SxS manifest. Specifically, it can't find the x86 platform version of the C++ components. So, I download and install the Visual Studio 2005 C++ Redistributable package (which the application vendor should have bundled), and the problem is resolved.
You can download the components here:
Microsoft Visual C++ 2005 SP1 Redistributable Package (x86)
Microsoft Visual C++ 2005 SP1 Redistributable Package (x64)
The application has failed to start because its side-by-side configuration is incorrect. Please see the application log for more details.
So, what do I do? I try re-running it. I try removing and reinstalling it. I run a repair from the Programs and Features Control Panel Applet. Nothing seems to be yielding any results.
So, I decide to check out the Application Log, like the dialog box suggested.
The Application Event Log has a little more detail about what's missing:
Activation context generation failed for "C:\Program Files (x86)\Nuance\OmniPage17\OmniPage17.exe". Dependent Assembly Microsoft.VC80.MFC,processorArchitecture="x86",publicKeyToken="1fc8b3b9a1e18e3b",type="win32",version="8.0.50727.762" could not be found. Please use sxstrace.exe for detailed diagnosis.
So, I crack open a command prompt and run the following command:
sxstrace trace -logfile:omnipage.etl
The system returns the following message:
Tracing started. Trace will be saved to file omnipage.etl.
Press Enter to stop tracing...
I launch the application again, generate the error, tab back to the command prompt window, and then press Enter to stop tracing.
You can try to read the trace file, but it's not going to do you any good. You need to convert it to human-readable form with the following command:
sxstrace parse -logfile:omnipage.etl -outfile:omnipage.txt
After a few moments, you should receive a notification that it's complete:
Parsing log file omnipage.etl...
Parsing finished! Output saved to file omnipage.txt.
At that point, you can open up the result file (omnipage.txt in my case) to get a detailed analysis of what is wrong.
=================
Begin Activation Context Generation.
Input Parameter:
Flags = 0
ProcessorArchitecture = Wow32
CultureFallBacks = en-US;en
ManifestPath = C:\Program Files (x86)\Nuance\OmniPage17\OmniPage17.exe
AssemblyDirectory = C:\Program Files (x86)\Nuance\OmniPage17\
Application Config File =
-----------------
INFO: Parsing Manifest File C:\Program Files (x86)\Nuance\OmniPage17\OmniPage17.exe.
INFO: Manifest Definition Identity is (null).
INFO: Reference: Microsoft.VC80.CRT,processorArchitecture="x86",publicKeyToken="1fc8b3b9a1e18e3b",type="win32",version="8.0.50727.762"
INFO: Reference: Microsoft.VC80.MFC,processorArchitecture="x86",publicKeyToken="1fc8b3b9a1e18e3b",type="win32",version="8.0.50727.762"
INFO: Reference: Microsoft.Windows.Common-Controls,language="*",processorArchitecture="x86",publicKeyToken="6595b64144ccf1df",type="win32",version="6.0.0.0"
INFO: Resolving reference Microsoft.VC80.CRT,processorArchitecture="x86",publicKeyToken="1fc8b3b9a1e18e3b",type="win32",version="8.0.50727.762".
INFO: Resolving reference for ProcessorArchitecture WOW64.
INFO: Resolving reference for culture Neutral.
INFO: Applying Binding Policy.
INFO: No publisher policy found.
INFO: No binding policy redirect found.
INFO: Begin assembly probing.
INFO: Did not find the assembly in WinSxS.
INFO: Attempt to probe manifest at C:\Windows\assembly\GAC_32\Microsoft.VC80.CRT\8.0.50727.762__1fc8b3b9a1e18e3b\Microsoft.VC80.CRT.DLL.
INFO: Did not find manifest for culture Neutral.
INFO: End assembly probing.
The long and short of it is that OmniPage is looking for some C++ components that it can't find in the program files directory or the SxS manifest. Specifically, it can't find the x86 platform version of the C++ components. So, I download and install the Visual Studio 2005 C++ Redistributable package (which the application vendor should have bundled), and the problem is resolved.
You can download the components here:
Microsoft Visual C++ 2005 SP1 Redistributable Package (x86)
Microsoft Visual C++ 2005 SP1 Redistributable Package (x64)
Subscribe to:
Posts (Atom)